Set Up Close-of-Day Report on Your POS
In this article
This guide shows you how to set up the Close of Day report on your POS app, so staff can close each day with a clear sales summary, cash drawer check, and staff sign-off.
Contents
Contents
Before You Start
Make sure you have completed the following:
- A published Close of Day receipt template. See -> [Configuring the Close of Day Report Template] to set this up first.— This powers the printed report your staff sees at the end of the day.
What Is the Close of Day Report?
At the end of each business day, you will want to close out your sales and see a summary of how much money came in. The Close of Day report gives you a full breakdown — total orders, total sales, income by payment method, and any outstanding balances.
Set Up Your Close of Day Report
By setting up a Close of Day flow, you can do two things at once — reconcile your cash drawer and generate your daily sales report in a single flow. This way, your staff do not have to close the drawer and run the report separately.
Setting this up takes a few steps, but you only need to do it once.
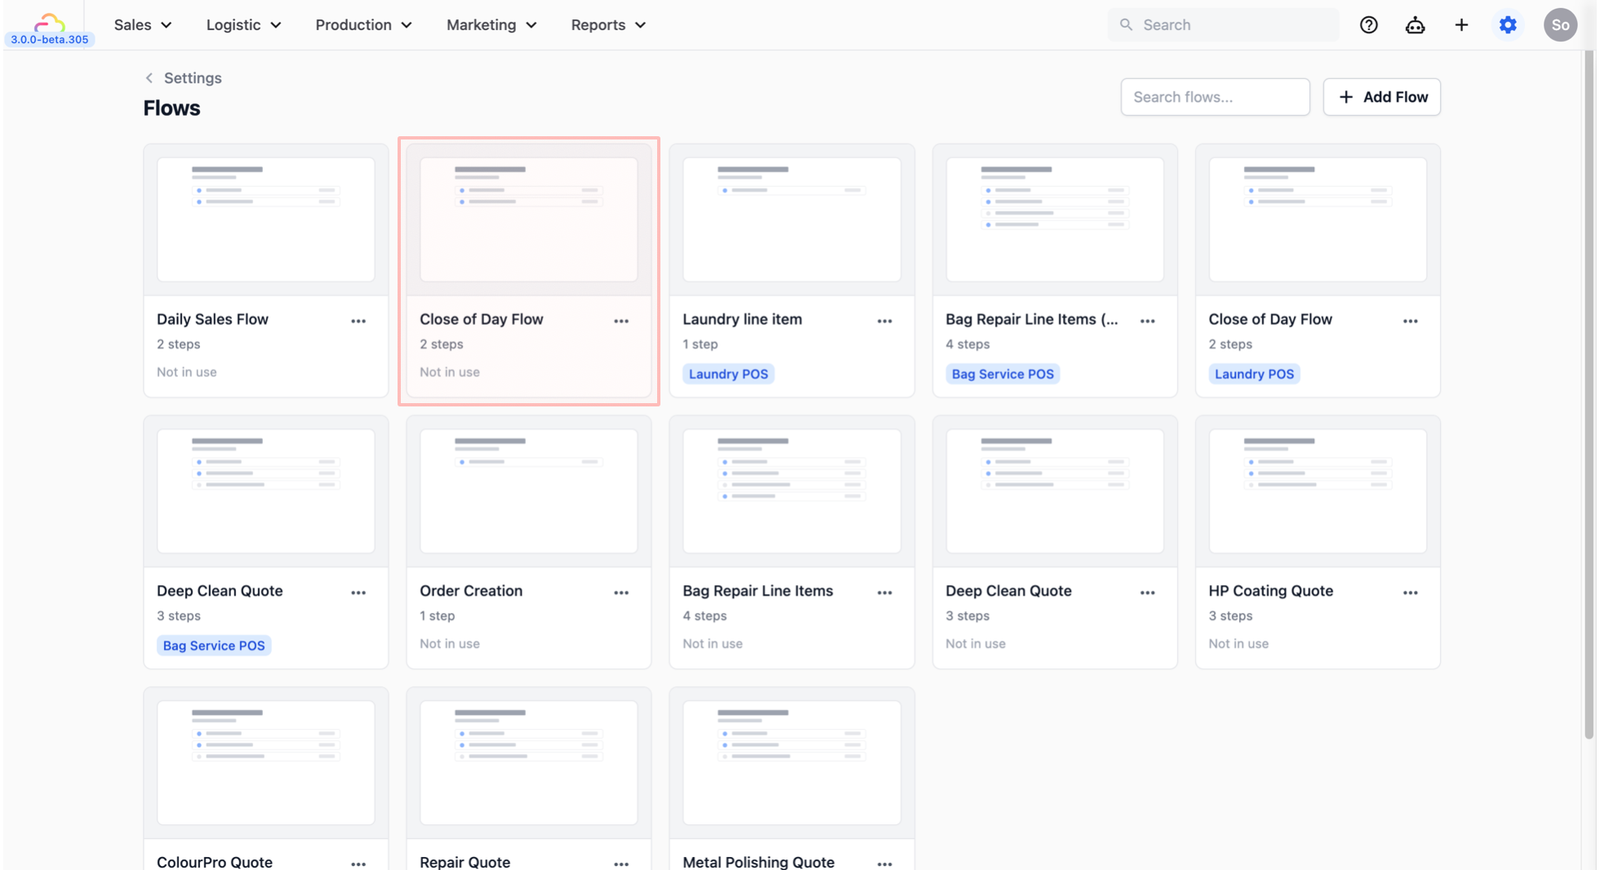
Create a Close of Day Flow
Now that your receipt template is ready, you need to create a flow. A flow guides your staff through the steps they need to follow when they close the day. You will set up two steps — one to count the cash in the drawer, and one for your staff to sign off.
- Click on the Settings icon (gear icon).
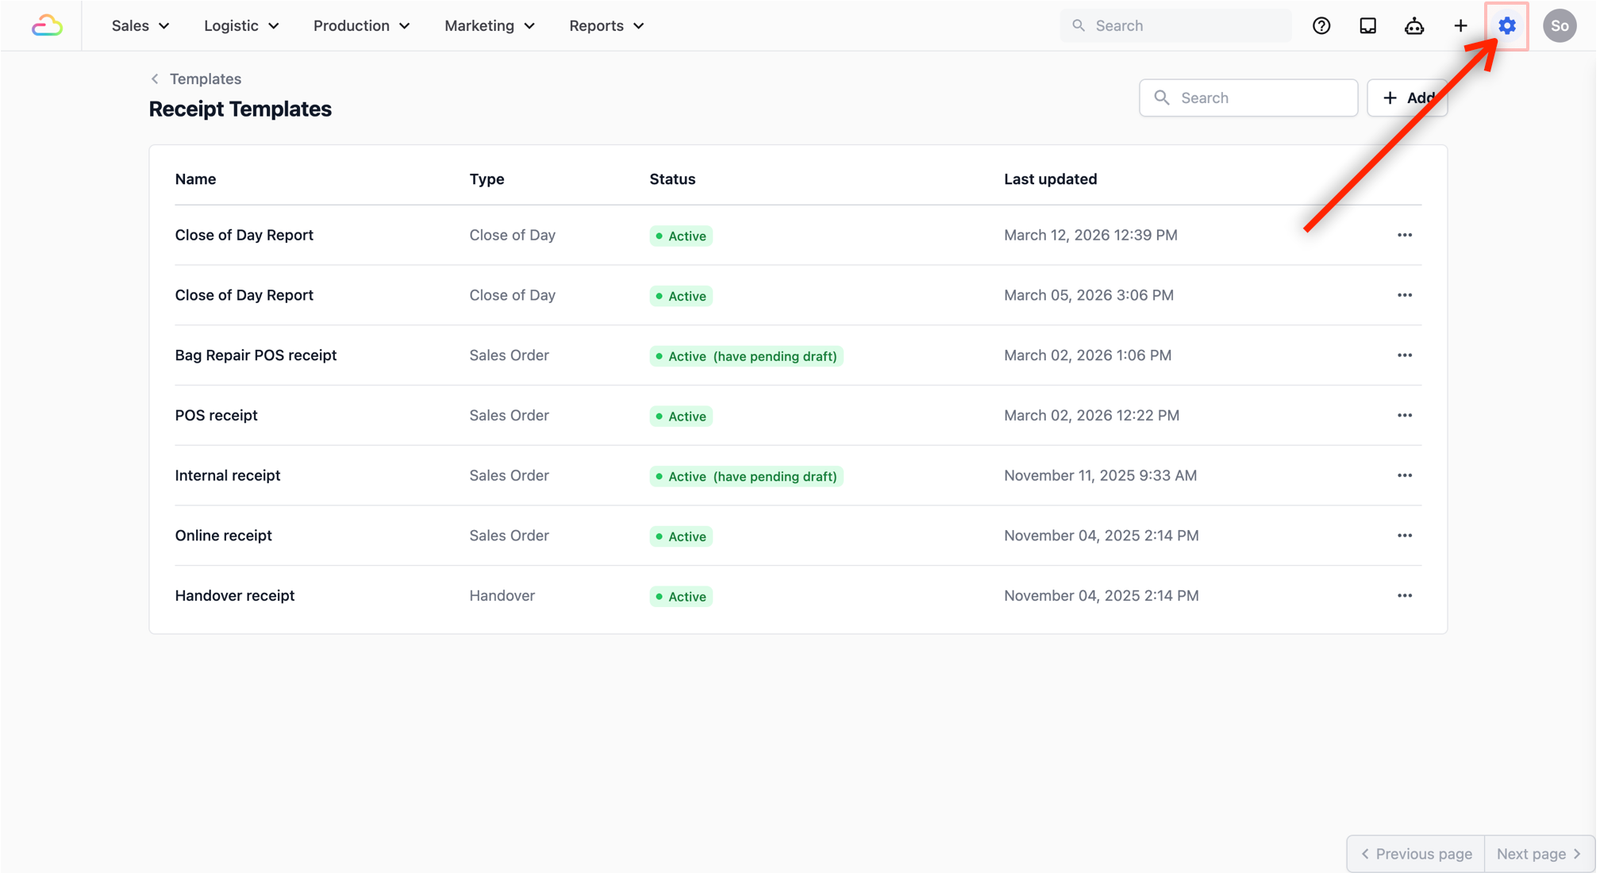
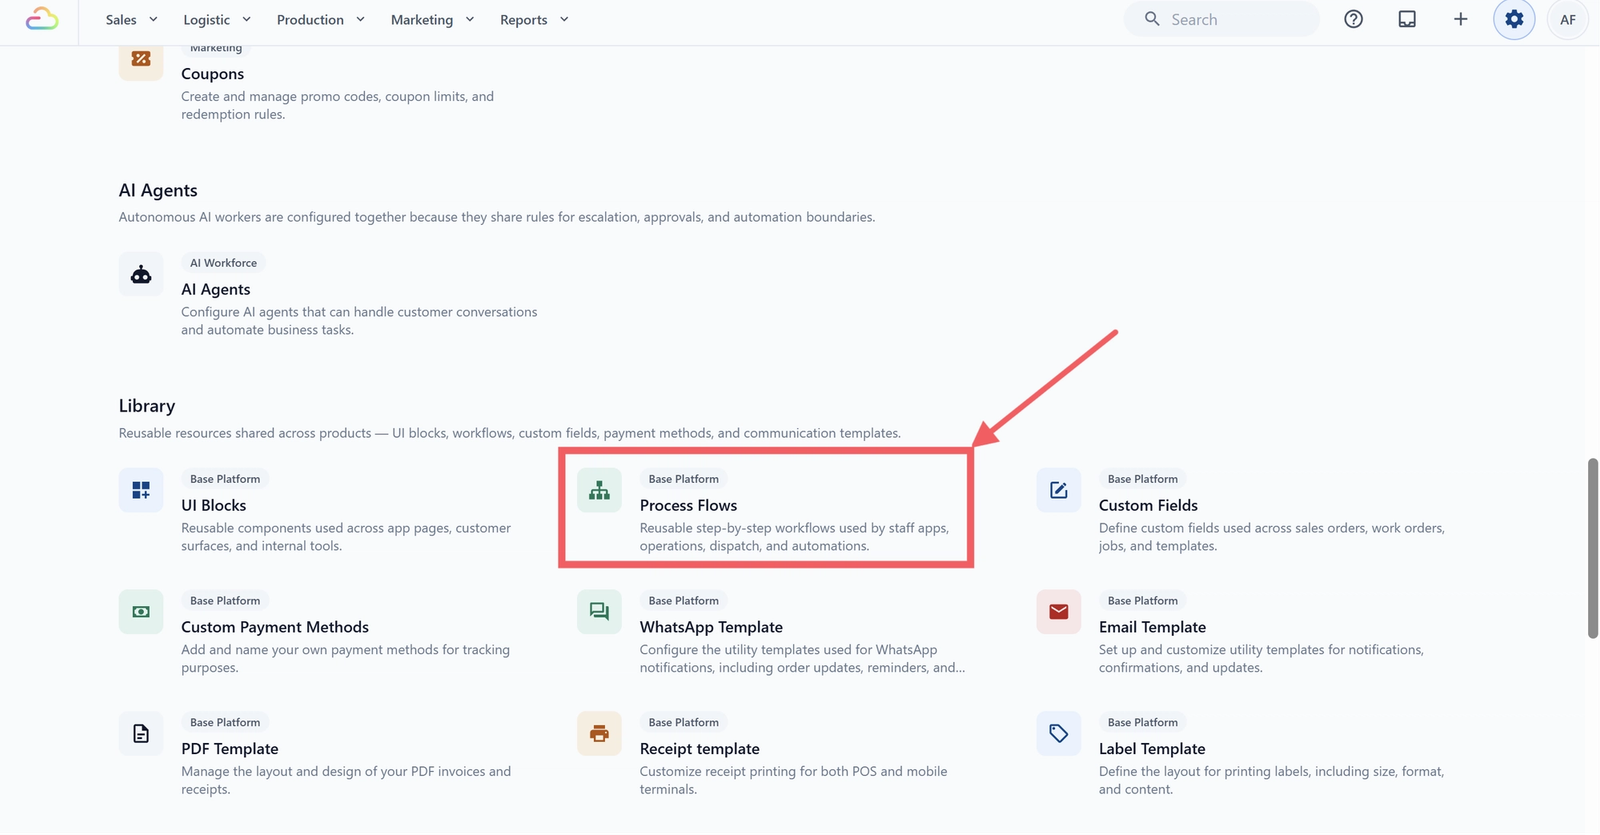
- Under Library, select Process Flows.
- From the Flows page, click on + Add Flow to add a new flow.
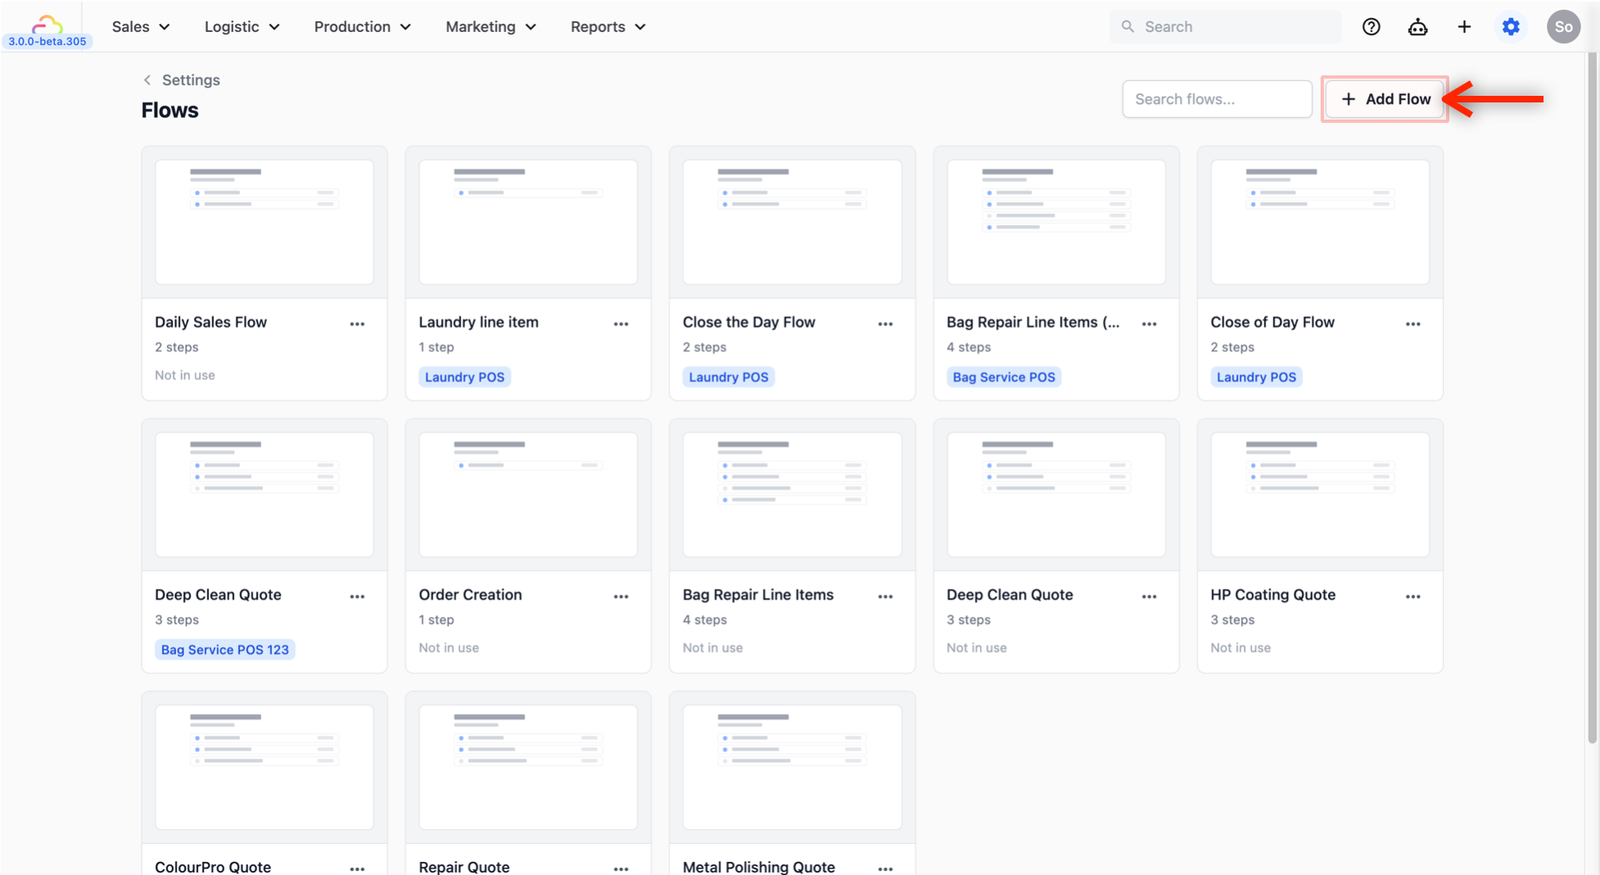
- A panel will open on the right side, Choose Blank Flow.
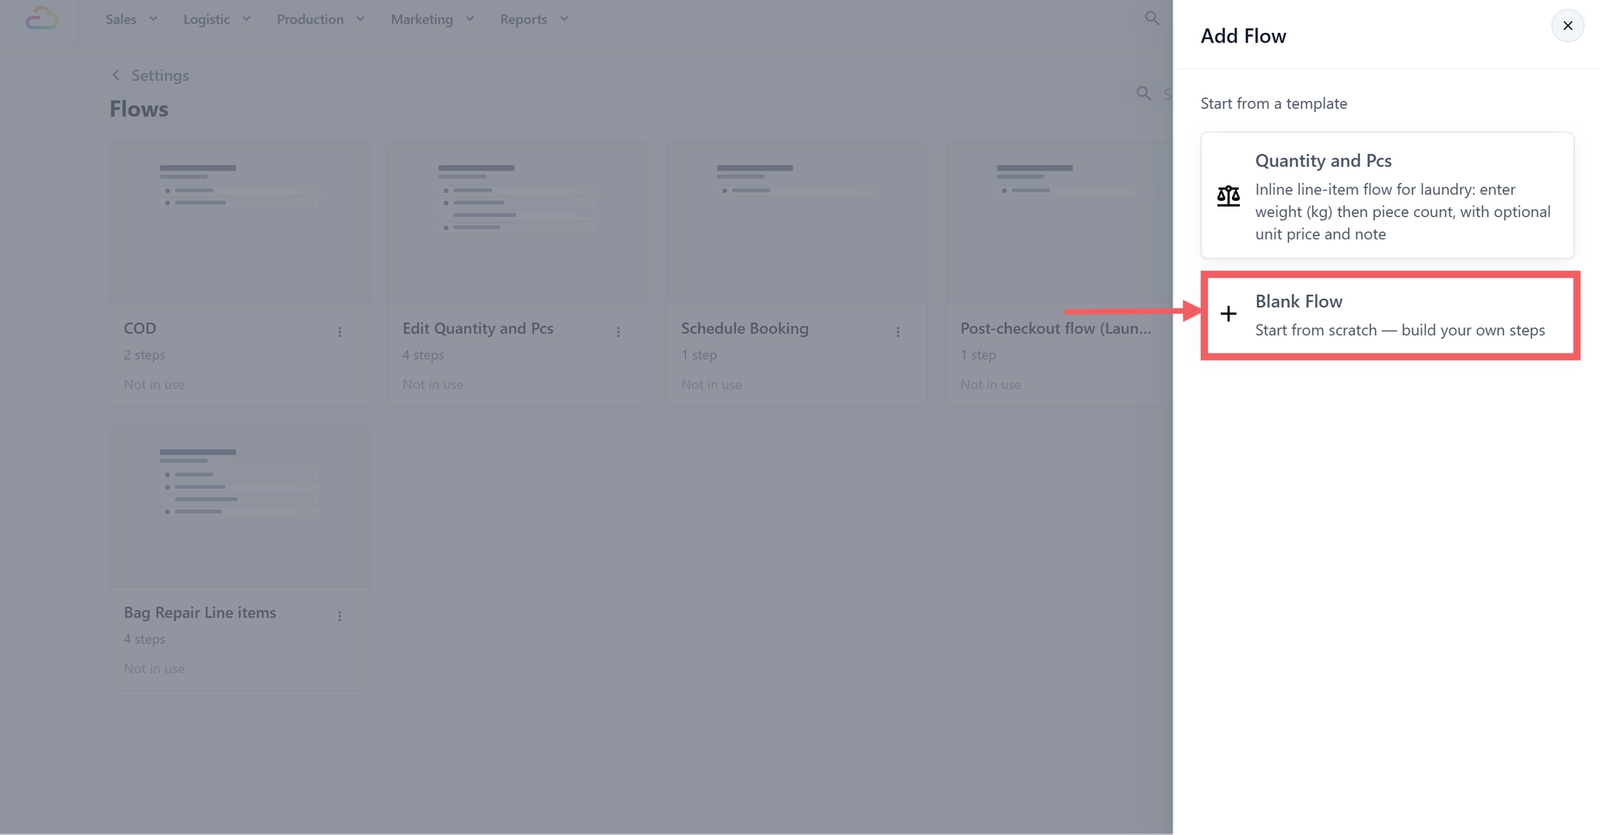
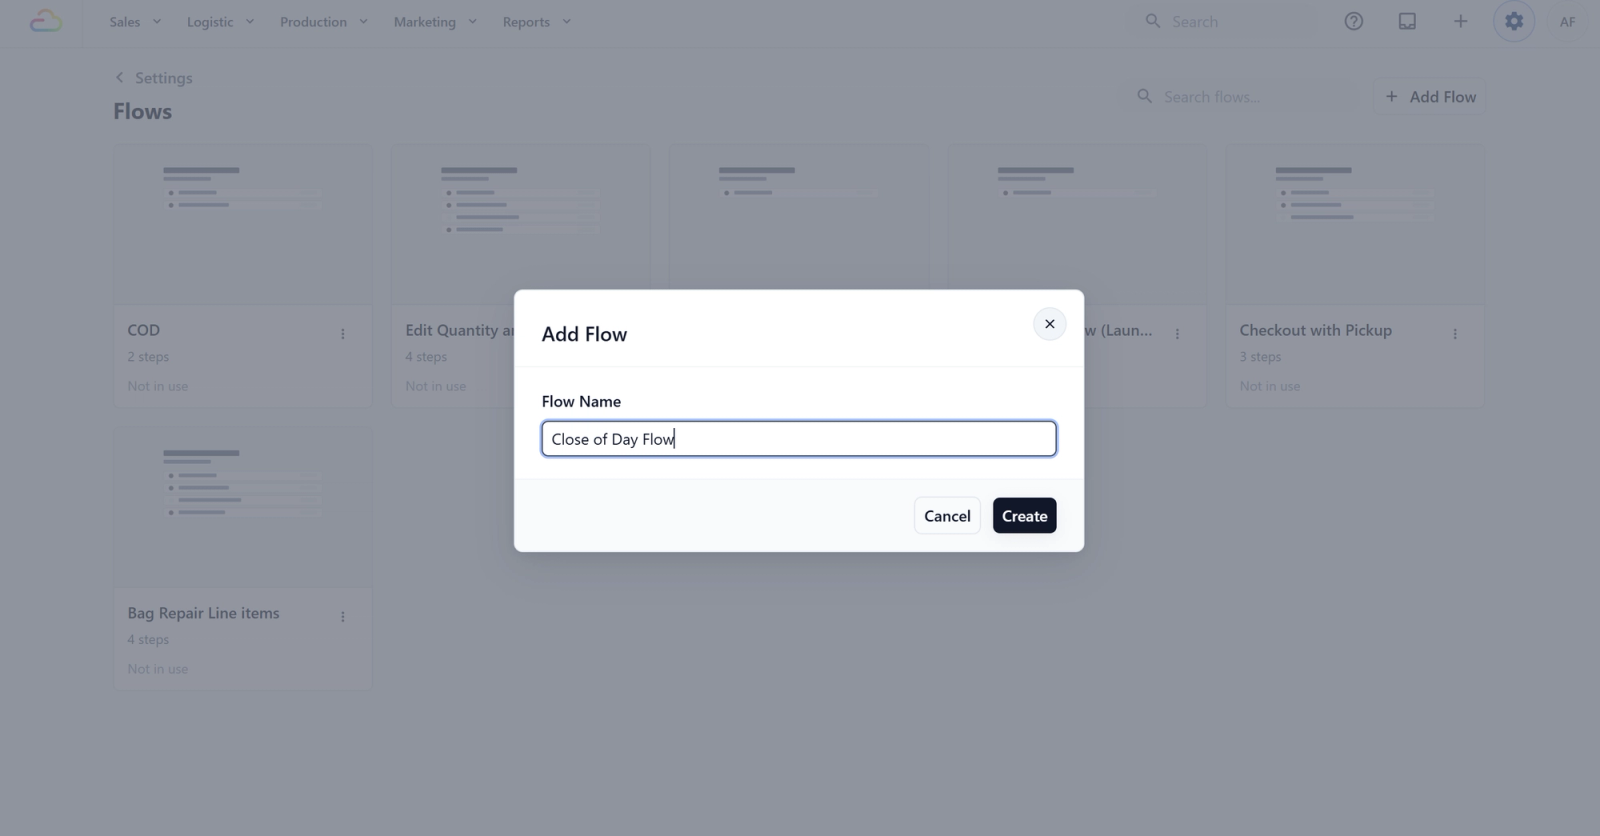
- Enter the Flow Name: Give your flow a name that describes what it does. For this example, we will name it "Close of Day Flow." Click Create.
Step 1 — Add the Cash Drawer (optional):
This step lets your staff see a summary of all the cash that came in during the day, so they can check if the amount in the drawer matches what the system expects.
Click + Add Step. You will see two options:
- Data Entry: Collect data from a field.
- Function Block: Use an existing block.
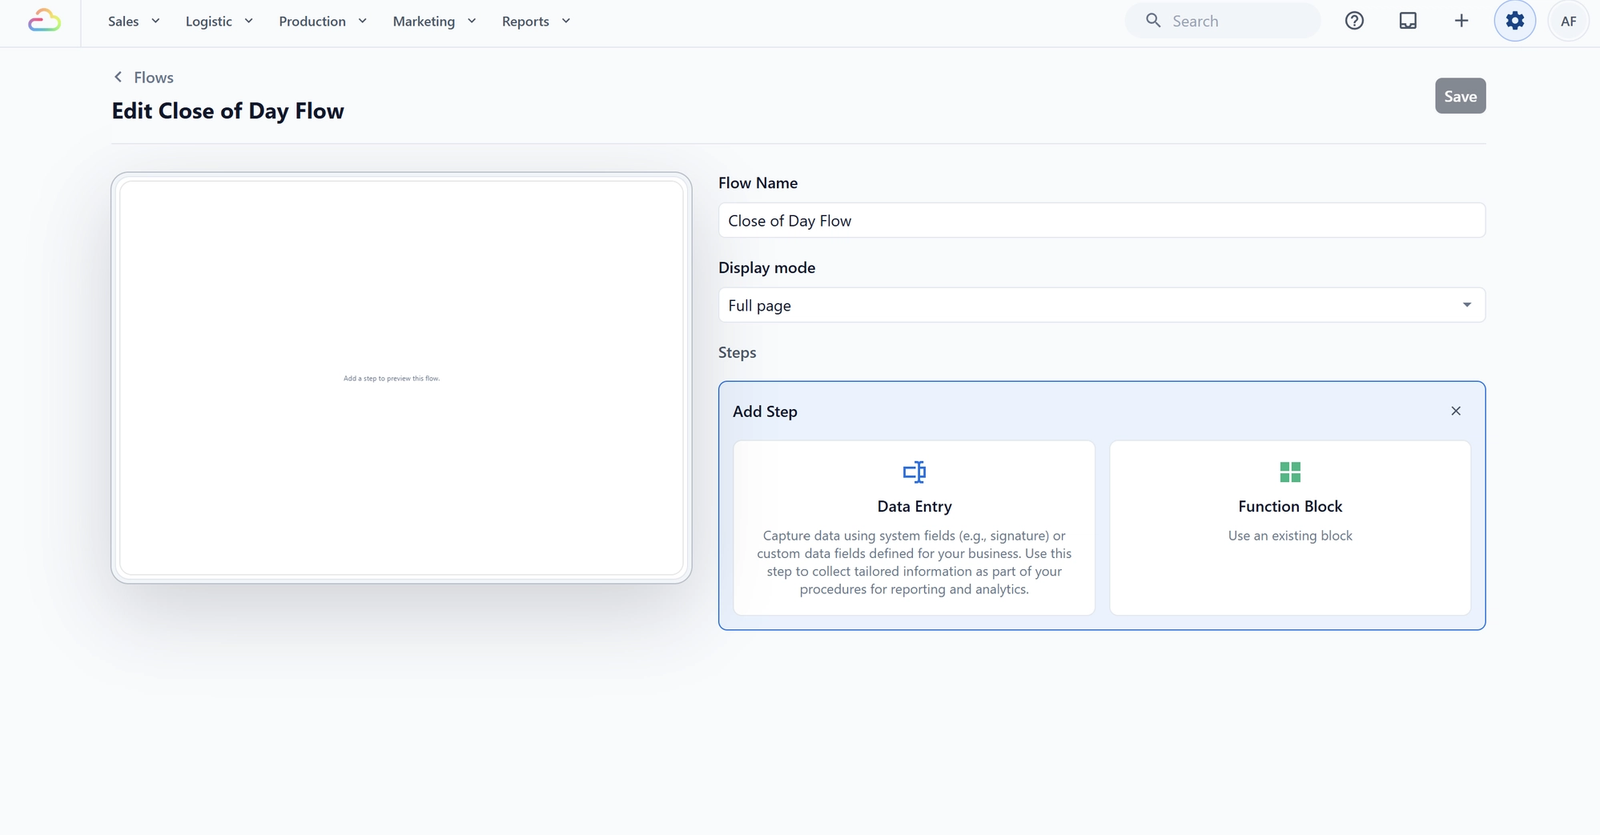
Choose Function Block. Three fields will appear:
- Block: Click the dropdown and select Cash Drawer. This pulls in the cash drawer summary that was already set up for you.
- Process Method: Leave this as Required.
- Visibility Conditions: Leave this as is. This is for showing or hiding the step based on certain conditions, which you do not need right now.
Step 2 — Add the Staff Sign-Off:
This step requires your staff to sign off on the day's report, confirming that the numbers are correct.
Click + Add Step again. This time, choose Data Entry. You will see similar fields:
- Data Field: Click the dropdown and select Signature.
- Process Method: Leave this as Required.
- Step Name: This will automatically follow the name of the data field you selected.
- Visibility Conditions: Leave this as is.
- Once both steps are added, click Save to save your new flow.
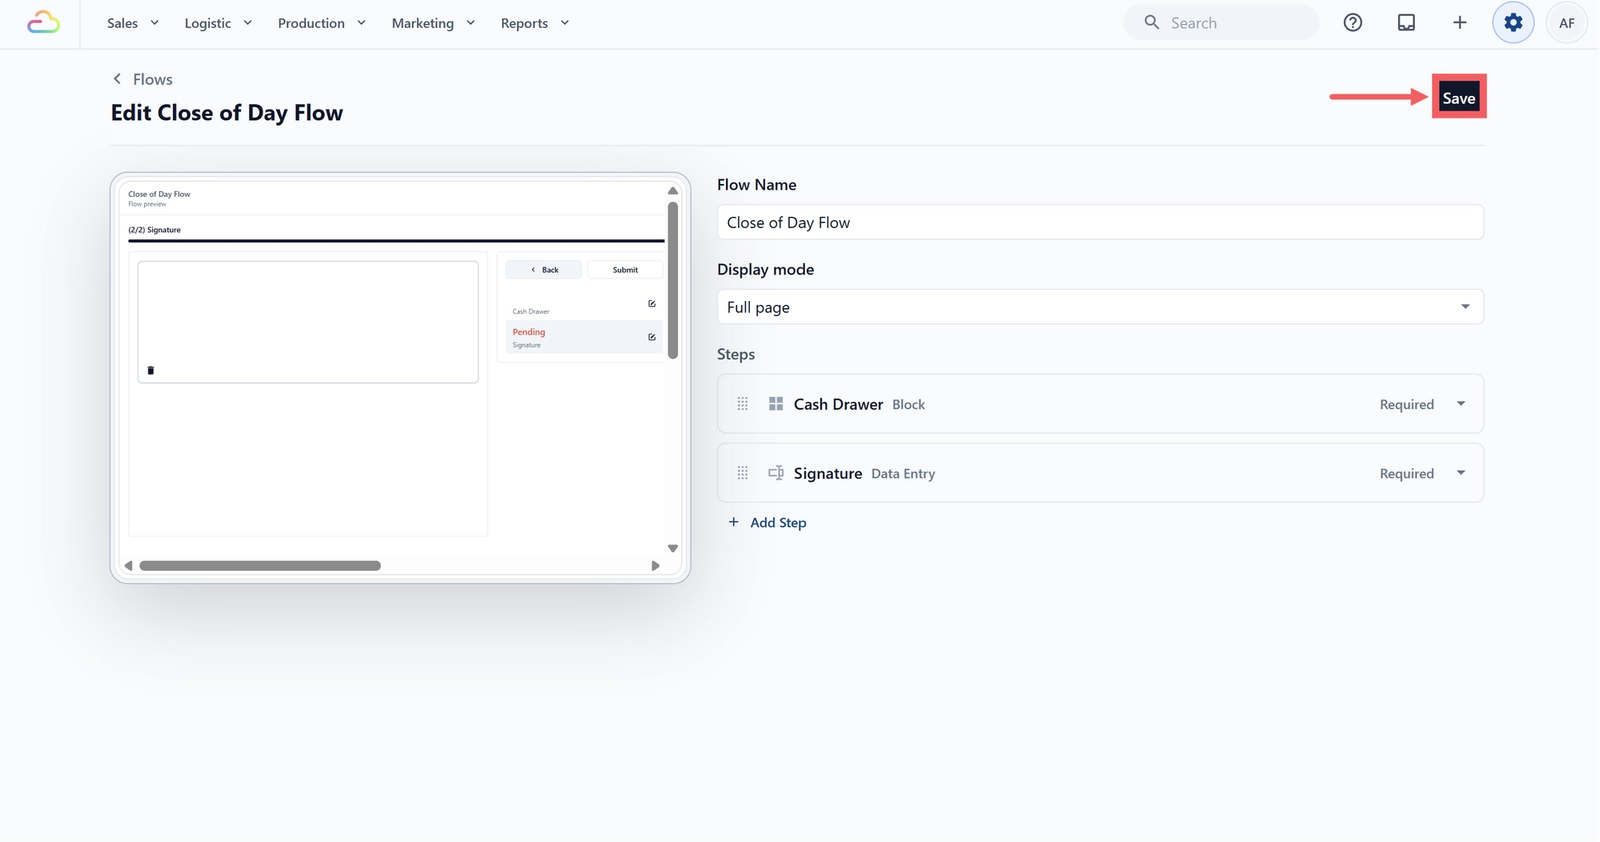
- You should now see it listed in the Flows page.
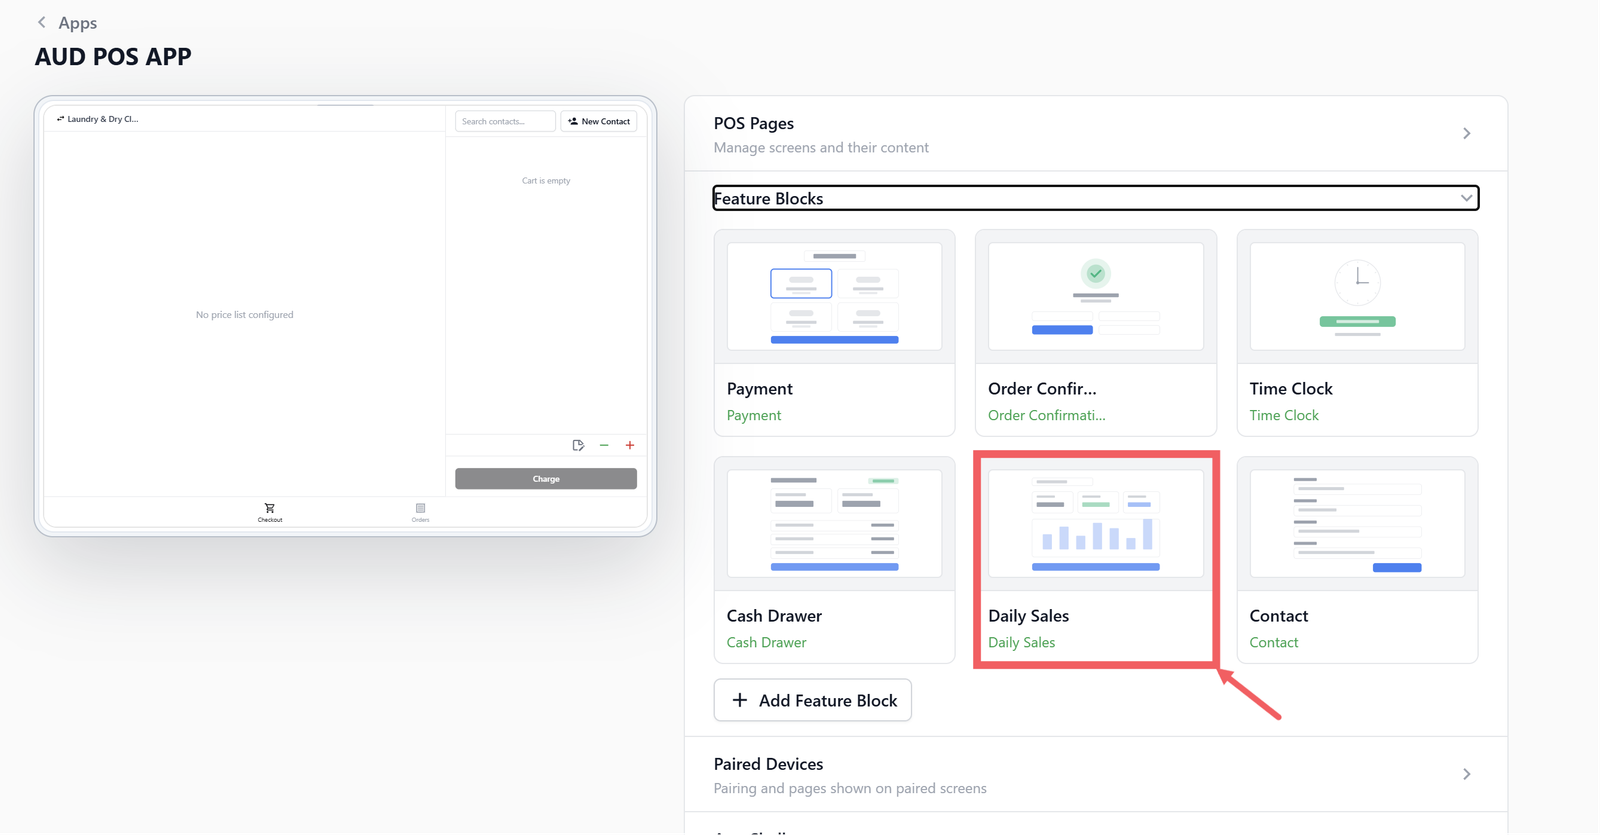
Link Everything to the Daily Sales Block
The Daily Sales block is what powers the Daily Sales screen in your POS — it is where your staff goes to see the day's sales summary and run the Close of Day report. Now you need to connect the flow and receipt template you just created to this block so everything works together.
- Under Sales Channel, click on the POS and select your POS app. Go to the Feature Blocks tab and click on Daily Sales to open its settings.
- Set the Close of Day Flow to the flow you just created (for example, "Close Of Day Flow").
- Set the Close of Day Receipt Template to the receipt template you published earlier.
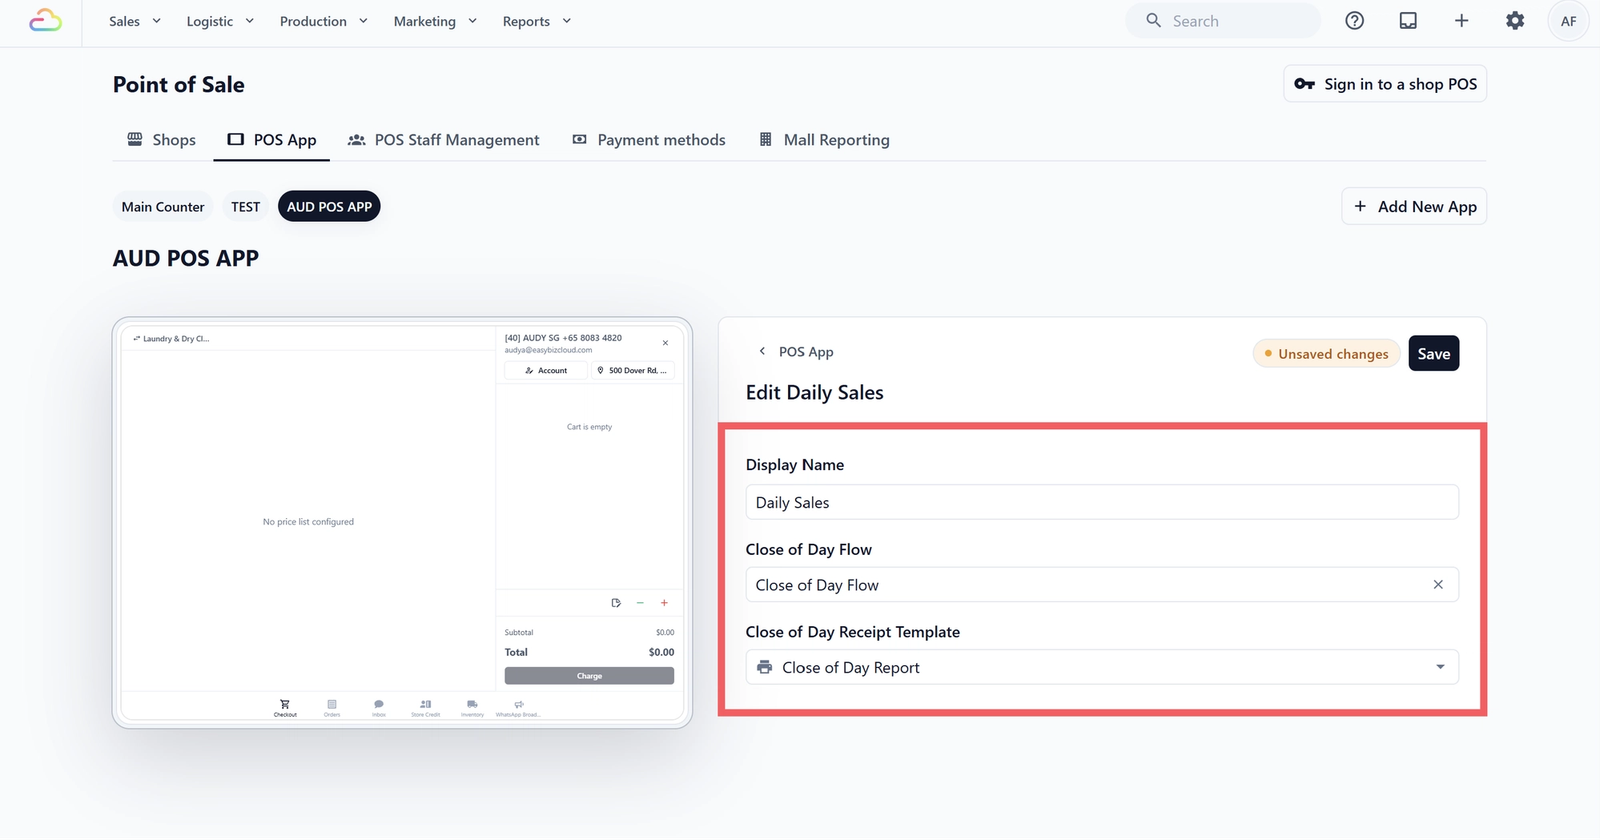
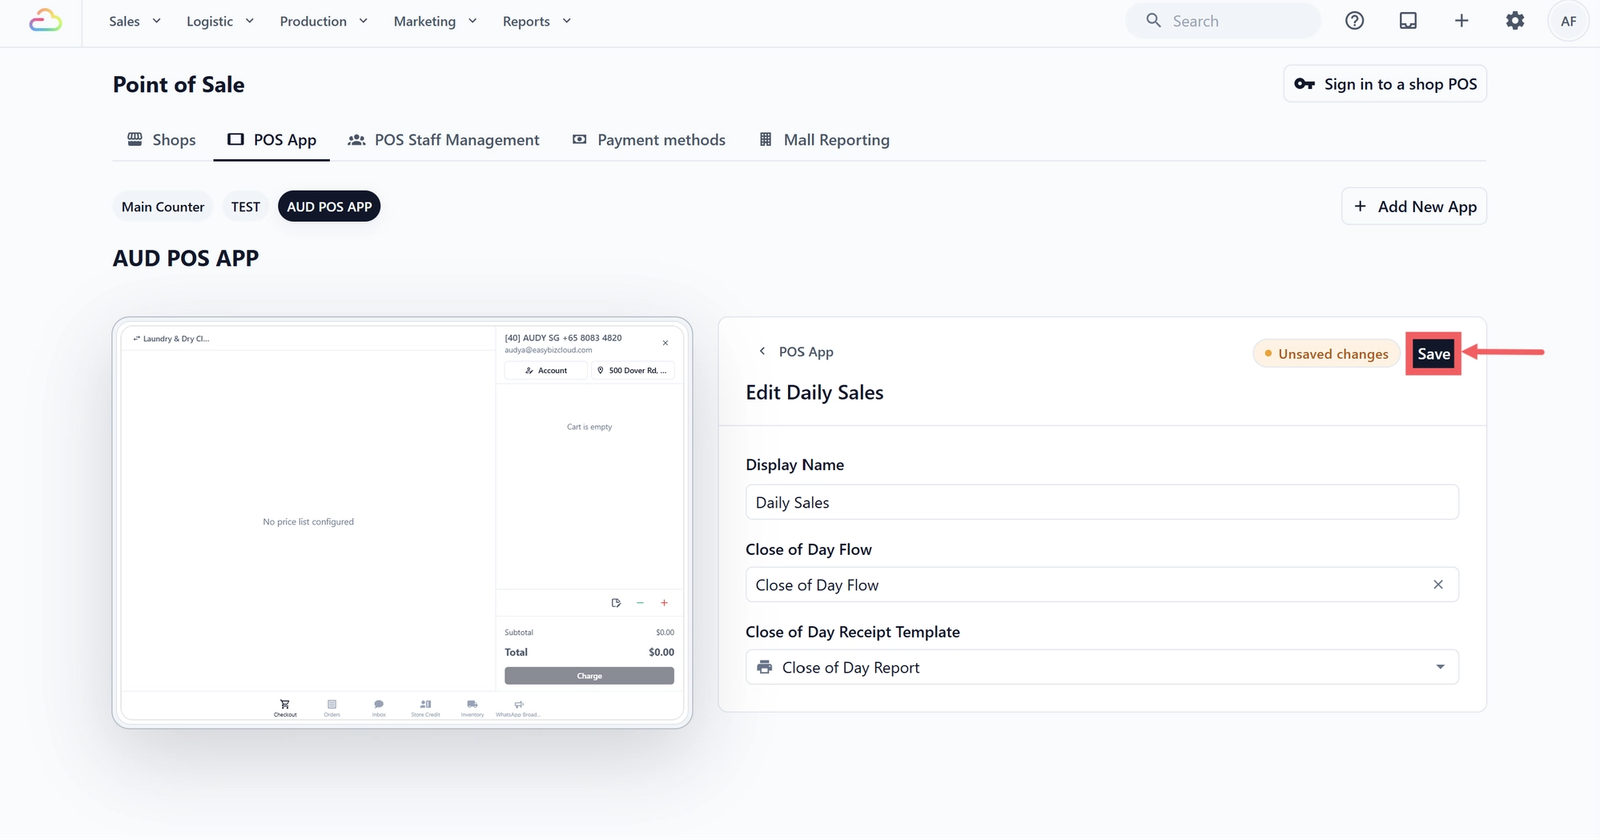
- Click Save to save your changes.
How It Works on the POS
Here is what your staff will see when running the Close of Day on the POS.
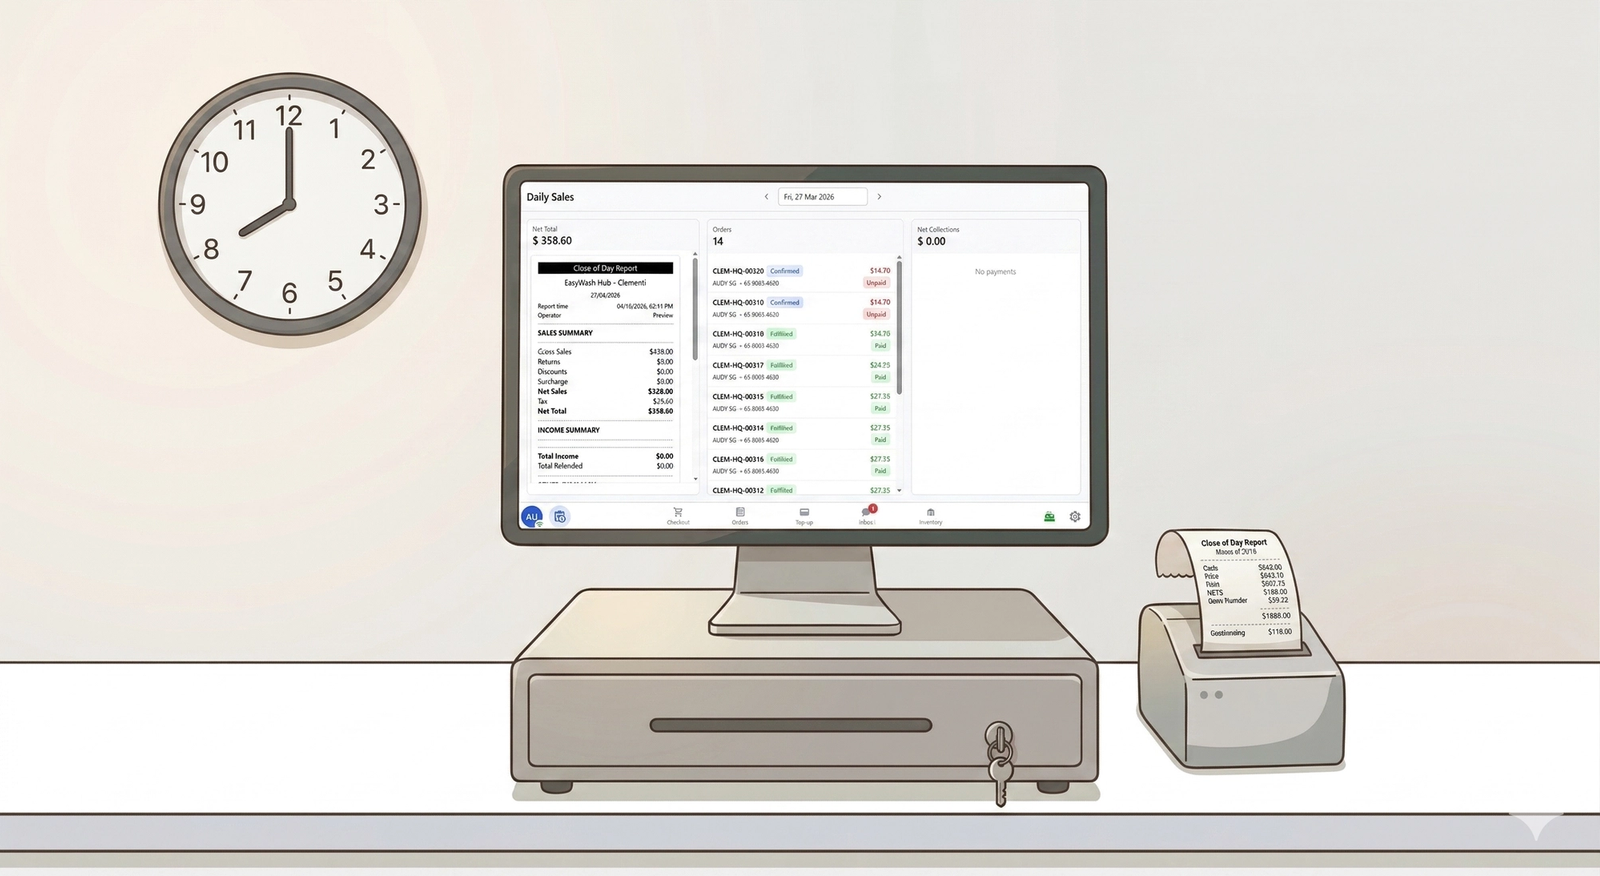
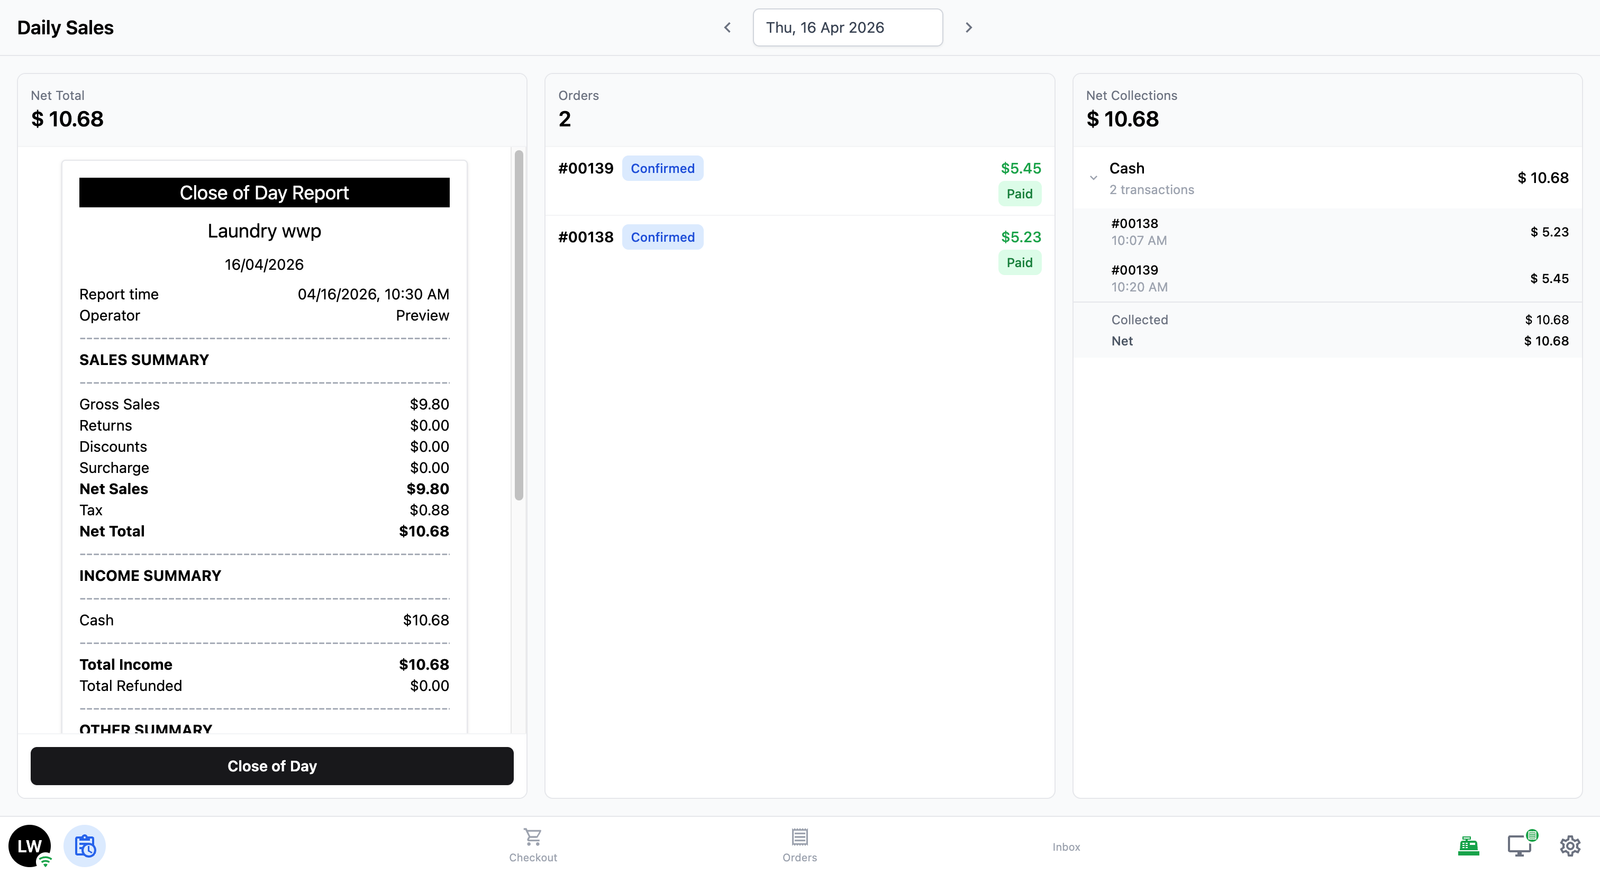
The Daily Sales Screen
To access the Daily Sales screen, tap the Daily Sales icon on the bottom navigation bar.
The Daily Sales screen is split into three sections:
- Close of Day Report (left): Shows a full summary of the day's sales — gross sales, returns, discounts, net total, income by payment method, total customers, total orders, and any outstanding balances.
- Orders (middle): Lists all the orders placed during the day, with their order number, status, amount, and payment status.
- Net Collections (right): Shows a high-level breakdown of payments by method (for example, Cash). Tap on a payment method to see the individual orders — including the order number, time, and amount collected.
Closing the Day
When your staff is ready to close the day, tap the Close of Day button at the bottom of the report.
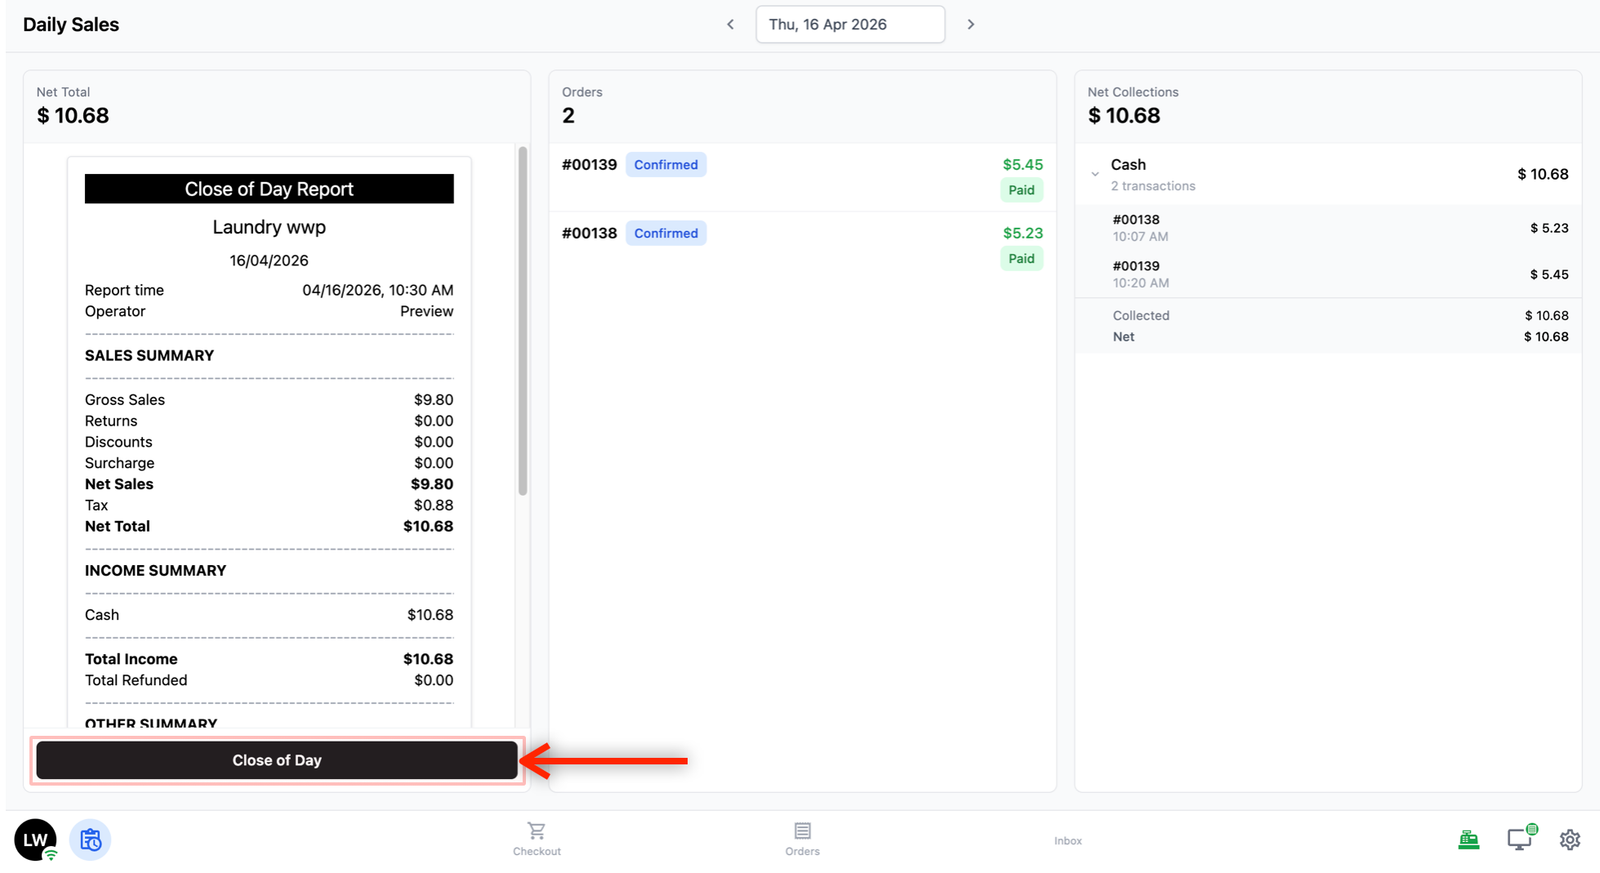
A pop-up window will appear, guiding your staff through the steps you set up earlier. On the left side, they will see the details for the current step (for example, the cash drawer summary or the signature pad). On the right side, they can see the list of steps and which ones are still pending.
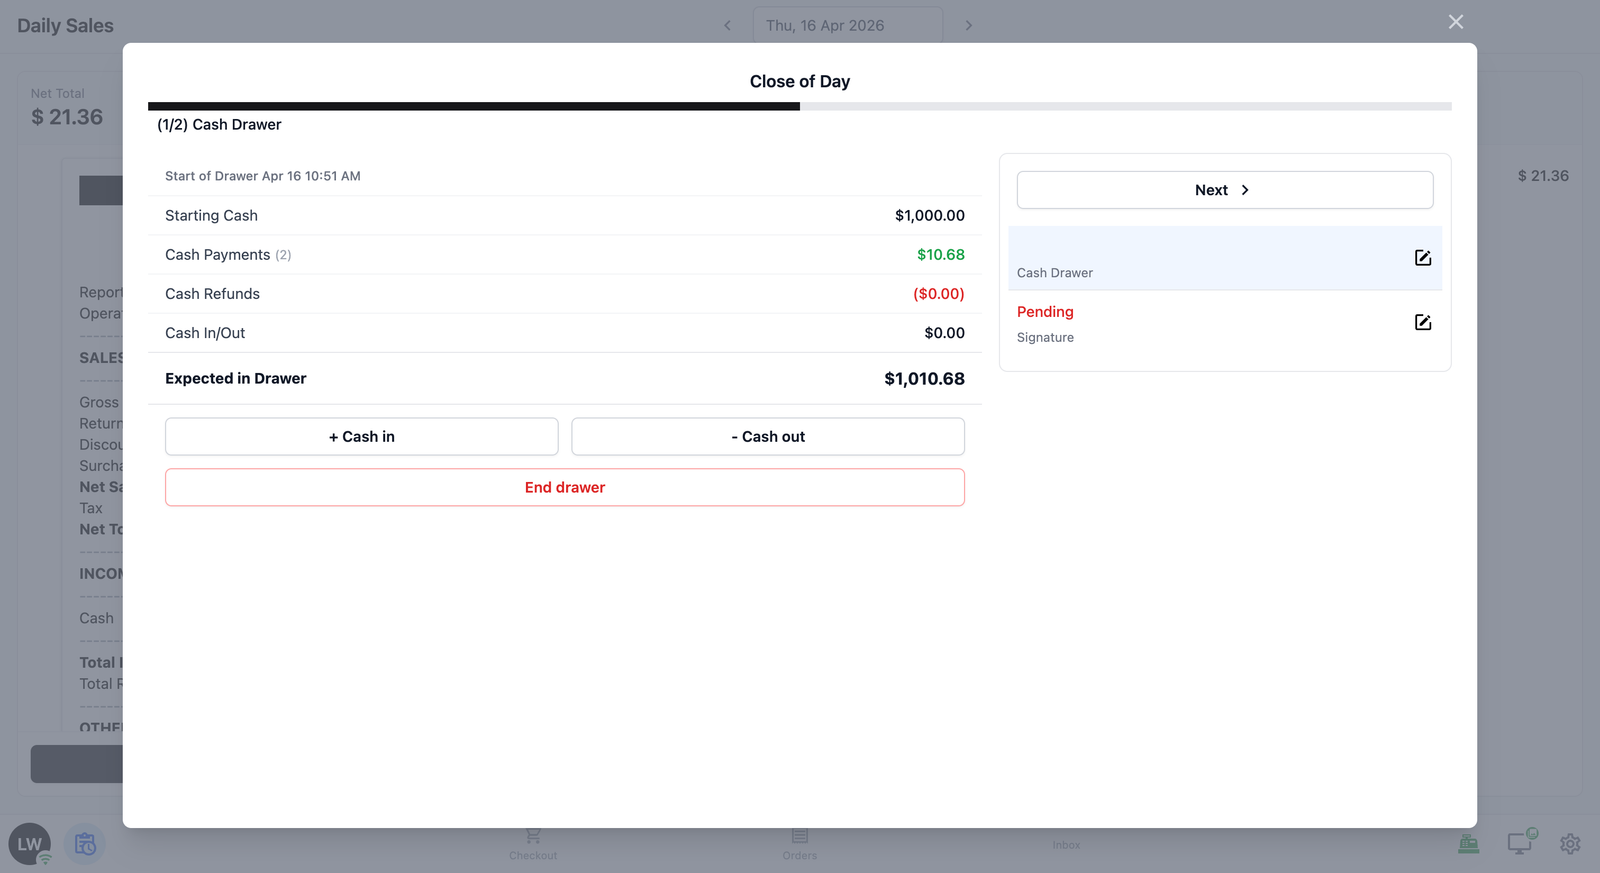
Step 1 — Cash Drawer:
The first screen shows a summary of the cash drawer for the day: starting cash, cash payments, cash refunds, any manual cash added to or taken out of the drawer (Cash In/Out), and the expected amount in the drawer.

Your staff should review these numbers, then tap End Drawer.
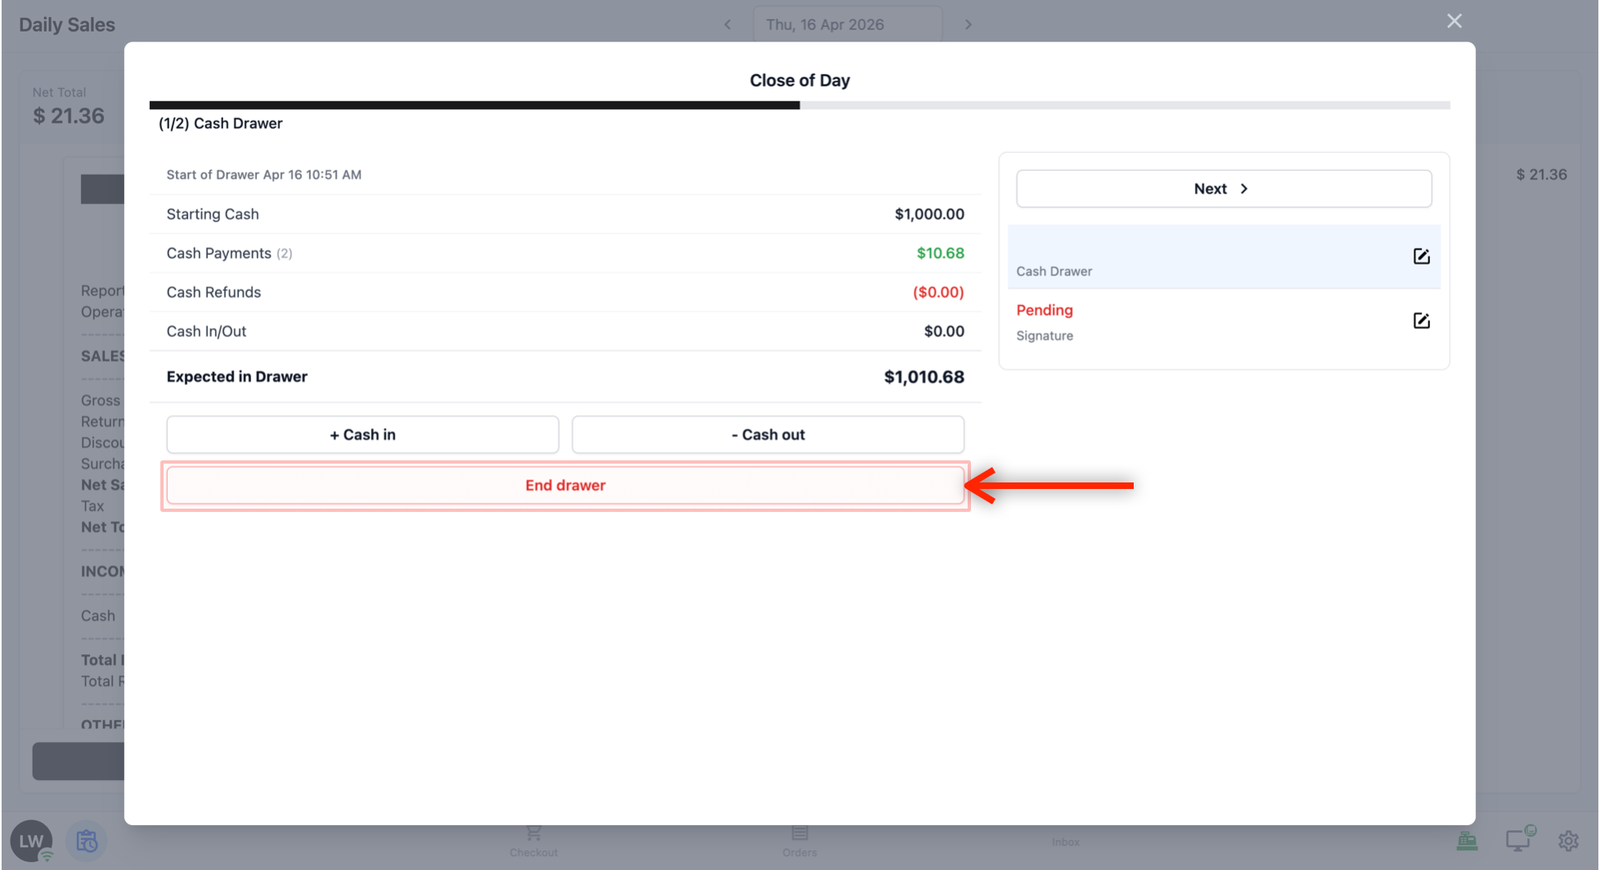
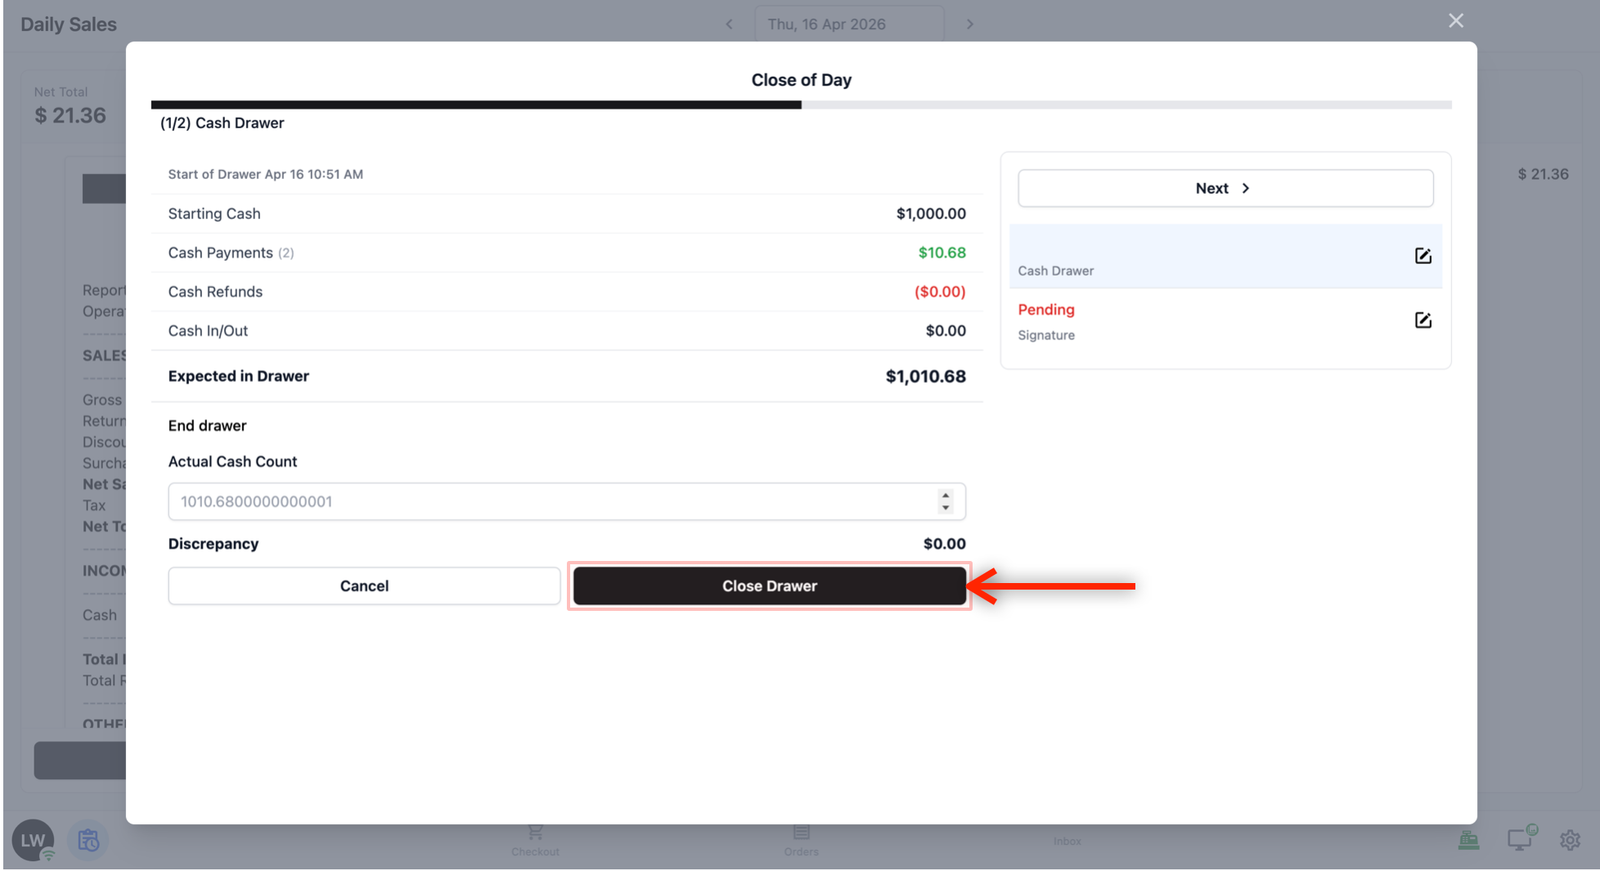
The system will show the Actual Cash Count, which is automatically filled in with the expected amount. If the cash in the drawer matches, your staff can just tap Close Drawer straight away. If it does not match, they can change the amount — the Discrepancy will update automatically to show the difference.
Tap Close Drawer to close the drawer.
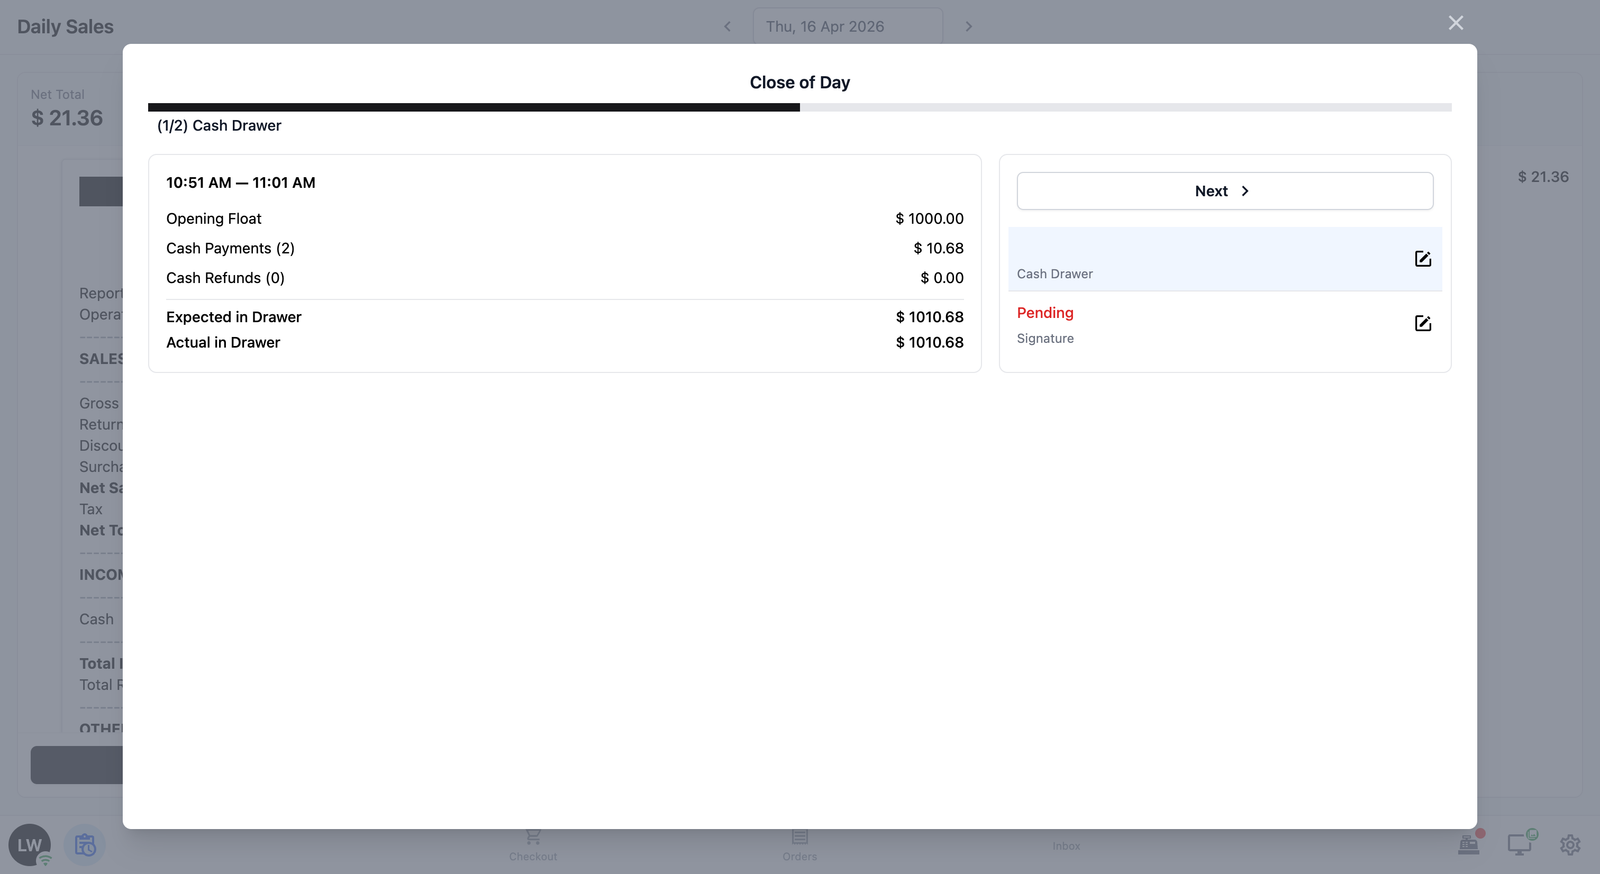
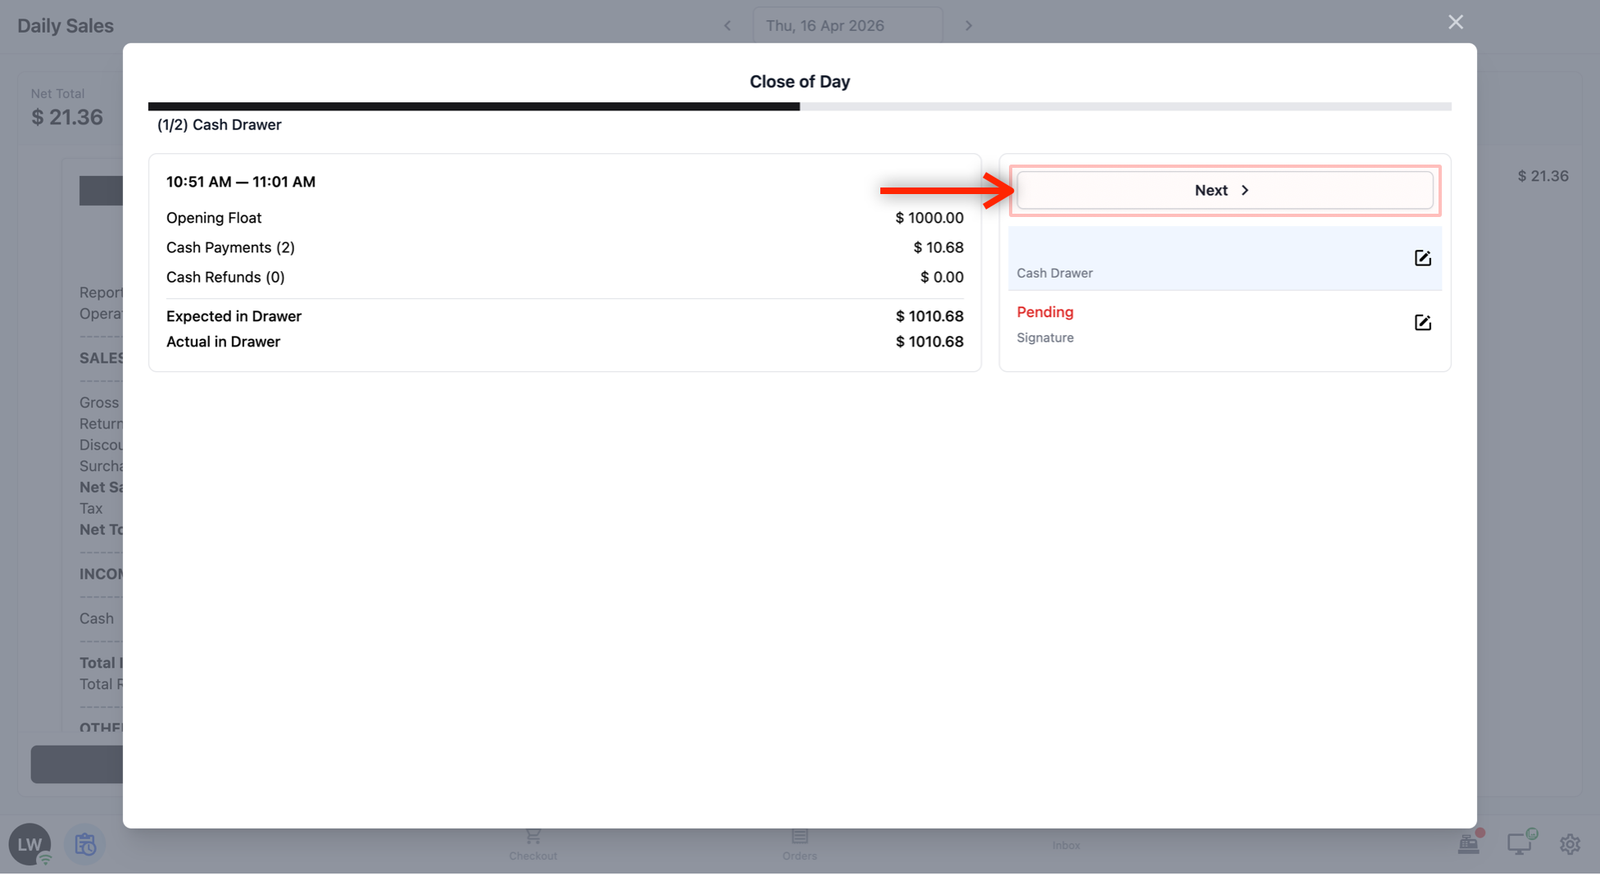
Once closed, a summary will appear showing the opening float, cash payments, cash refunds, and the expected vs actual amounts in the drawer.
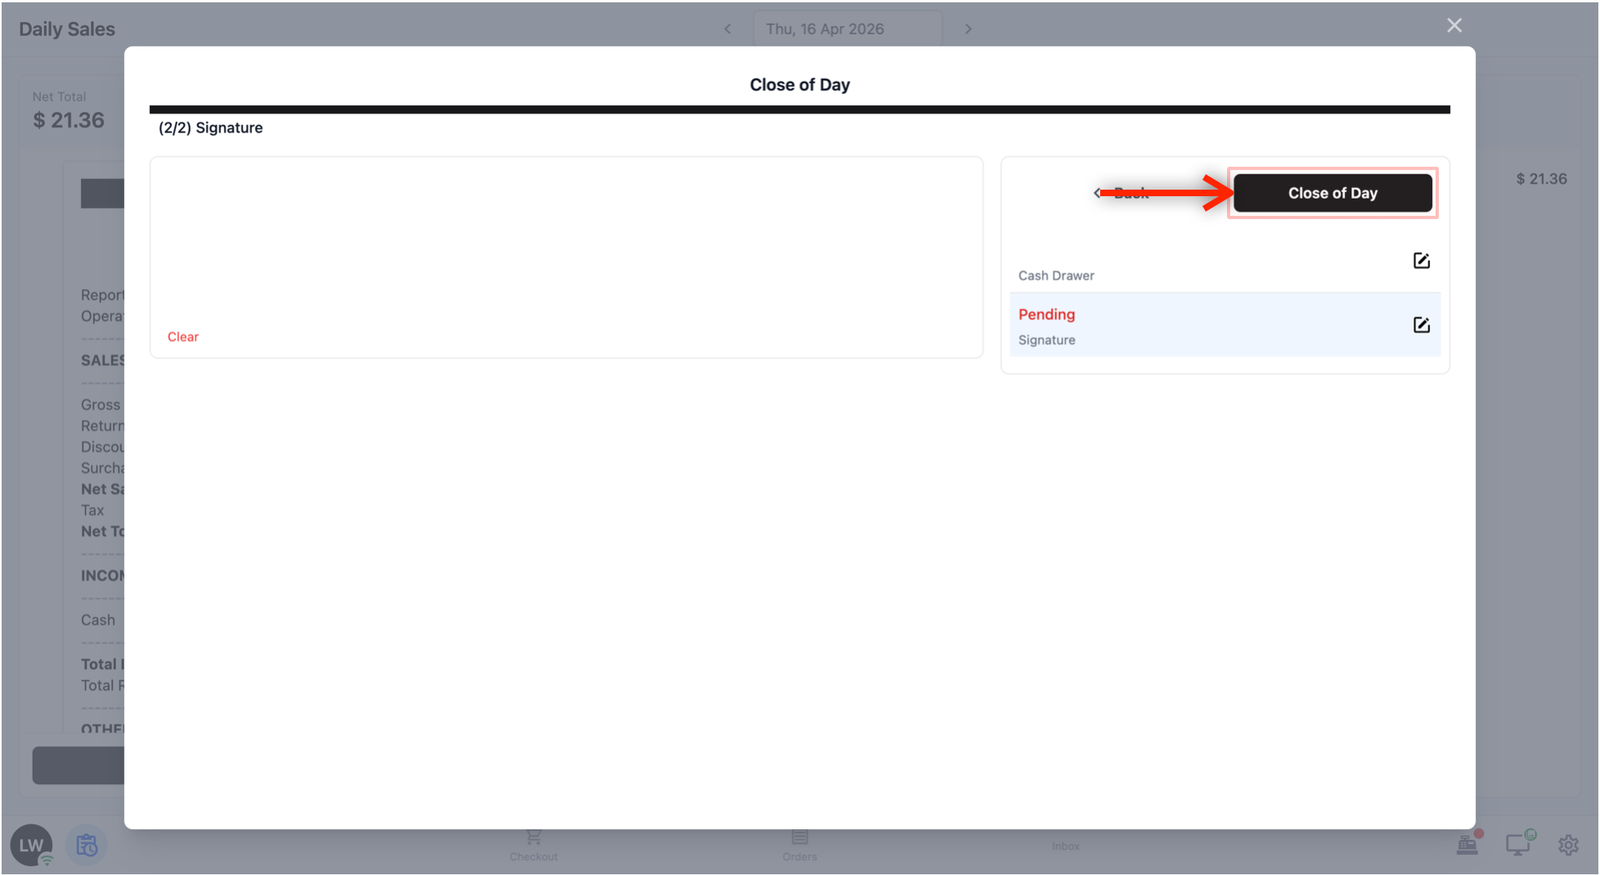
Step 2 — Signature:
When your staff is done reviewing the cash drawer summary, tap Next to move to the signature step.
A signature pad will appear. Your staff signs off to confirm that the day's numbers are correct.
Once signed, tap Close of Day to complete the process.
After Closing the Day
Once the Close of Day is submitted, a banner will appear at the top of the screen: "Close of day has been submitted. Sales operations are blocked until tomorrow." This means no more orders can be processed for the rest of the day.
The day's report, orders, and net collections will still be visible on the screen. Your staff can print the report by tapping Print Report if they need a physical copy.

FAQs
What do I need to set up before my staff can run a Close of Day on the POS?
Three things, done once: (1) publish a Close of Day Report receipt template, (2) create a Close of Day Flow (typically Cash Drawer Summary + Signature steps), and (3) link both to the Daily Sales block.
Do I need to customise the Close of Day receipt template?
No. The default layout works well for most businesses — it already shows gross sales, returns, discounts, net total, payment breakdown, orders, and outstanding balances. Just make sure you click Publish, otherwise the report won't appear on the POS.
Can I skip the Cash Drawer step in the flow?
Yes. If you prefer to close your cash drawer separately (for example, you run multiple shifts in one day), add only the Signature data-entry step and skip the Cash Drawer function block.
What happens after staff submits the Close of Day?
A banner appears: "Close of day has been submitted. Sales operations are blocked until tomorrow." No more orders can be processed for the rest of the day. The report, orders, and net collections stay visible, and you can print a copy.
Can I view previous days' Close of Day reports?
Yes. On the Daily Sales screen, tap the back arrow next to the date to browse past days. Each day's report, orders, and net collections are preserved.
Give feedback
Up next
Set Up WhatsApp Inbox on Your POSRead and reply to customer WhatsApp messages right from your POS — no phone switching needed.
Read more