
Setting Up Consumer Price Lists
In this article
A Consumer Price List ties everything in your catalogue together. It is where you set the actual dollar amount for each Service Option on each Service Item, the unit price for each Retail Product, and how tax is applied. Once published, you link it to your POS counter or online store through your Business Unit. This guide walks through creating a price list from scratch or by copying an existing one, organising the editor with categories, attaching products and service options, configuring tax, and the publish flow.
Contents
Contents
Before You Start
Make sure these are configured first:
- Service Items and Retail Products you intend to price.
- Service Options for each type of work you do.
- A Business Unit the price list will belong to.
- At least one POS Location or sales channel to link the price list to.
How to Access Consumer Price Lists
- Click the ⚙️ Settings icon in the top-right corner.
- Under the Products & Pricing section, click Price Lists.
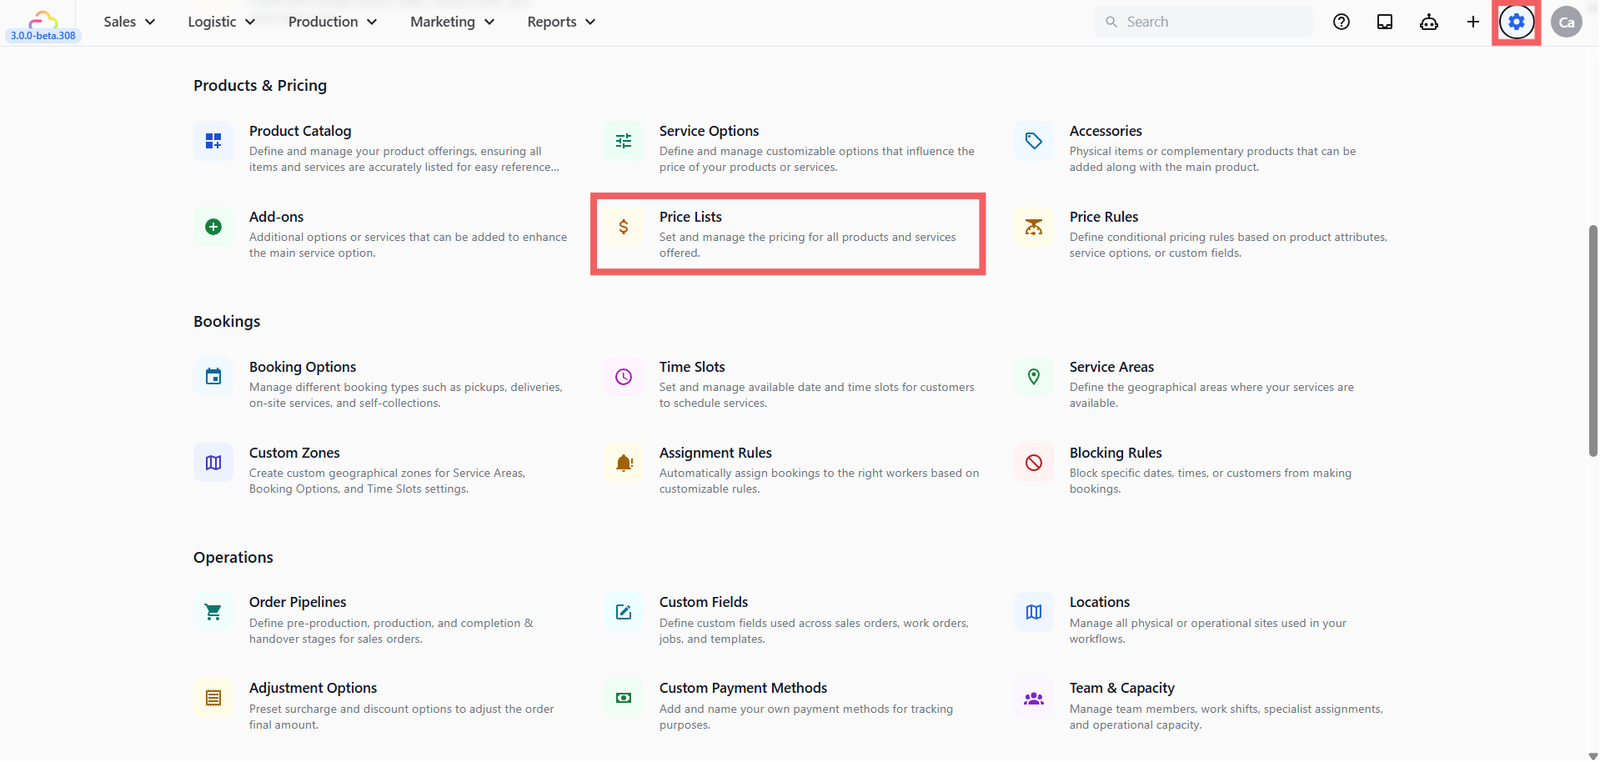
- You land on the Consumer Price Lists tab by default.
Creating a New Price List
Click + Add Price List at the top right.
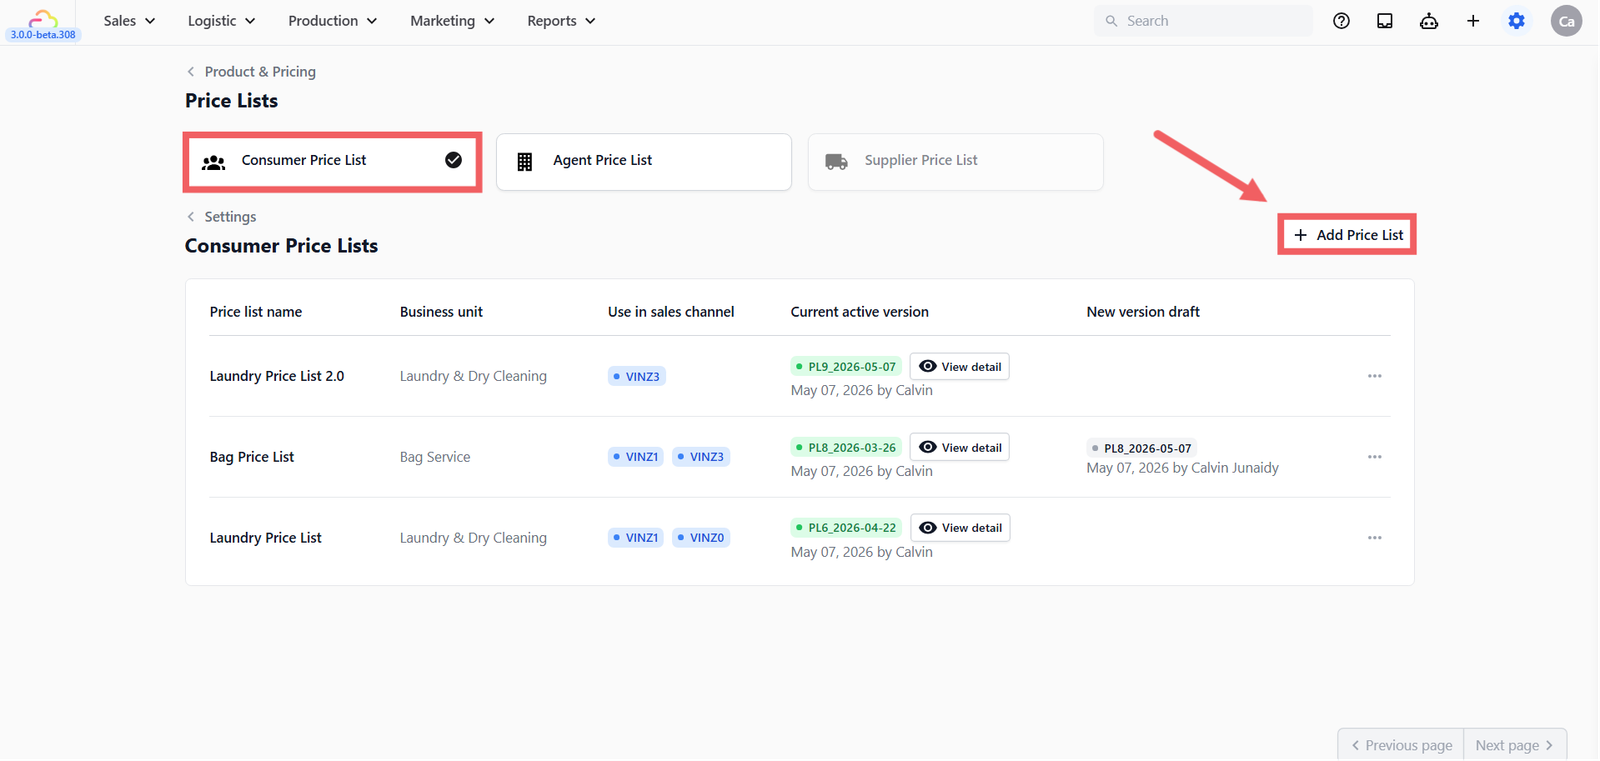
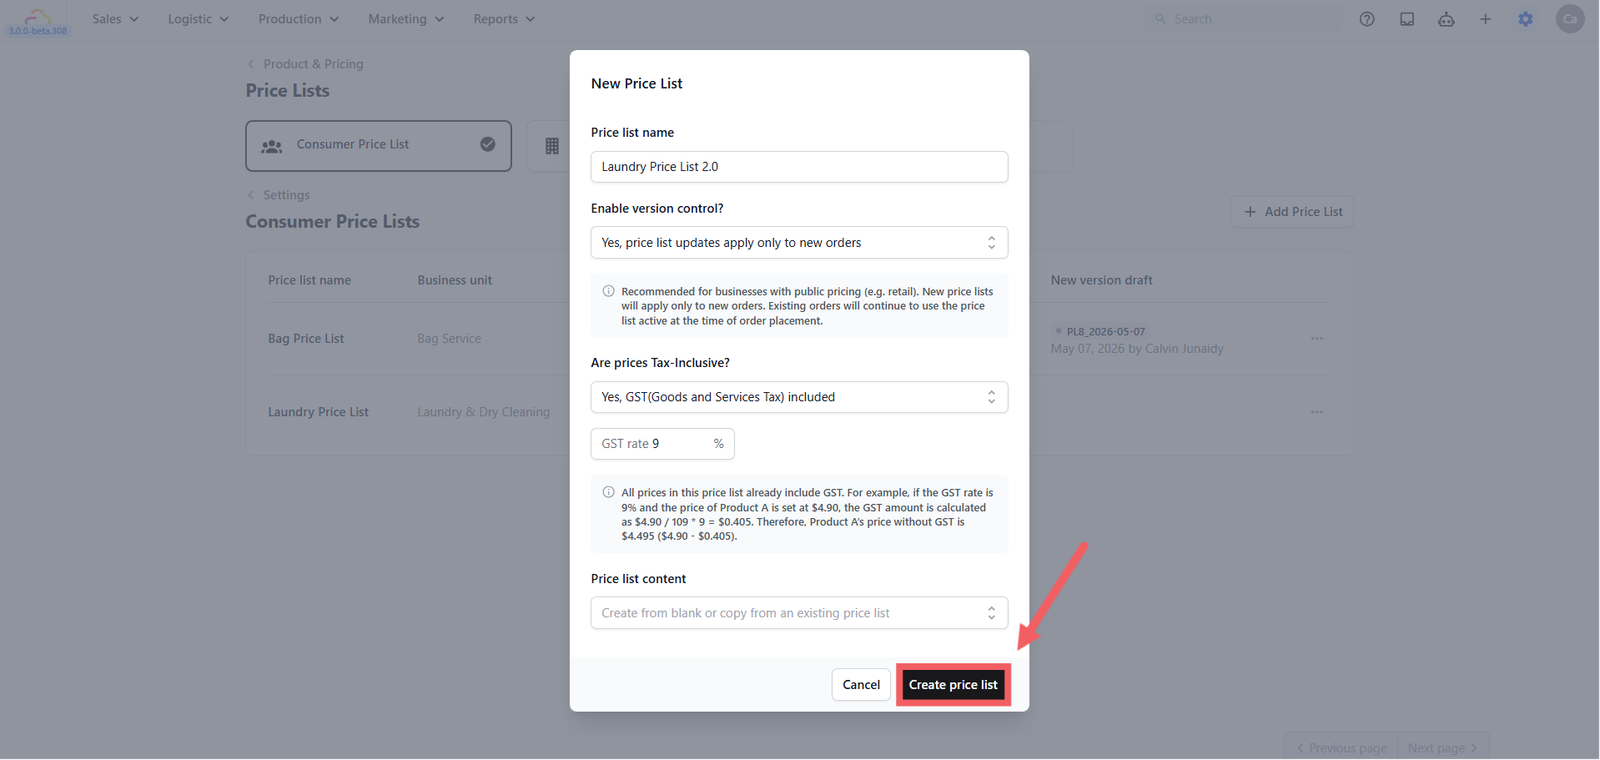
- Price list name -> An internal name. Name by what it represents, not by version.
- Enable version control
| Pick this | Result |
|---|---|
| Yes, price list updates apply only to new orders | Every change goes through a draft and a publish step. Historical orders keep their original pricing. Recommended for almost all consumer price lists. |
| No, price list updates apply to all orders | Edits apply directly. Open orders may see new prices on reload. Risky outside of small fixes. |
- Are prices Tax-Inclusive?
| Pick this | Result |
|---|---|
| No tax included | Prices in the editor are the base price. Tax is added at checkout based on your business unit's tax settings. |
| Yes, GST(Goods and Services Tax) included | Prices already include GST. You enter the GST rate (e.g. 9 for Singapore). |
| Yes, VAT(Value-Added Tax) included | Prices already include VAT. You enter the VAT rate. |
- Price list content -> Start blank, or copy from an existing price list. Copying brings over categories, products, service options, and prices, but not the version control or tax settings.
Click Create price list to save and open the editor.
Inside the Editor
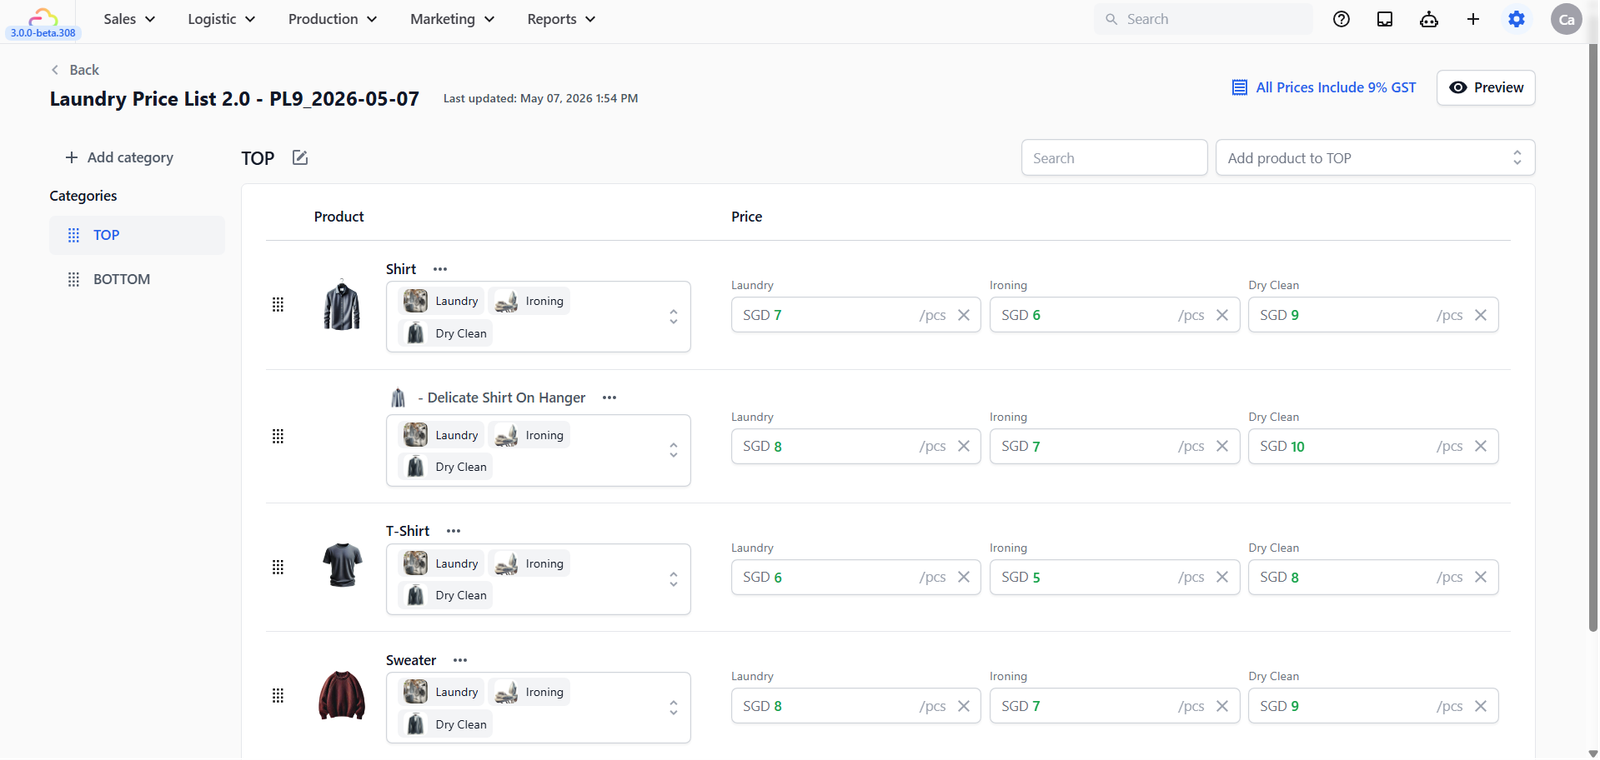
The editor is a categorised table. Categories run down the left, products and prices fill the table on the right.
Adding categories
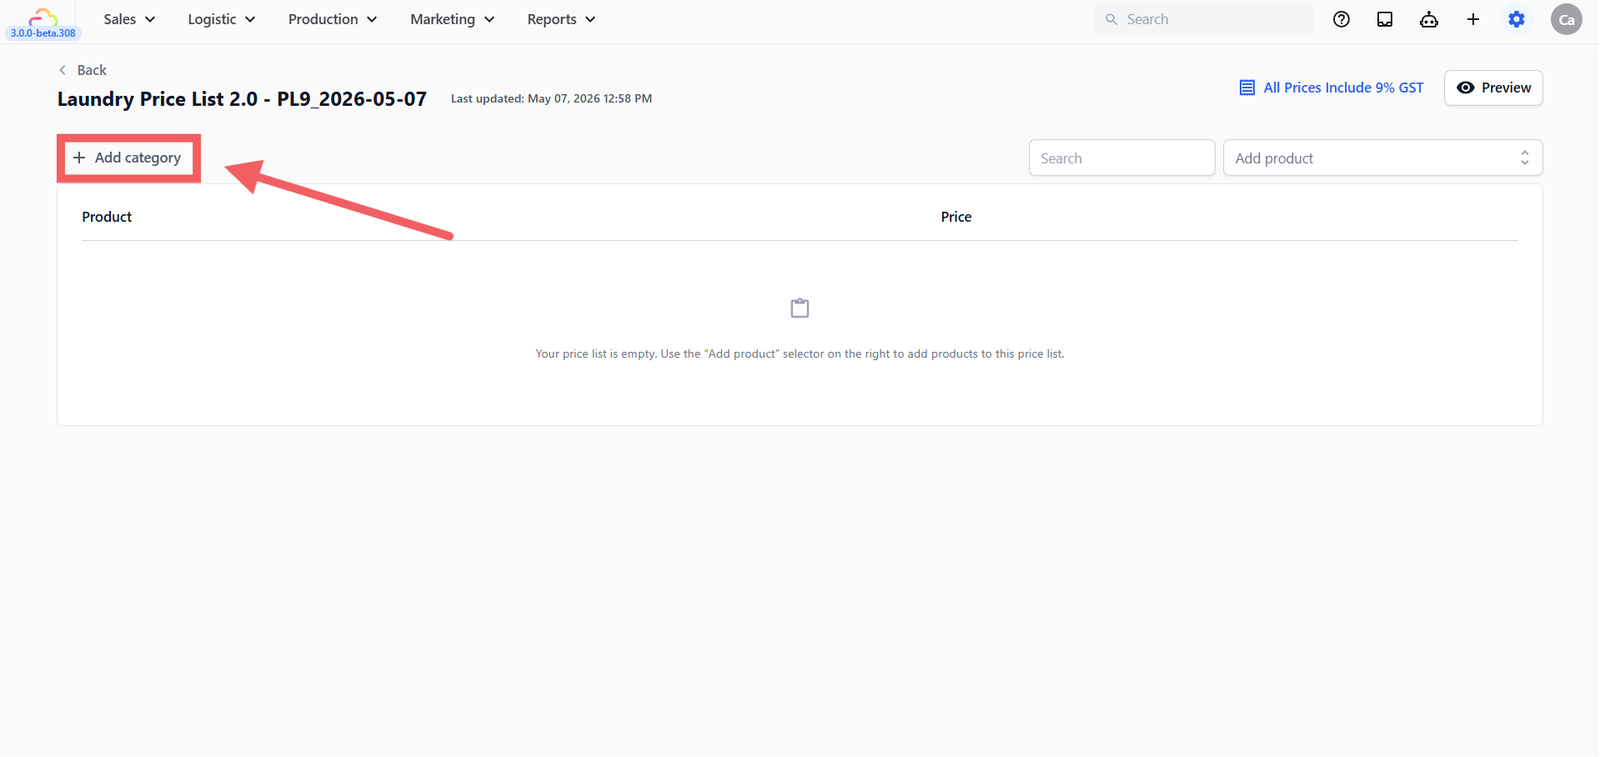
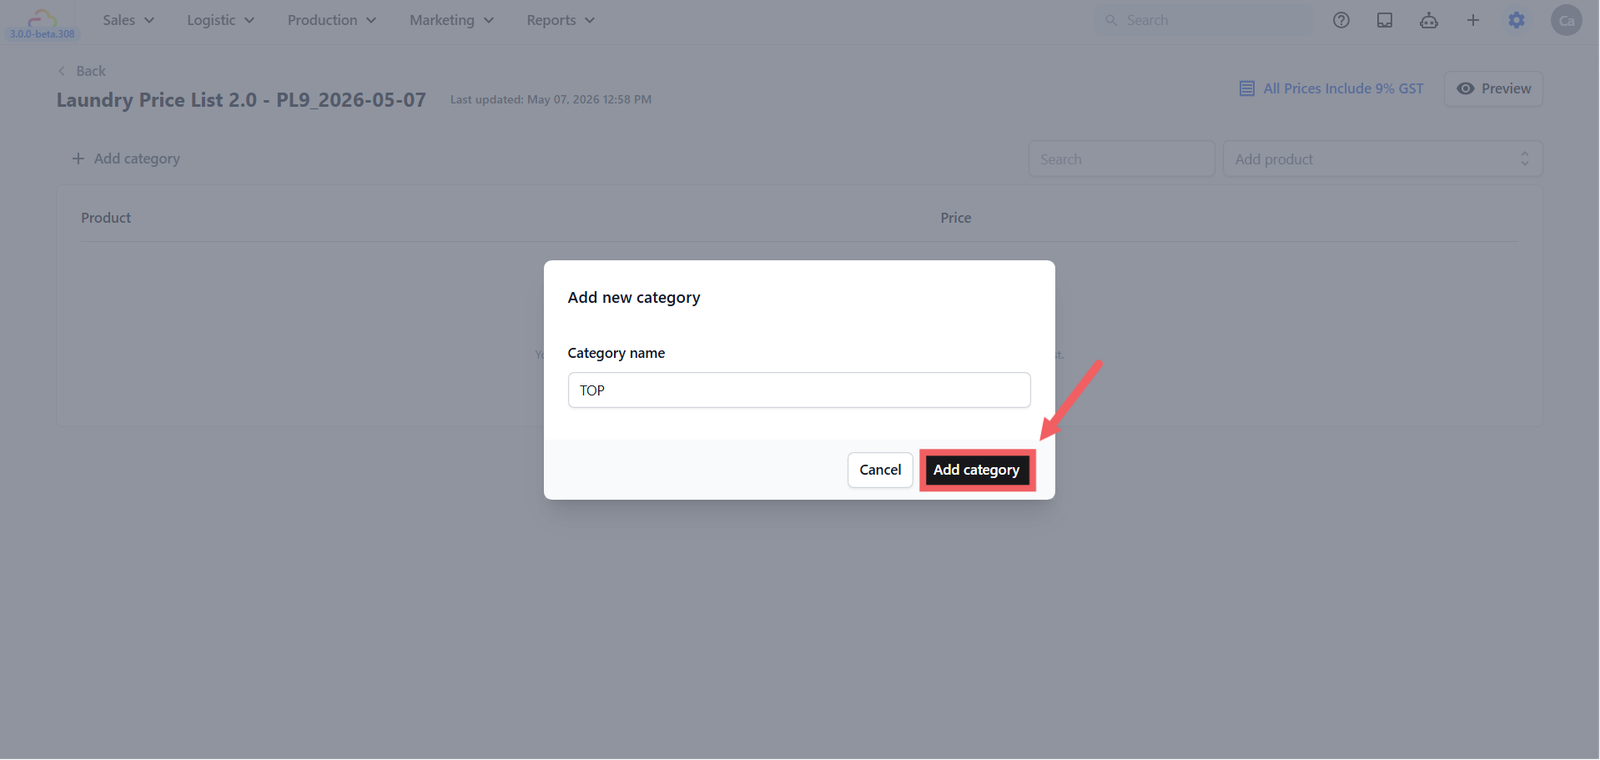
Click + Add category to open the Add new category dialog. Type a Category name (e.g. Bags, Curtains, Retail) and click Add category. Drag categories using the handle on the left to reorder. The order here is the order at POS.
To rename a category, click the pencil icon next to the category name. To delete a category, the system asks whether to move products inside it to another category or delete them.
Adding products to a category
Click the Add product to [category] dropdown at the top right. You see three options:
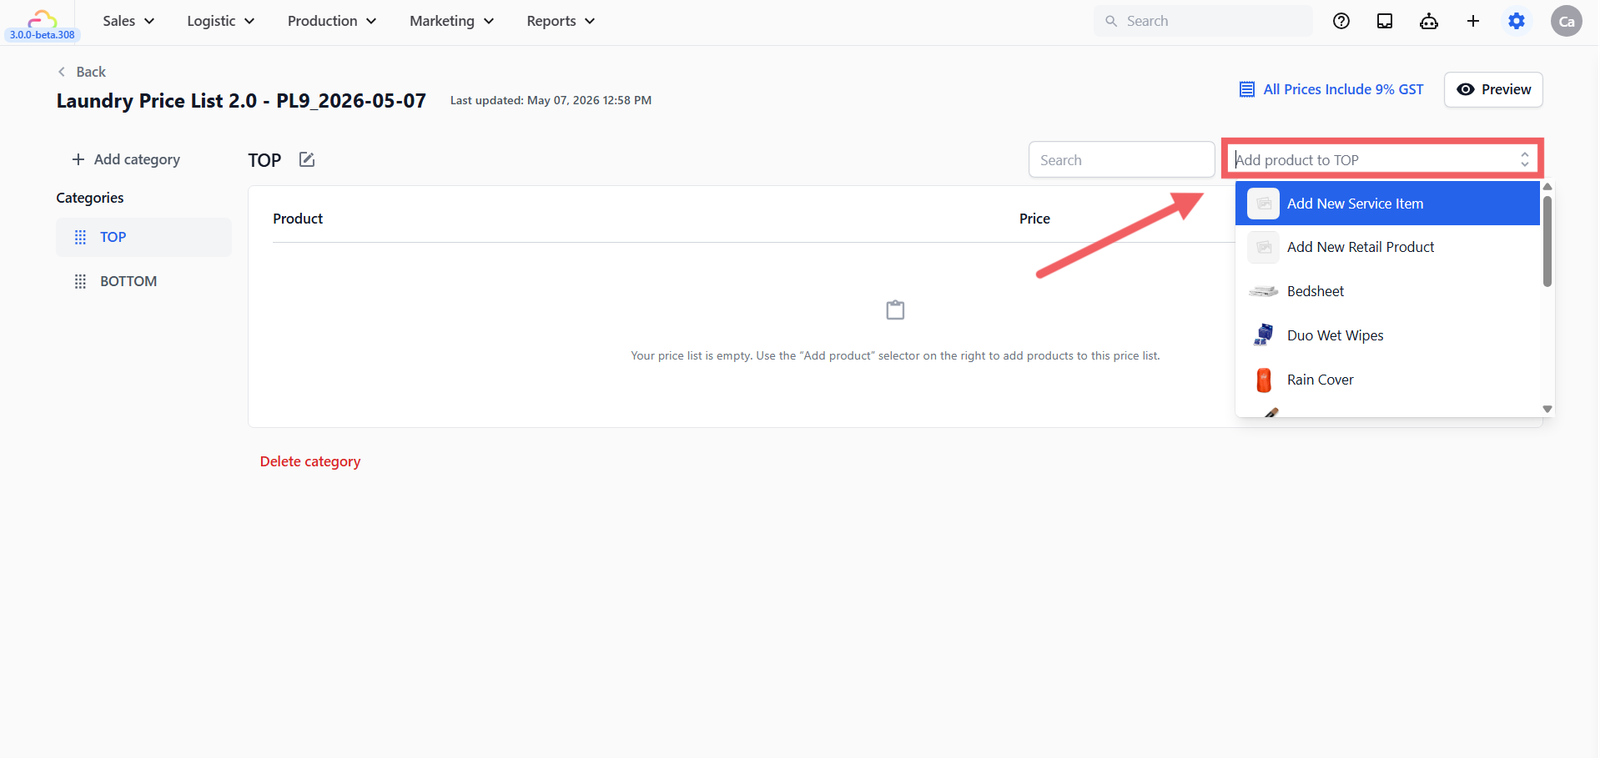
- Add New Service Item — creates a new Service Item inline and adds it to this category.
- Add New Retail Product — same, for a Retail Product.
- Existing products — pick any product already in your Product Catalog.
Setting prices and service options
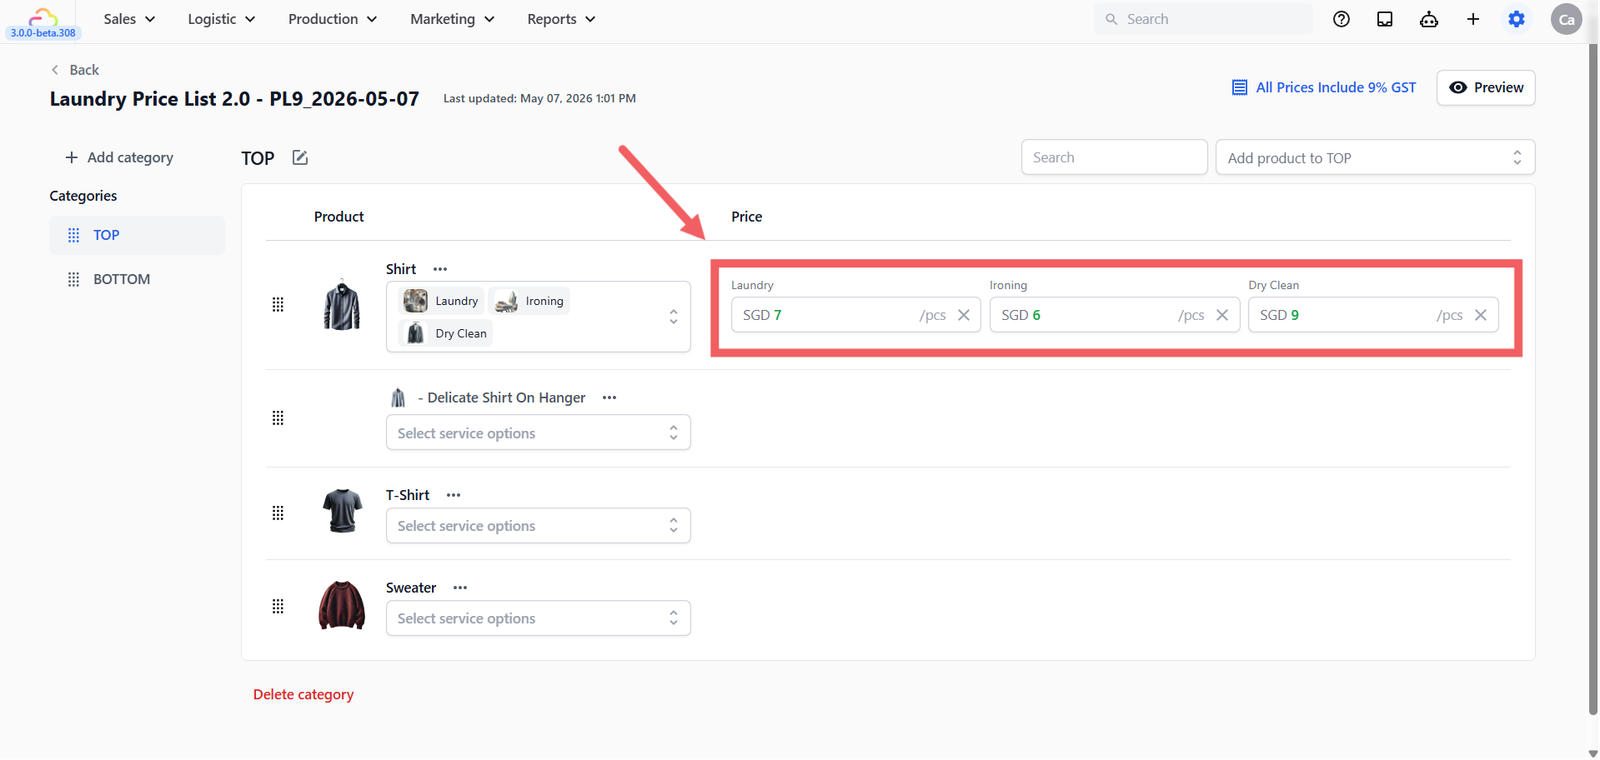
On each Service Item row, click the chevron next to the service option chips to open the dropdown. Tick the Service Options that apply to this item (e.g. Wash, Dry Clean, Iron Only). A price column appears for each option you tick.
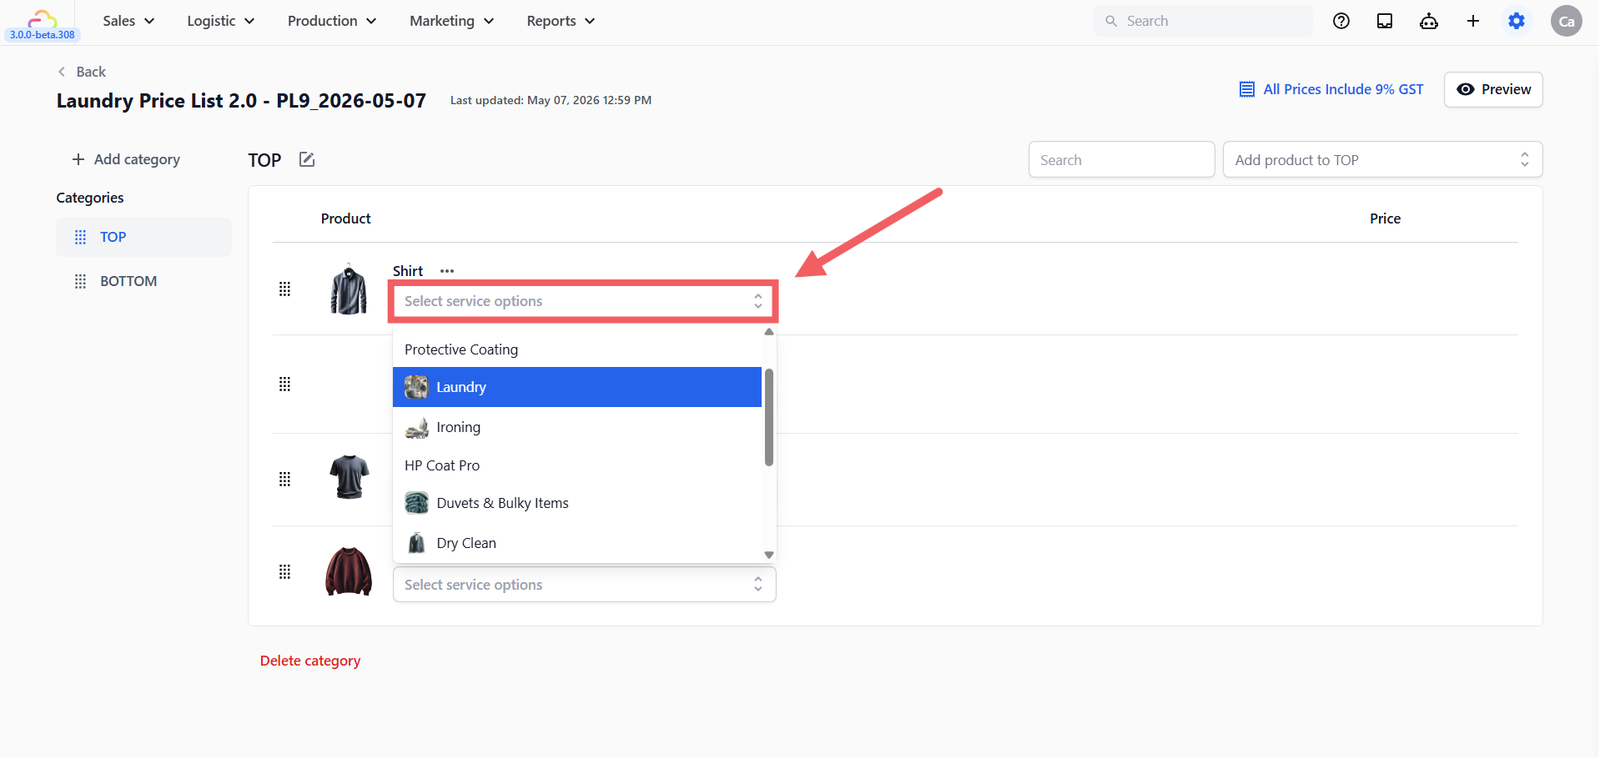
Click each price field and type the amount. The currency prefix (e.g. SGD) comes from your account settings. The unit suffix (e.g. /pcs) comes from the product's Unit label. Click the X next to a price to remove the service option from this row.
Three-dots menu on a row
Click the ••• three dots next to a product name to:
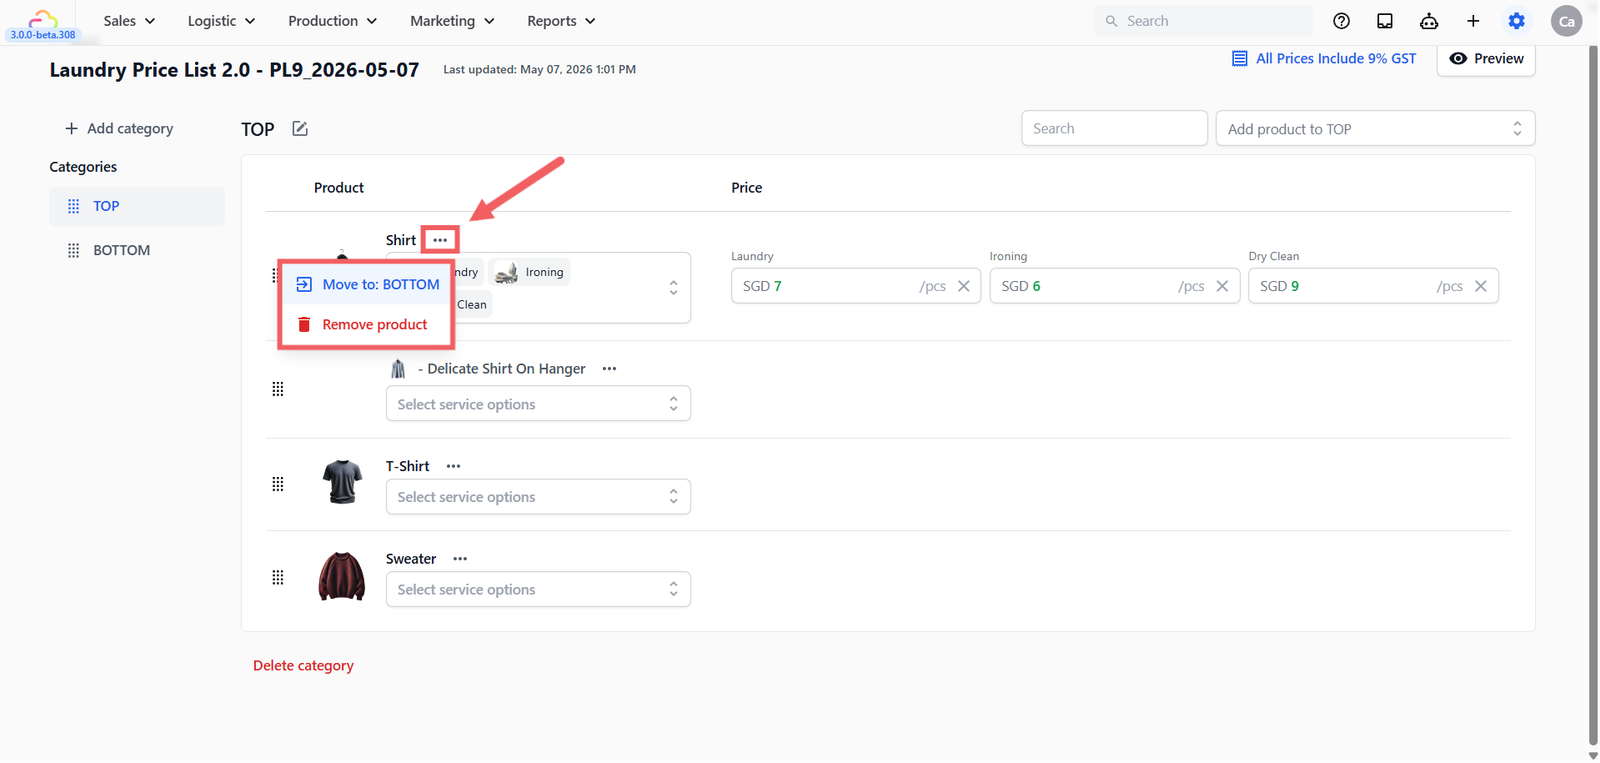
- Move to: [other category] -> moves the row to another category in this list.
- Remove product -> removes the row from this price list. The underlying product is not deleted.
Tax settings dialog
The text at the top right of the editor shows your current tax setting:
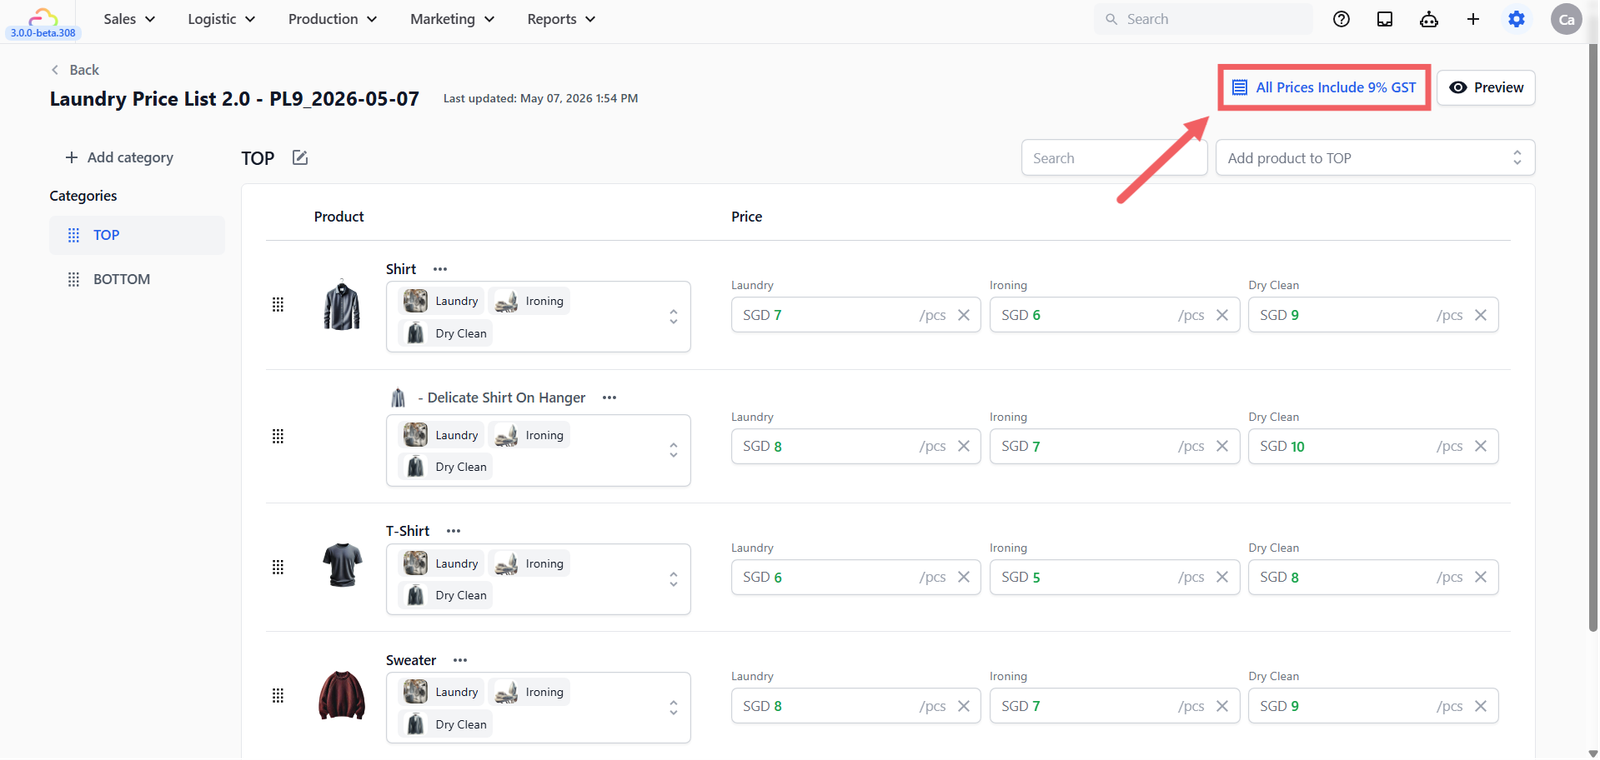
- All Prices Include X% GST if you picked GST included
- All Prices Include X% VAT if you picked VAT included
- No Tax Included if you picked no tax
EasyBiz has two places where tax can be configured: here on the Price List, and on your Company under ⚙️ Settings icon > Administration > Company > Sales Tax. Pick one based on how you want your prices to work.
- Set tax here on the Price List if you want each item's price to already include tax.
- Set tax on the Company if you want tax added on top at the order level.
If you turn tax on in both places, customers get charged tax twice. See Creating and Configuring a Company for the Company-side setup.
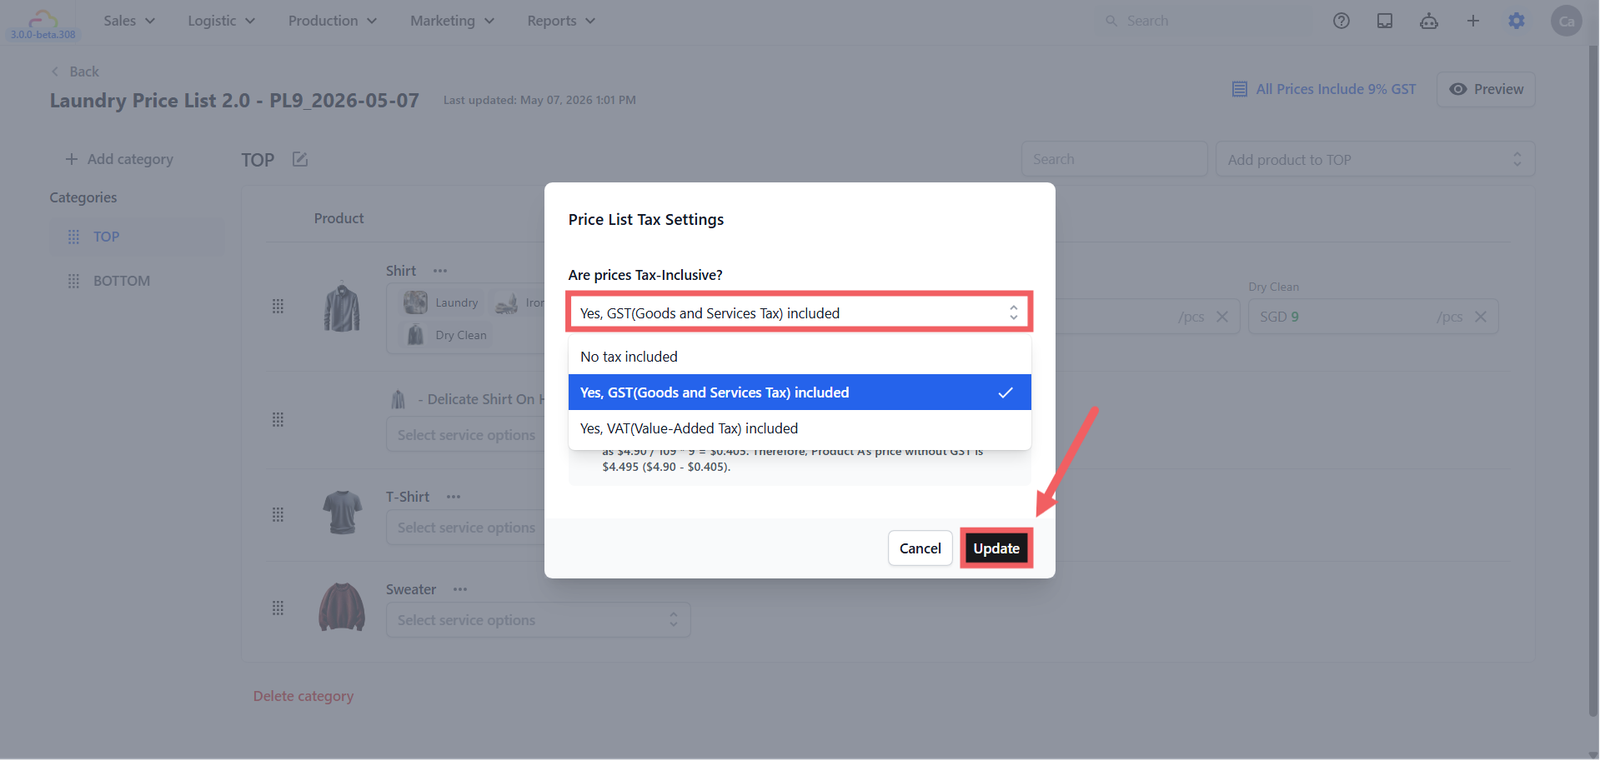
Click it to open the Price List Tax Settings dialog, where you can switch tax type or change the rate. Existing prices in the list are not auto-recalculated when you change tax mode, so review the table after toggling.
Search
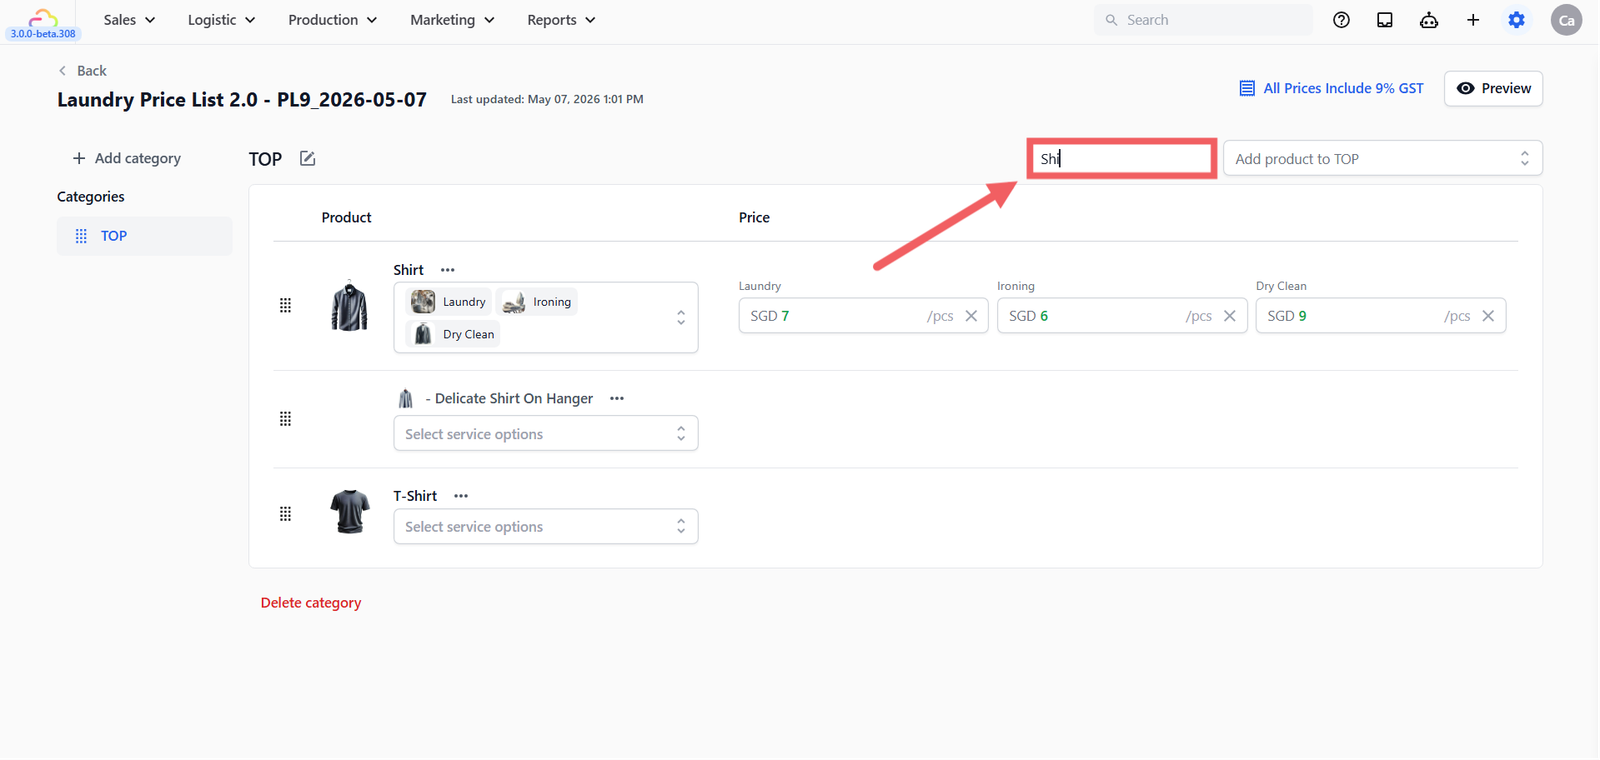
Use the search bar at the top to find a row by item name across the whole list.
Preview and Publish
Click Preview at the top right to see exactly what customers and staff will see.
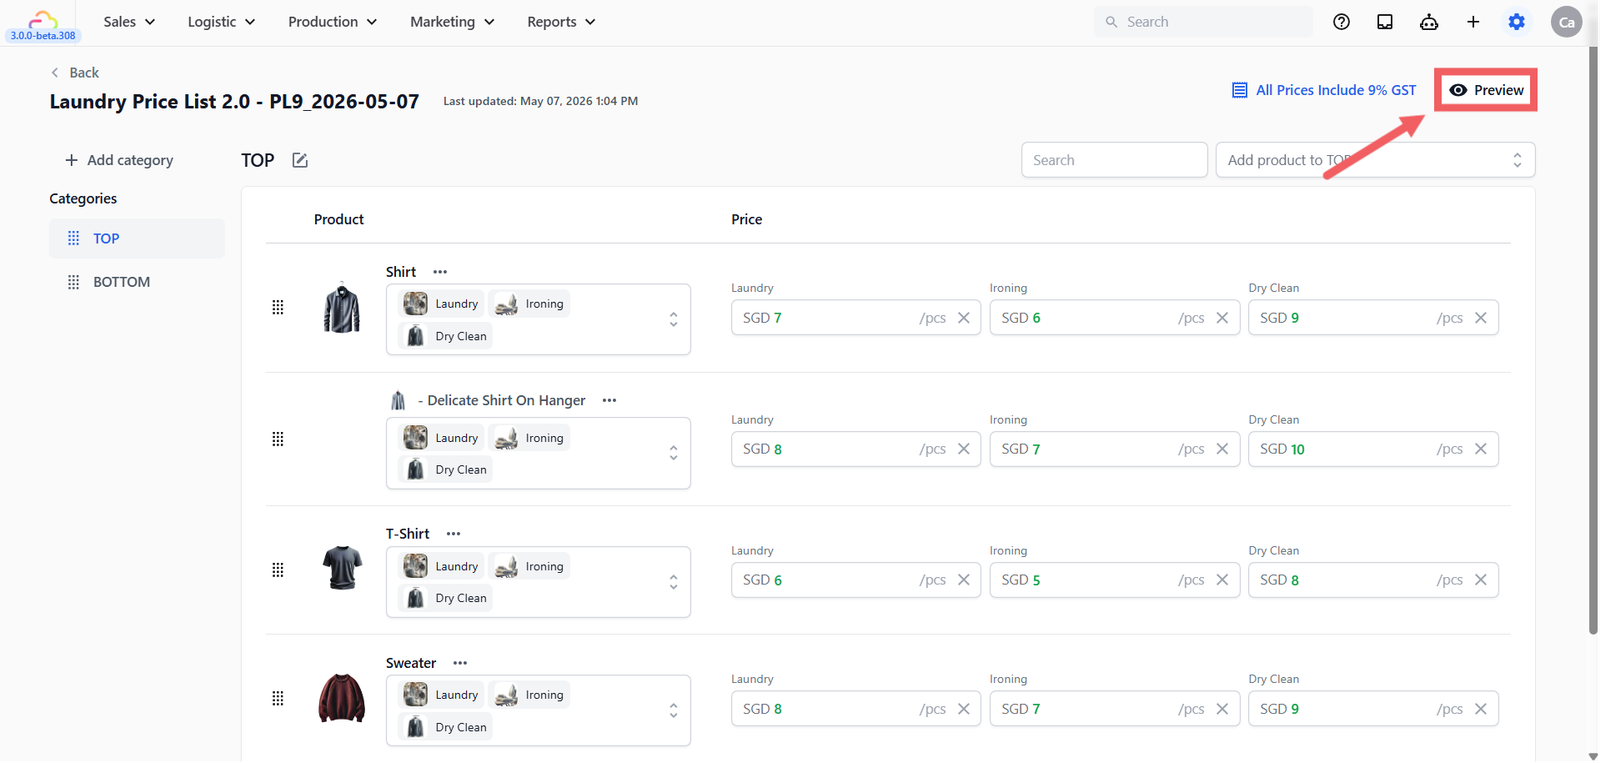
The preview is read-only and matches the customer-facing layout. Once you are happy, click Publish. The price list is now saved and ready to be linked to a sales channel.
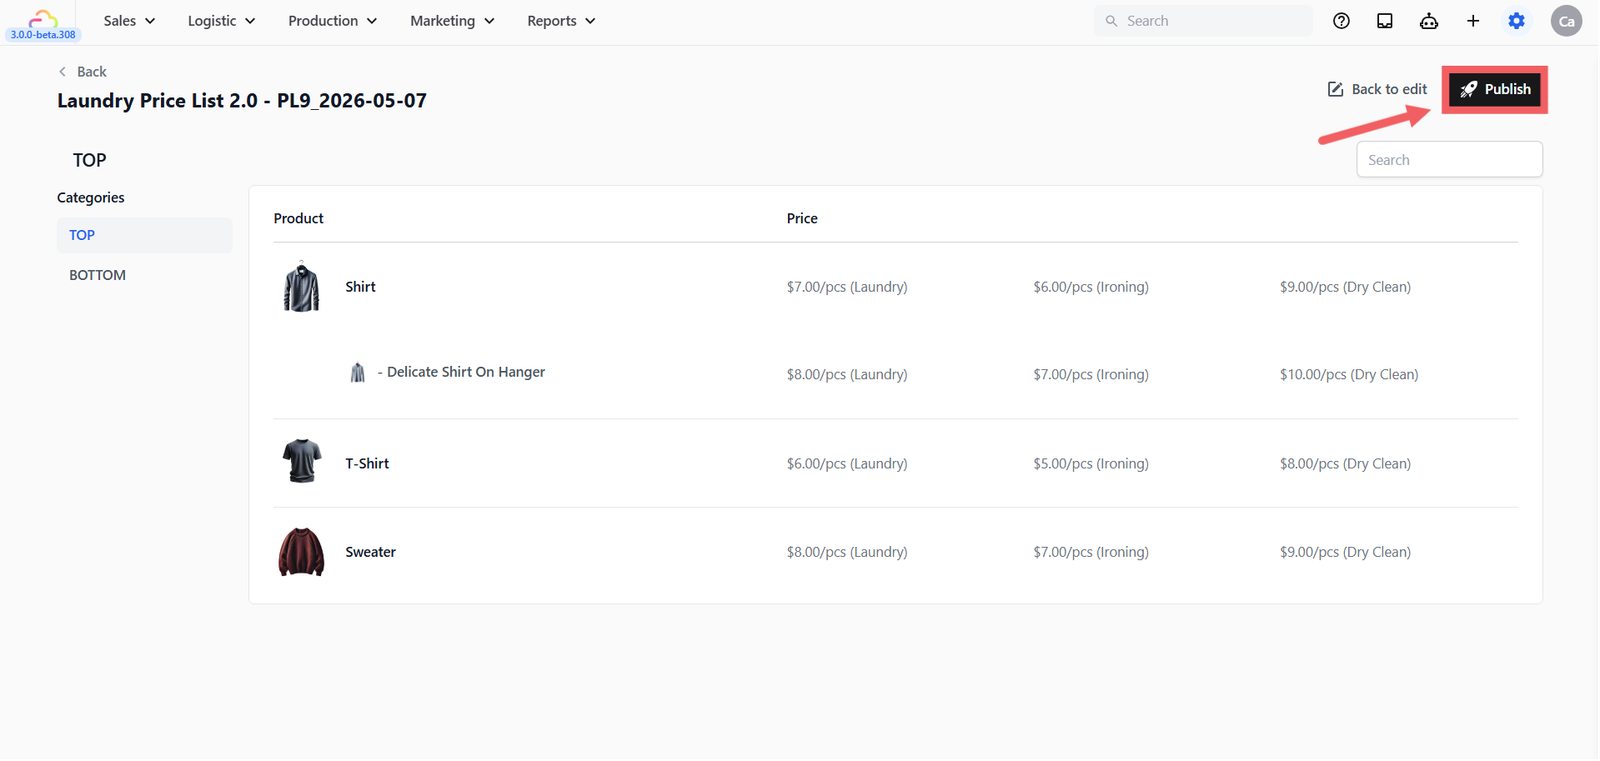
Linking Your Price List to Your Sales Channels
After you publish, your price list is ready to be used. The link to your POS counter or online store is made in your Business Unit's Catalog section.
In short:
- Click the ⚙️ Settings icon in the top-right corner.
- Under the Administration section, click Business Units.
- Open your business unit and scroll to the Catalog section.
- Choose Price List as the product source.
- Click + Add channel configuration and pick the sales channel (All Stores POS, All Online, or a specific counter/store).
- Pick this price list, set the minimum order if needed, and save.
For the full Business Unit setup, see [Setting Up Your Business Unit for Laundry].
FAQs
What is the difference between Tax Inclusive and Tax Excluded?
Tax Inclusive means the prices you type into the editor already contain tax. The customer sees one final number, and the tax line on the receipt shows what was already included. Tax Excluded means the prices are net, and tax is added on top at checkout.
My customers are getting taxed twice. What's wrong?
Both Price List tax AND Company Sales Tax are turned on at the same time. Pick one. Go to ⚙️ Settings icon > Administration section > Company, click the three dots, click Edit, scroll to Sales Tax, and turn the toggle off if you want tax controlled by the Price List. Or set Price List tax to "No tax included" if you want tax controlled by Company Sales Tax.
Can one price list cover multiple POS locations?
Yes. In your Business Unit's Catalog section, you can link the same price list to multiple sales channels using All Stores (POS) or by adding multiple channel configurations. If two locations need different prices, create two price lists.
What happens to open orders when I publish a new version?
With version control on, open orders keep the version they were created on. New orders pick up the new version. With version control off, edits flow through to all open orders immediately.
Can I have a Service Item priced differently in two price lists?
Yes. That is the main reason price lists exist. The Service Item is the same record, but each price list attaches its own price for the same Service Option on that item.
Why is a Service Option missing from my Service Item row?
Click the Service Options chip dropdown on the row and tick the option. A Service Option only appears as a price column once you explicitly attach it to the item.
Where does the Online Store get its prices from?
The Online Store reads from whichever price list you link to All Online (or to a specific online store) in your Business Unit's Catalog section. Update the link in your Business Unit and the Online Store picks up the new price list automatically.
What's Next
After publishing, link the price list to your sales channels through [Setting Up Your Business Unit for Laundry]. Manage future revisions through [Manage Price List Versions].
Give feedback
Up next
Manage Price List VersionsEdit prices safely by working on a draft version and only publishing when you are ready, with full history of who changed what and when.
Read more