Configuring Receipt Templates
In this article
A Receipt is a document sent to a customer as official proof of payment. Unlike an Invoice, which asks for payment (Amount Due), a Receipt confirms that the money has already been received (Amount Paid). In EasyBiz Cloud, the tools used to build Receipts are identical to those used for Invoices. You can fully customize the layout, add your logo, and automate when they are sent.
Contents
Contents
Why configure your receipt templates?
A default receipt confirms payment, but a customized template improves the customer experience:
- Professional Image: Add your logo and brand colors to make the proof of payment look official and trustworthy.
- Clear Confirmation: Clearly highlight "Amount Paid" and the payment method so customers know exactly how much was charged and when.
- Reduce Disputes: Display detailed line items and tax info so customers understand the charges without needing to contact support.
Accessing Receipt Templates
Go to Settings > Templates and select the Email card. By default, EasyBiz provides pre-made templates:

Click + Add to create a new Email template based on standard layouts.
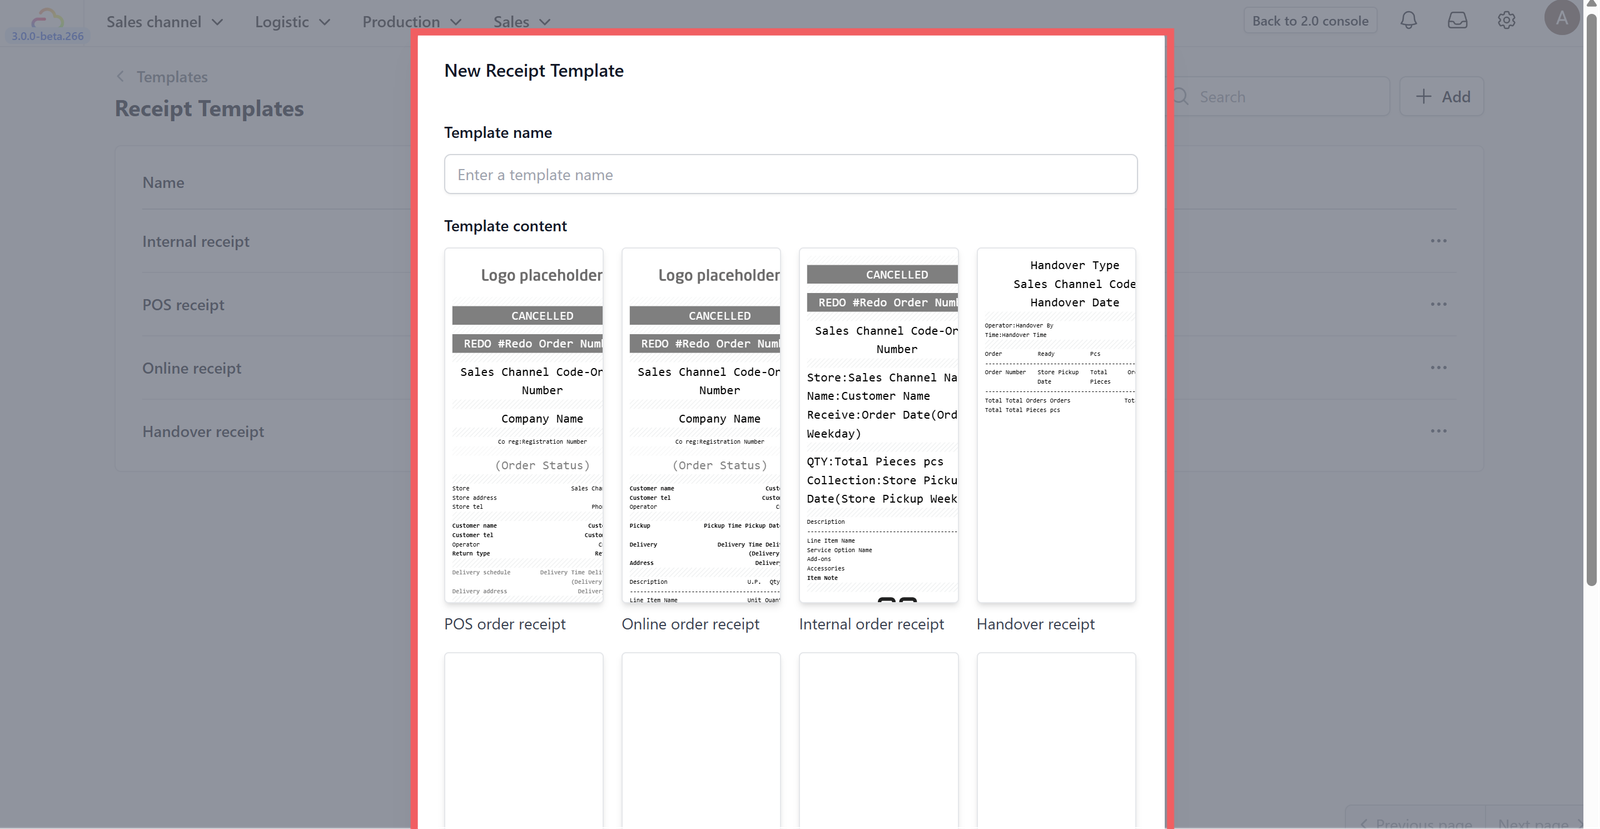
Navigate to the Receipt Template section to find pre-made layouts designed to streamline your operations:
- POS Order Receipt: The standard receipt printed for in-store purchases at the Point of Sale.
- Online Order Receipt: A digital receipt format sent to customers who order via the web or app.
- Internal Order Receipt: A layout designed for kitchen staff or warehouse teams to process orders.
- Handover Receipt: A document used to confirm delivery or customer pickup.

Once you have chosen the template, don't forget to click Create.
Layout Configuration

Use the left-side panel to configure the global settings for your receipt template.
- Date Format: Choose how the date appears.
- Time Format: Select between a 12-hour (01:00 PM) or 24-hour (13:00) clock.
- Currency Display: Control if the price shows the narrow symbol ($), code (SGD), or no symbol.
- Select Order to Preview: Choose a real order from your history to see how the design looks with actual data.
Customizing the Design

You can insert dynamic data that changes for every order by typing the @ symbol. This reveals a dropdown list of common variables, including:
- Line Item ID: The unique system code for the product.
- Line Item Product ID: The reference ID for the specific product variant.
- Item Index: Numbers the items in the list (1, 2, 3...).
- Line Item Name: The name of the product or service.
- Label Indexes: The category or group number the item belongs to.
- Item Note: Special instructions added by the customer or staff.
- Measurement: Displays weight, volume, or size (e.g., kg, liters).
- Item Status: Shows if the item is Pending, Ready, or Delivered.
- Quantity: The number of units ordered.
- Unit: The unit of measure (e.g., "pcs", "box").
- Unit Price: The cost of a single item.
- Line Total: The total cost for that line (Quantity x Unit Price).
- And others...: Scroll down the dropdown list to access many more variables available for your store.
Block Settings

Business Logo
This block displays your company logo at the top of the receipt to ensure brand recognition.
Select this block to adjust its properties:
- Image Width: Select a size from the dropdown to control how big the logo appears.
- Top Margin: Adds blank space above the logo to separate it from the paper edge.
- Conditional Display: Set rules to hide this block based on specific order criteria.

Text
This block allows you to insert written content. You can combine static text (like "Thank You") with dynamic variables (like @Customer Name) to personalize the message.
Select this block to adjust its properties:
- Font Size: Adjust the text size for better readability.
- Top Margin: Adds spacing above the text block.
- Booking Date Shift: Adjusts the displayed date relative to the actual booking time.
- Conditional Display: Hides the text block if specific conditions are met.

Text Columns
This block allows you to display information side-by-side.
Select this block to adjust its properties:
- Text Columns: Click here to set the number of columns, their width, and text alignment.
- Column Gap: Controls the empty space between the columns.
- Font Size: Sets the size of the text within the columns.
- Top Margin: Adds spacing above the column block.
- Booking Date Shift: Adjusts the displayed date for booking-related items.
- Conditional Display: Hides the columns based on specific rules.

Line Items
This block generates the list of orders made. It automatically repeats for every item in the order.
Select this block to adjust its properties:
- Text Columns: Define which data points appear in the list.
- Column Gap: Adjusts the spacing between the item details.
- Font Size: Controls the readability of the product list.
- Currency Display: Sets how prices appear within the list.
- Date/Time Format: Sets the format for any dates shown inside the item list.
- Top Margin: Adds spacing above the list.
- Booking Date Shift: Adjusts dates for service-based items.
- Conditional Display: Hides the list if the order has no items (rare).
Quick Actions Toolbar

When you select a block, a floating toolbar appears above it for fast adjustments:
- Duplicate: Creates an exact copy of the selected block.
- Alignment: Cycles the block's position.
- Block: Opens the specific settings for that block type.
- Invert Mode: Toggles the color scheme.
- Move Block: Drag the block to a new position on the receipt.
- Delete Block: Permanently removes the block.
- Insert Sibling Block Below: Adds a new block immediately after the selected one.
Previewing and Publishing the Template
Before finalizing your template, ensure that dynamic data appears correctly.

Click the Select order to preview bar at the top and select a real order to test how your layout handles actual data.

The system will generate a realistic preview, showing exactly how the receipt looks. When ready, click the Publish button to publish your draft version.
Click Publish again.

Your template is now Active on the main list; click the three dots (...) menu to edit, rename, duplicate, or delete it.
Enabling Receipts to Business Units
Once your template is designed, you must enable it for your store.

Click on your Profile Icon in the top right corner and select Business Unit from the menu.

Choose the specific Business Unit (store) you want to update and click to the Receipts section.

1 & 2. Assign your new template to the relevant category (e.g., POS Receipt or Online Order Receipt).
3. Click Update to save your changes.
Give feedback

Up next
WhatsApp IntegrationEverything you need to connect WhatsApp to your EasyBiz console, set up your business profile, and start communicating with customers professionally.
Read more