
Every order your counter takes ends with the customer getting their items back: collected at your shop, or delivered to their door, with a date your staff can keep.
Before You Start
- A POS shop and app that your staff already sign in to. See Setting Up a New POS Shop.
- At least one business unit, such as Laundry or Bag Repair. A business unit is one line of service in your shop, with its own prices and order steps. See Introduction to Business Units.
- Owner or admin access to ⚙️ Settings in the Console.
This article pulls the setup together in order and links to the full guide for each part. You don't need to read those guides first.
Choose your setup
| Level | Fits shops like | What you set up | Read these sections |
|---|---|---|---|
| Easy | One shop where customers drop off and come back, and staff tell them the ready day by word of mouth | Store pickup switched on. No dates | What your POS does without a date, Step 1: Switch on Store pickup and Home delivery |
| Intermediate | Shops that promise a ready date on every order, with a faster Express option for an extra charge | Everything in Easy, plus a shop booking option | Step 2: Give store pickup a collection date, Seeing what's due each day |
| Advanced | Shops that also deliver finished orders to customers' homes, only in the areas their drivers cover | Everything in Intermediate, plus Home delivery, a home delivery booking option with time windows, and service areas | Step 3: Give home delivery dates and time windows, Step 4: Limit where you deliver |
The Easy path works on its own. Your POS takes, charges and hands over orders as normal. You can add dates and delivery later without changing any order you already took.
Overview
Every counter order needs a way back to the customer. Store pickup means the customer comes back to your shop to collect. Home delivery means your driver brings the order to the customer's address. You choose which of these each business unit offers, and you can give each one a date so staff promise a ready day, and customers know when to come or when to expect the driver.
Where it works
- POS: staff see a Delivery / Pickup row in the cart, under the items, and can change it for each order.
- Console: the same choice appears when staff create an order in the Console.
- Online Store and Mobile App: Home delivery, once switched on, is also used for online orders. Customers pick a delivery date and time when they book.
- EasyBiz app: your drivers see the deliveries booked at the counter.
What your POS does without a date
Your POS keeps working at every stage of this setup. What changes is how much the order records about when, and how, the customer gets it back.
| What you have set up | What staff see in the cart | What happens to the order |
|---|---|---|
| Nothing switched on under Completion & Handover | No Delivery / Pickup row | Staff take and charge the order as normal. It has no Ready for Collection or Order Completed step, so there is nothing to hand over at the end |
| Store pickup on, no shop booking option | Store pickup with the shop's name, but no date and no calendar | Staff take and charge the order as normal, and hand it over when the customer collects. No ready date is saved, so the order doesn't show on the Collection page |
| Store pickup on, with a shop booking option | Store pickup with a date, for example 26 Oct | The ready date is saved on the order. Staff see it in the order list and on the Collection page |
| Home delivery on, no home delivery booking option | Home delivery can be ticked, but no dates appear | Staff can't confirm a delivery, because a delivery always needs a date. The order stays on Store pickup |
Why set it up
- A date your staff can keep. The POS fills in the earliest ready date for you and skips the days you are closed, so nobody promises a Sunday.
- Extra charges are never forgotten. An Express option or a delivery fee is added to the bill on its own when staff pick that date.
- Everyone knows what's due today. Staff open the Collection page in the morning and see which orders must be ready, instead of searching shelves or receipts.
- Deliveries go to your drivers. A delivery booked at the counter is sent to the EasyBiz app, with the customer's address, date and time window.
- No deliveries to places you don't serve. Staff can only book a delivery to an address inside your areas.
If you skip it, staff write the ready day on the receipt or remember it, and customers call to ask whether their order is ready.
Step 1: Switch on Store pickup and Home delivery
Each business unit decides how its orders get back to the customer. Do this for every business unit you sell at the counter.
- Click the ⚙️ Settings icon in the top-right corner.
- Under the Company & business structure section, click Business Units.
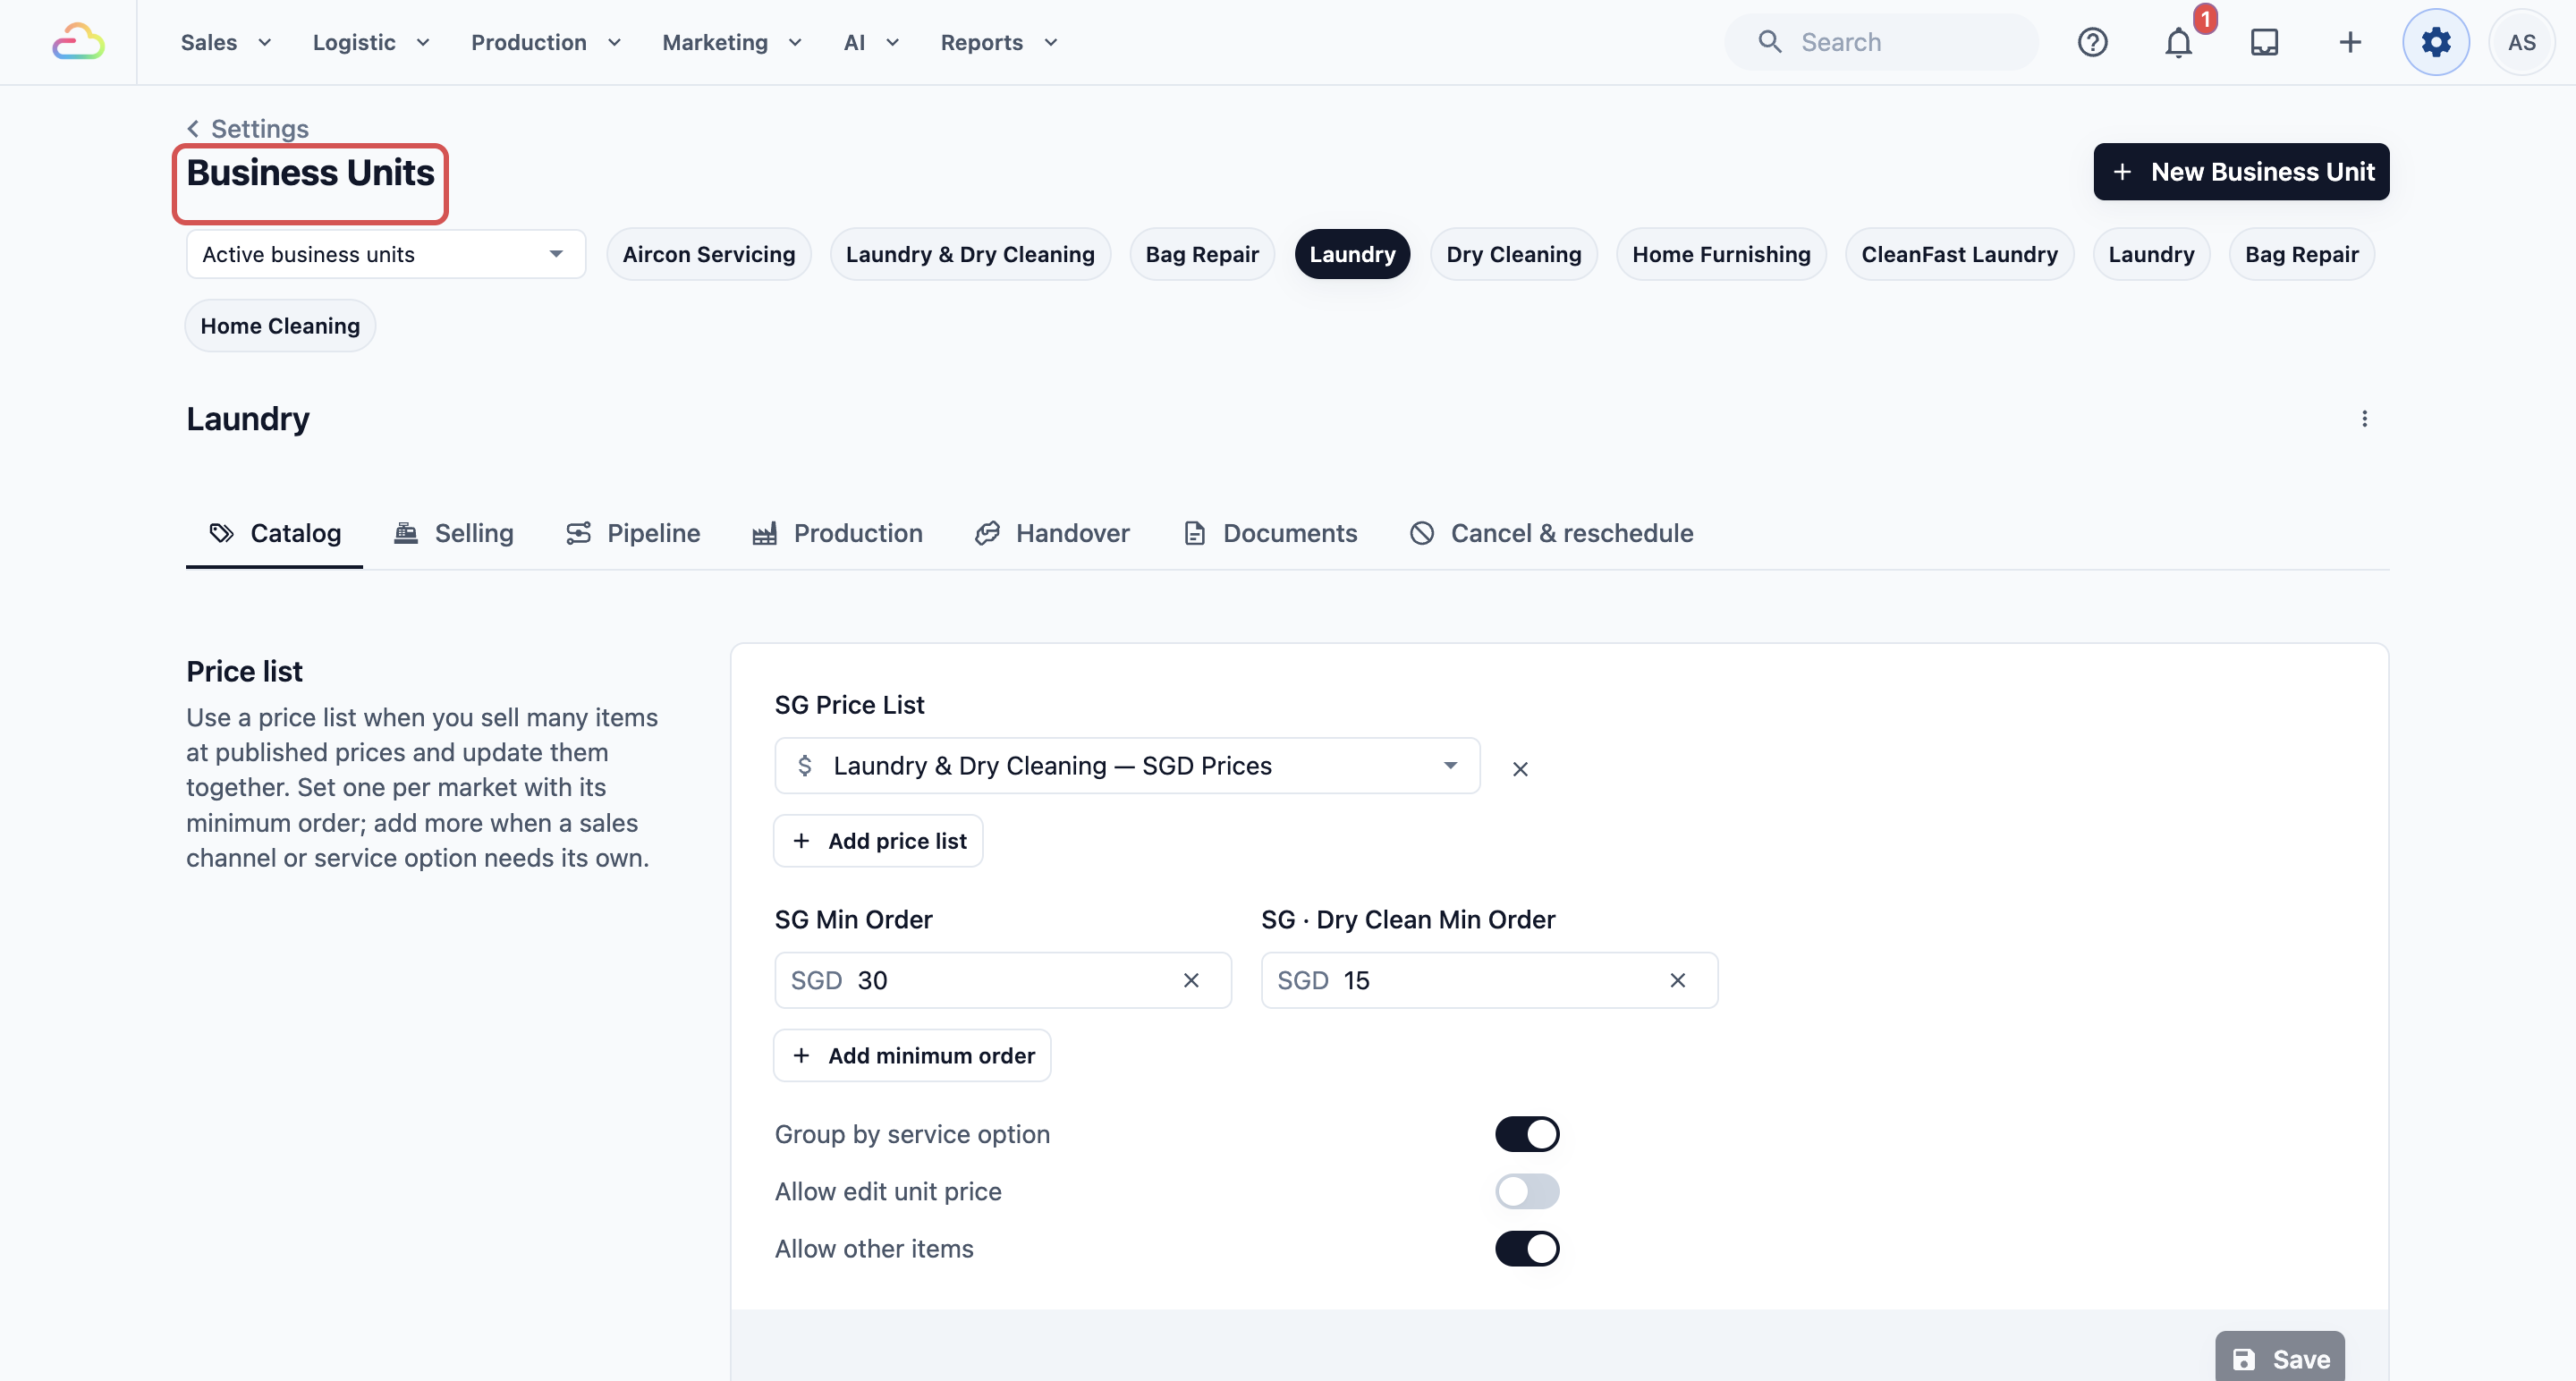
- At the top of the page, click your business unit, for example Laundry.
- Click the Pipeline tab.
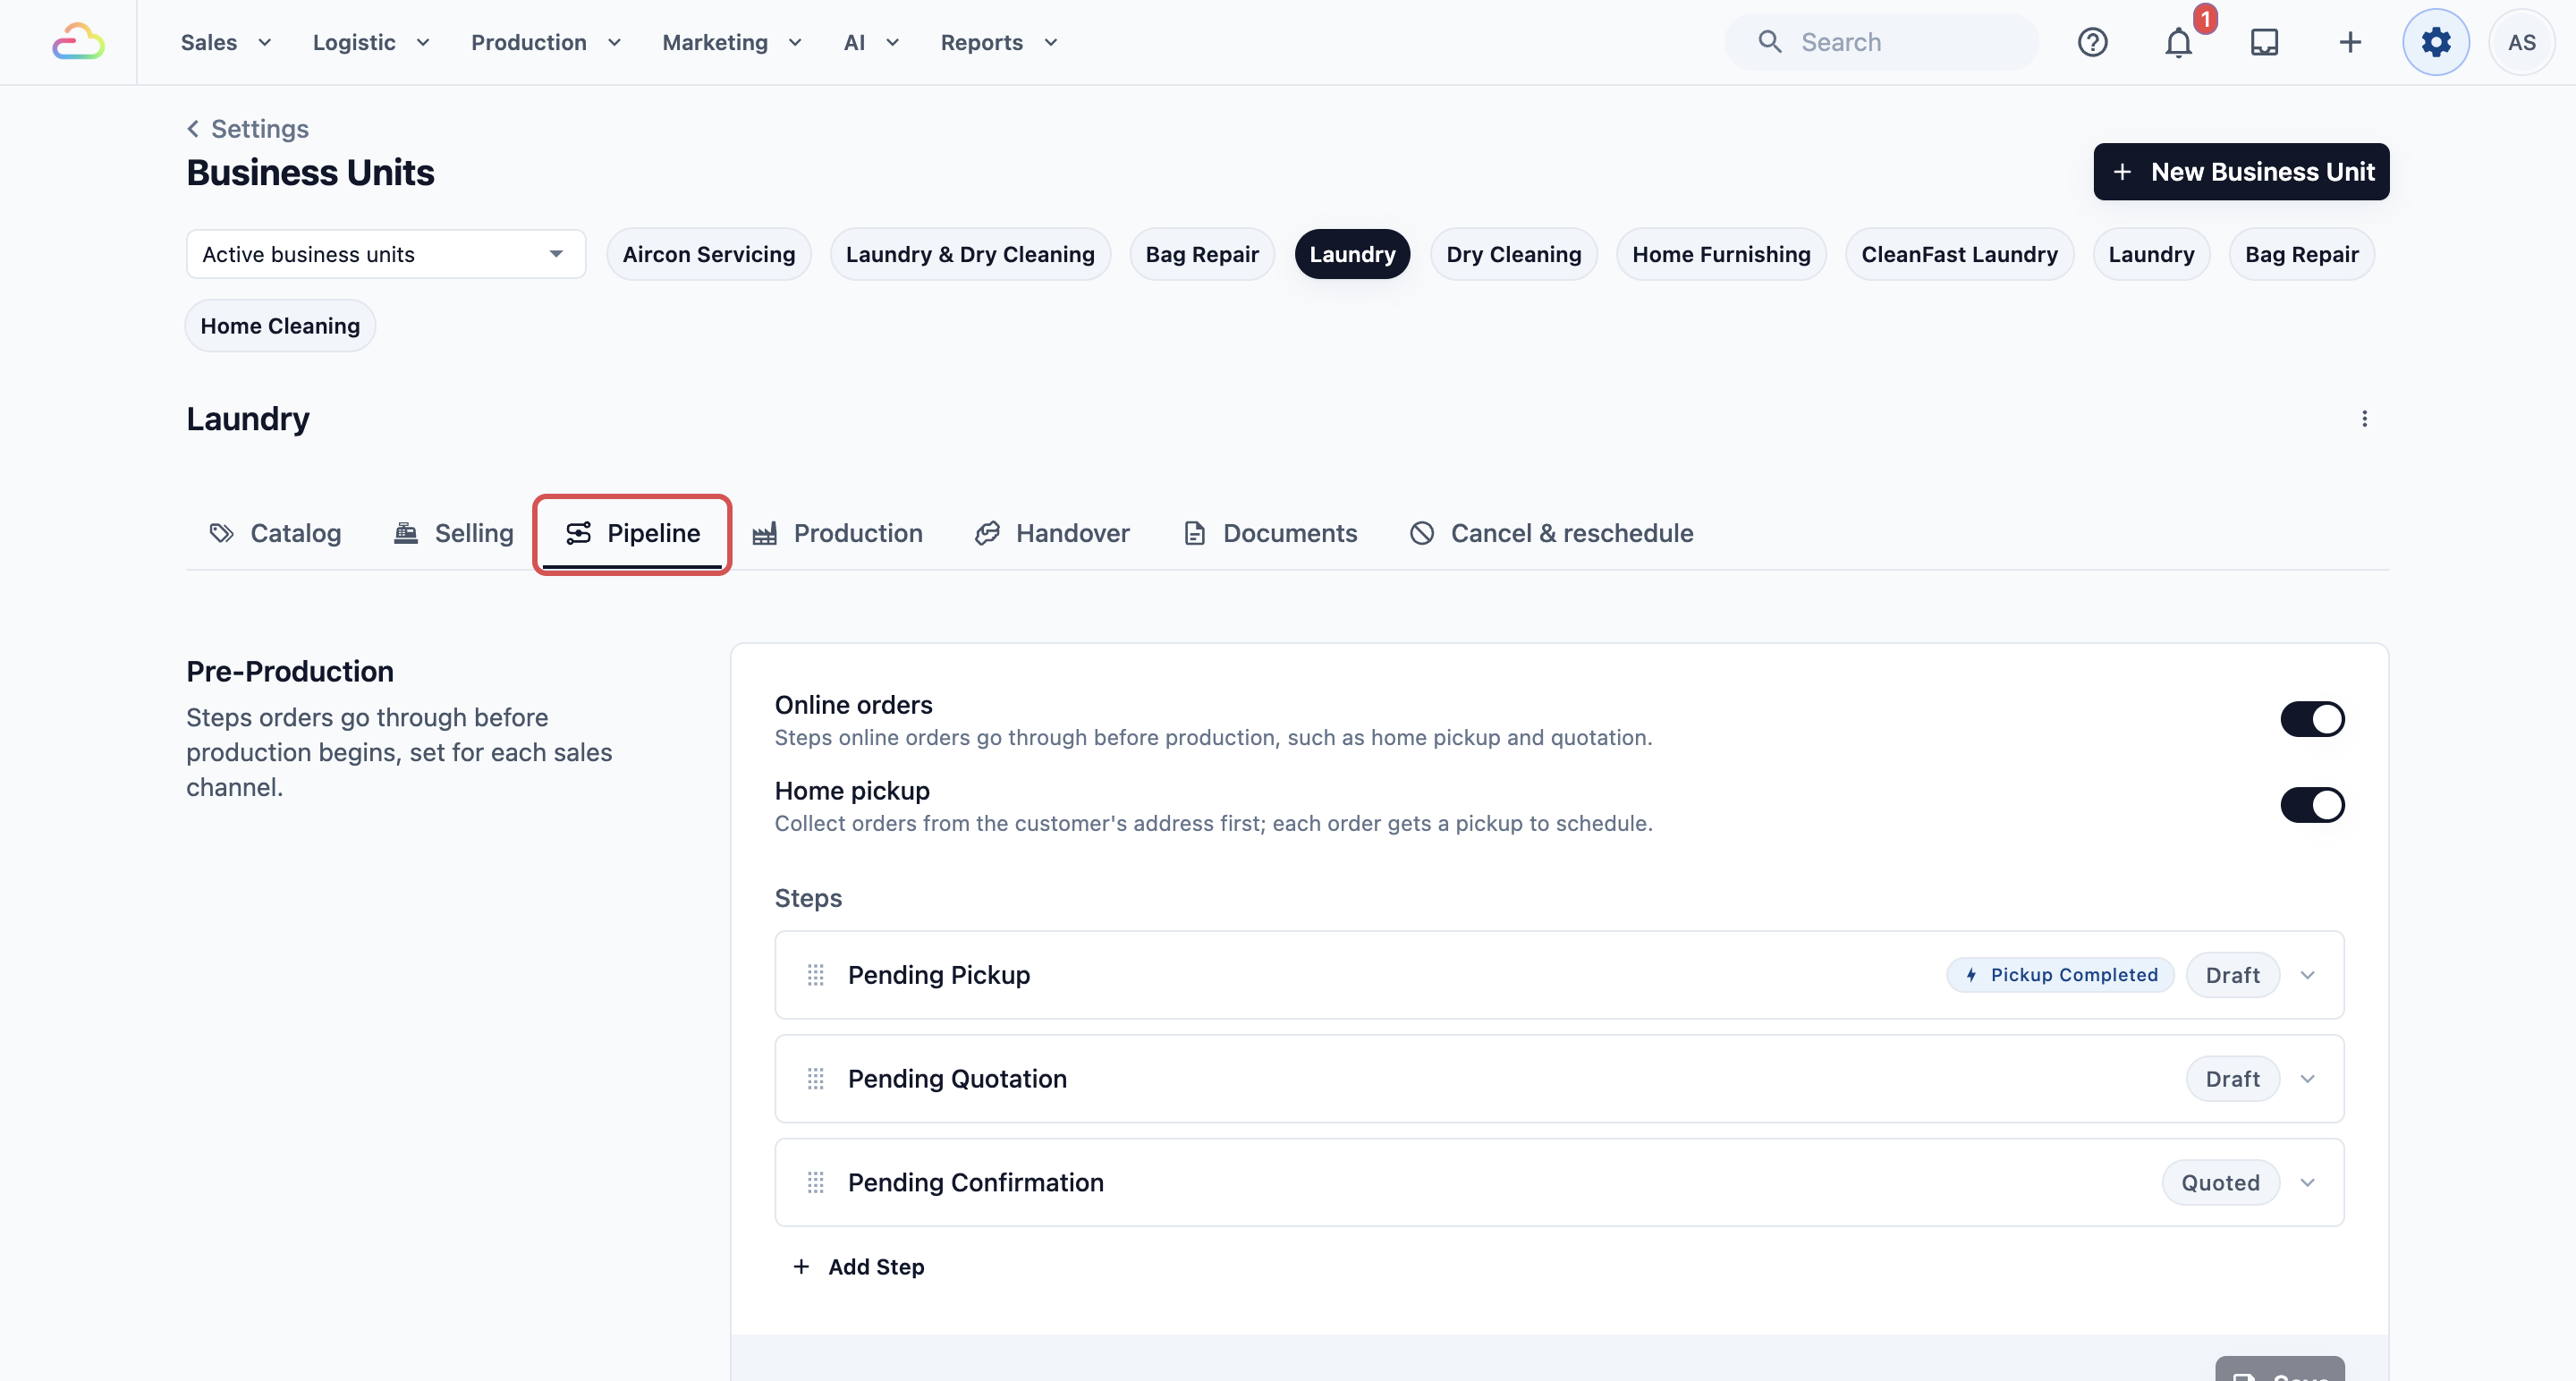
- Scroll down to the Completion & Handover section.
- Turn on Store pickup, Home delivery, or both.
- Click Save in each card you changed. Each method has its own Save button.
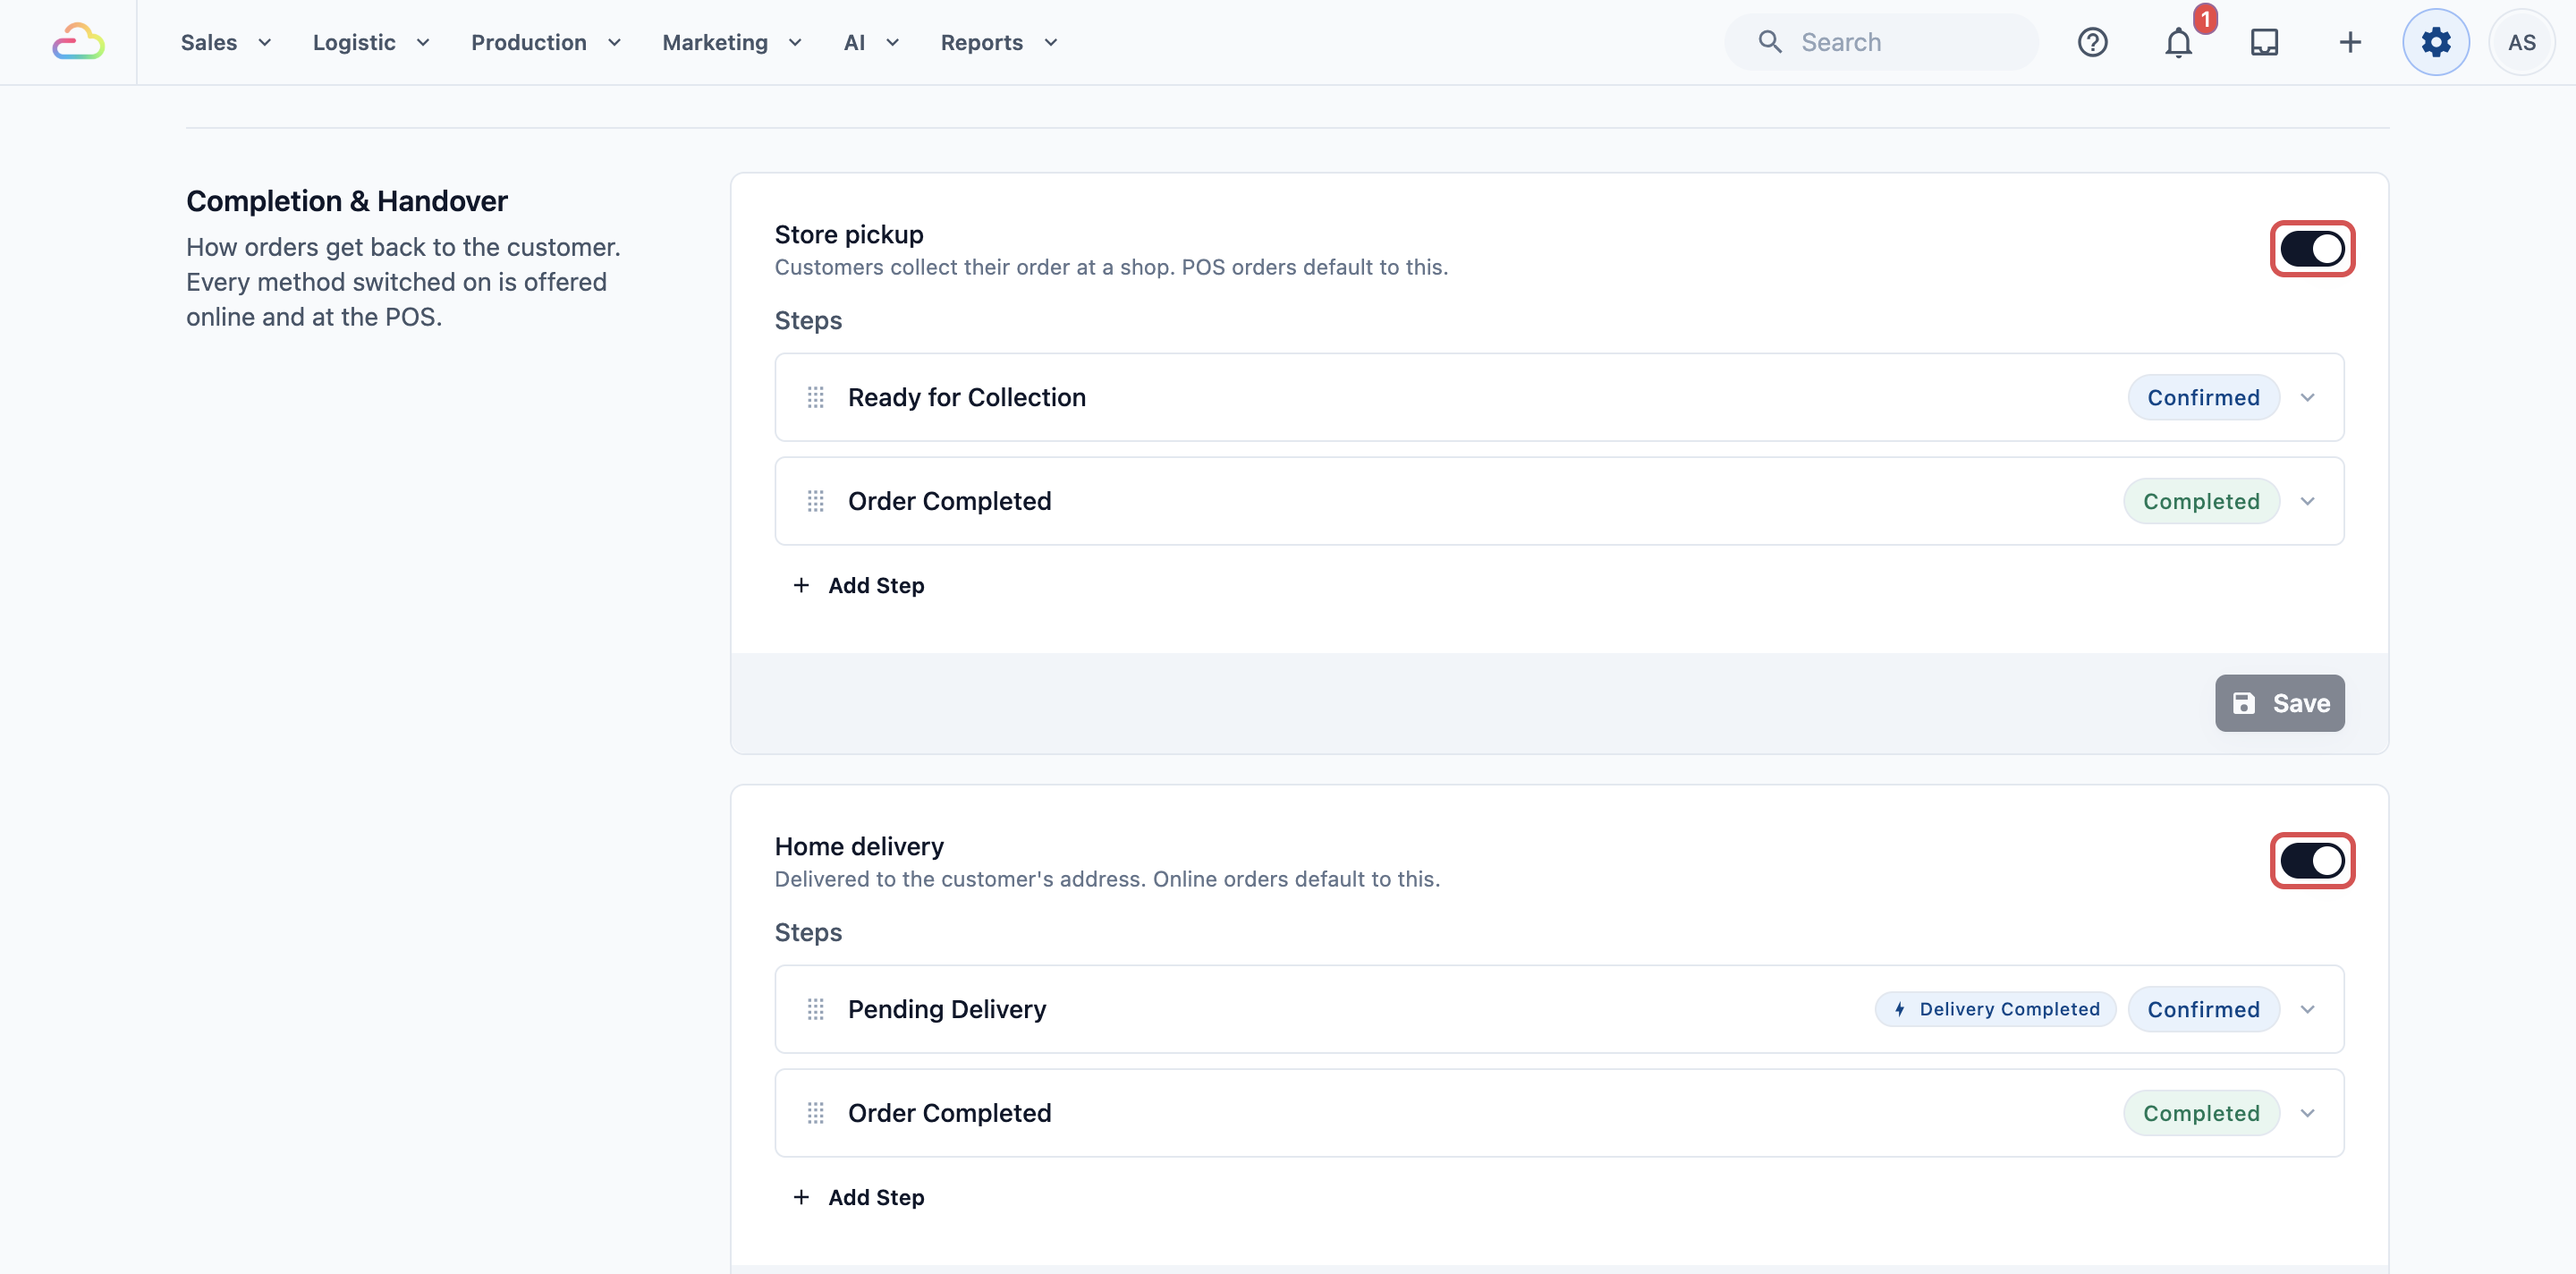
If you turn on only Store pickup, every counter order is collected at a shop. If you turn on both, Store pickup is already selected in the cart, and staff switch to Home delivery when a customer asks for it.
The steps each method adds, such as Ready for Collection and Pending Delivery, are covered in Setting Up Completion and Handover.
Step 2: Give store pickup a collection date
For Intermediate and Advanced setups:
A shop booking option tells the POS how long your shop needs before an order is ready. The POS then fills in the earliest collection date on each order.
- Click the ⚙️ Settings icon in the top-right corner.
- Scroll down to the Scheduling & dispatch settings section and click Bookings.
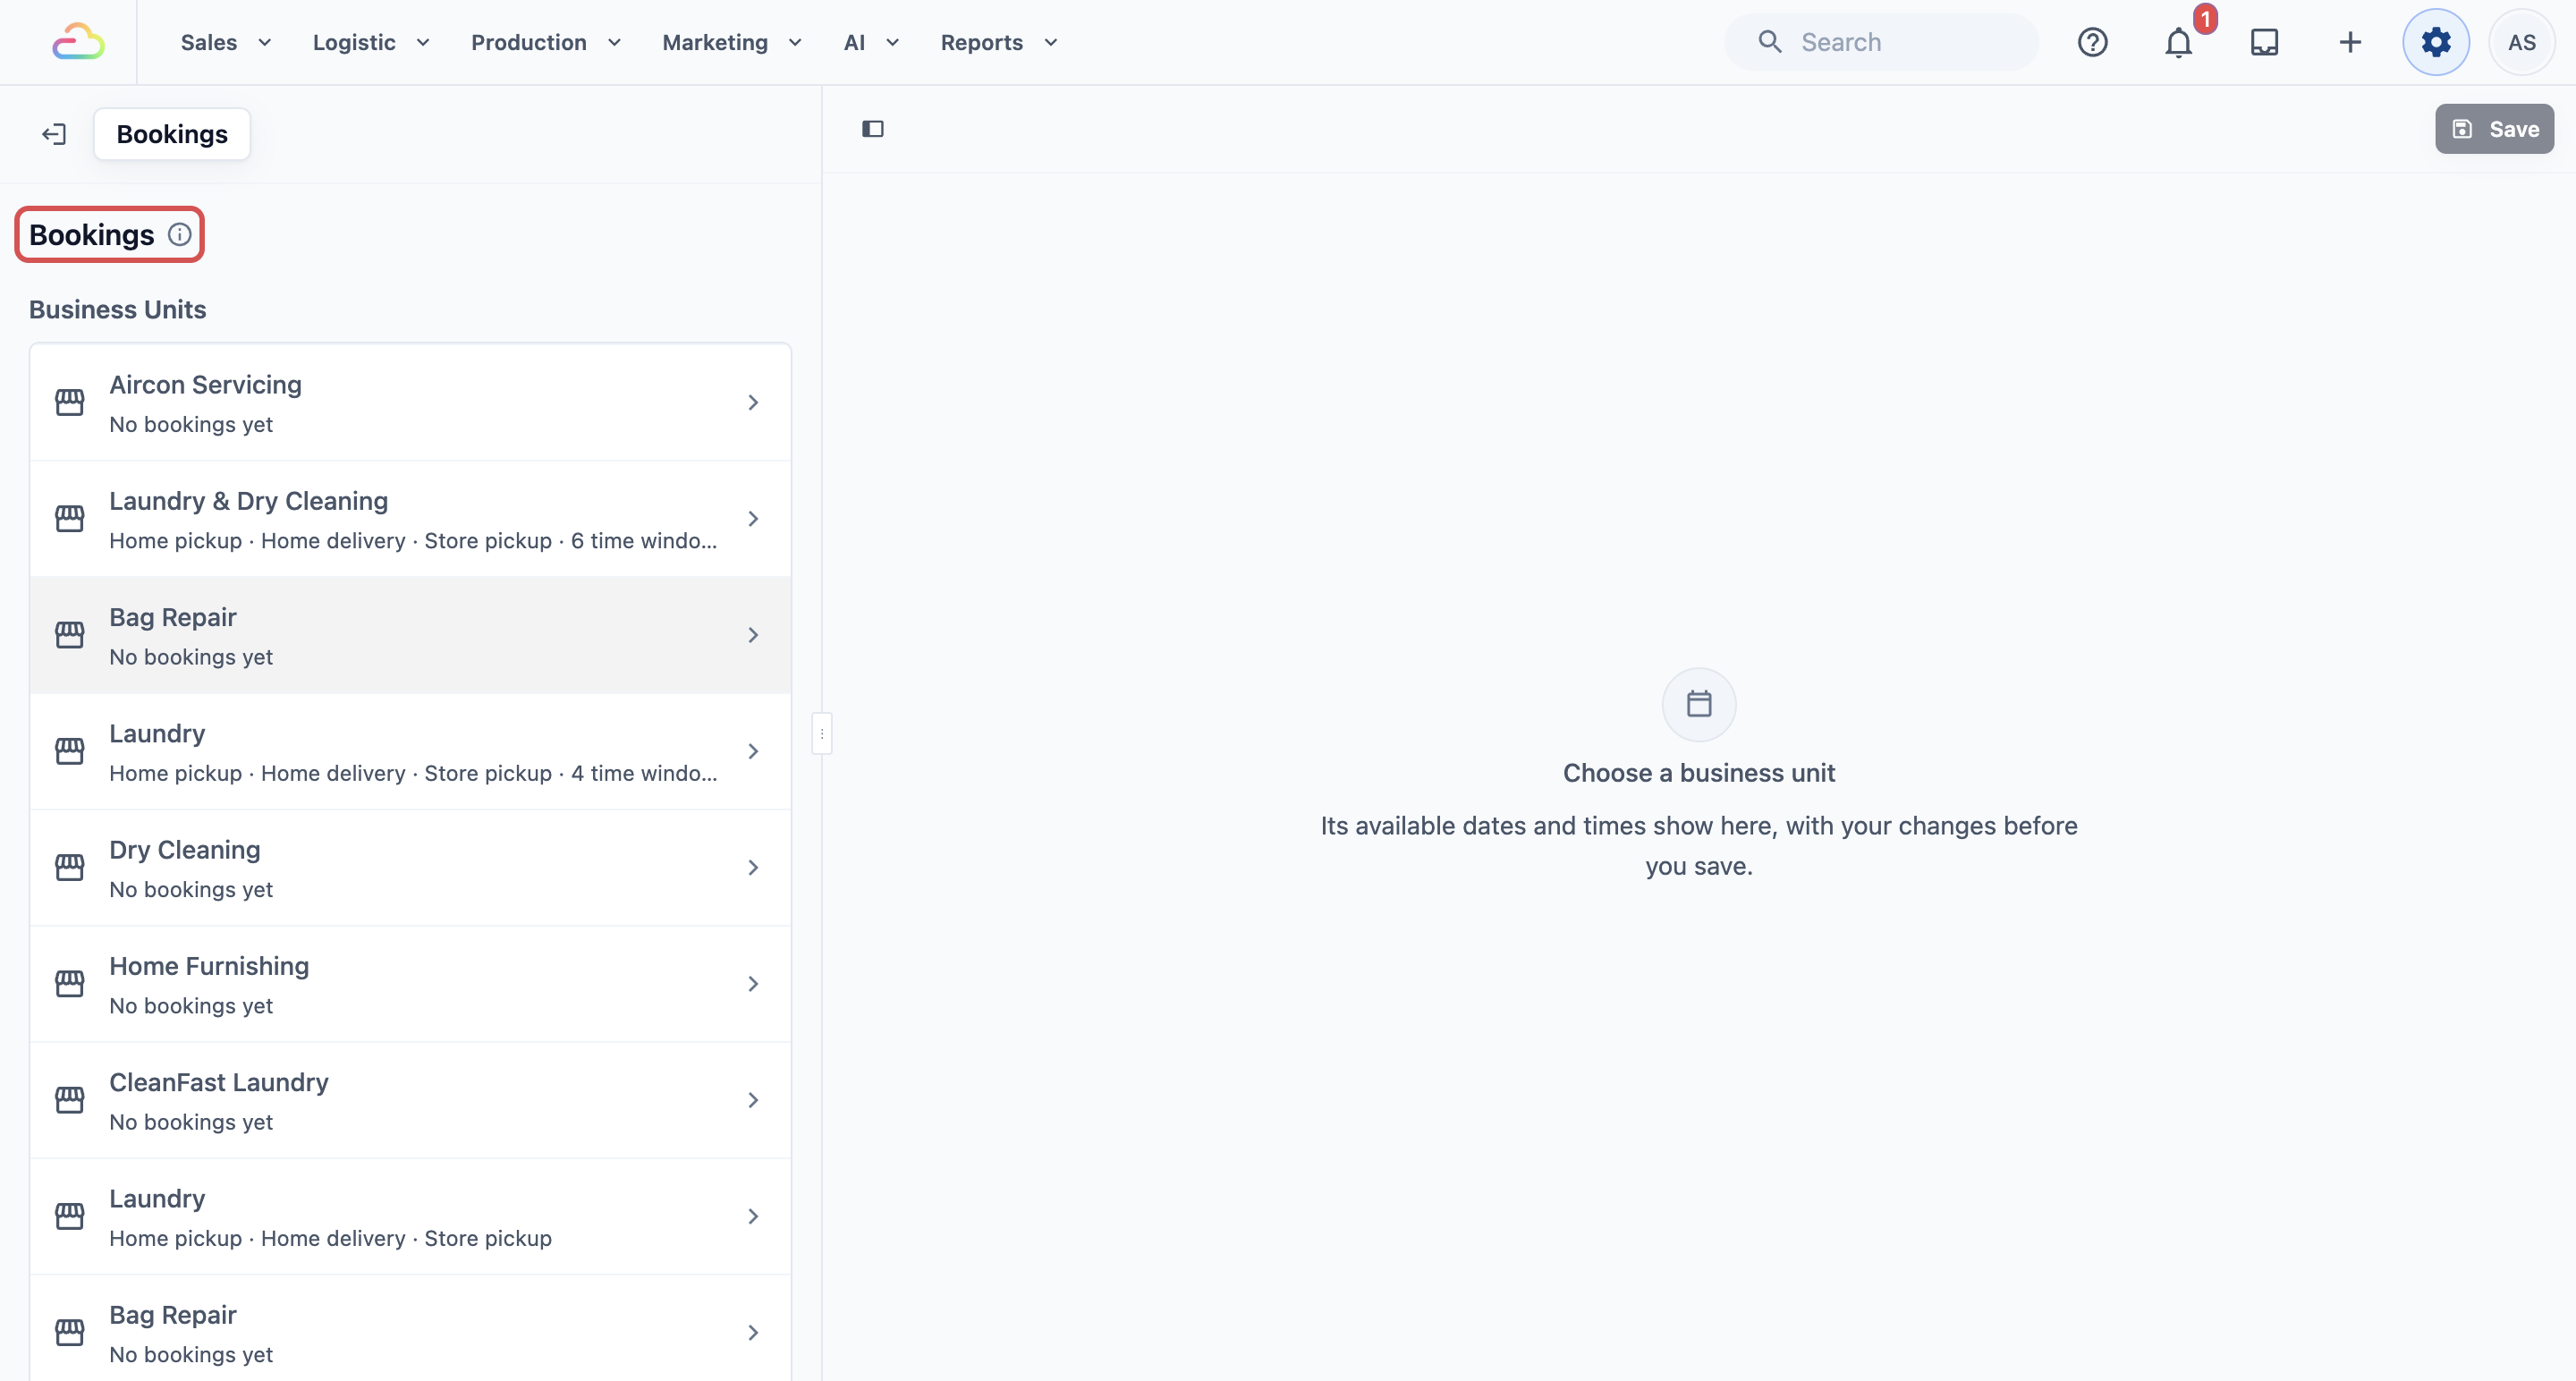
- Under Business Units, click your business unit, for example Laundry.
- Under Shop booking options, click Add booking option.
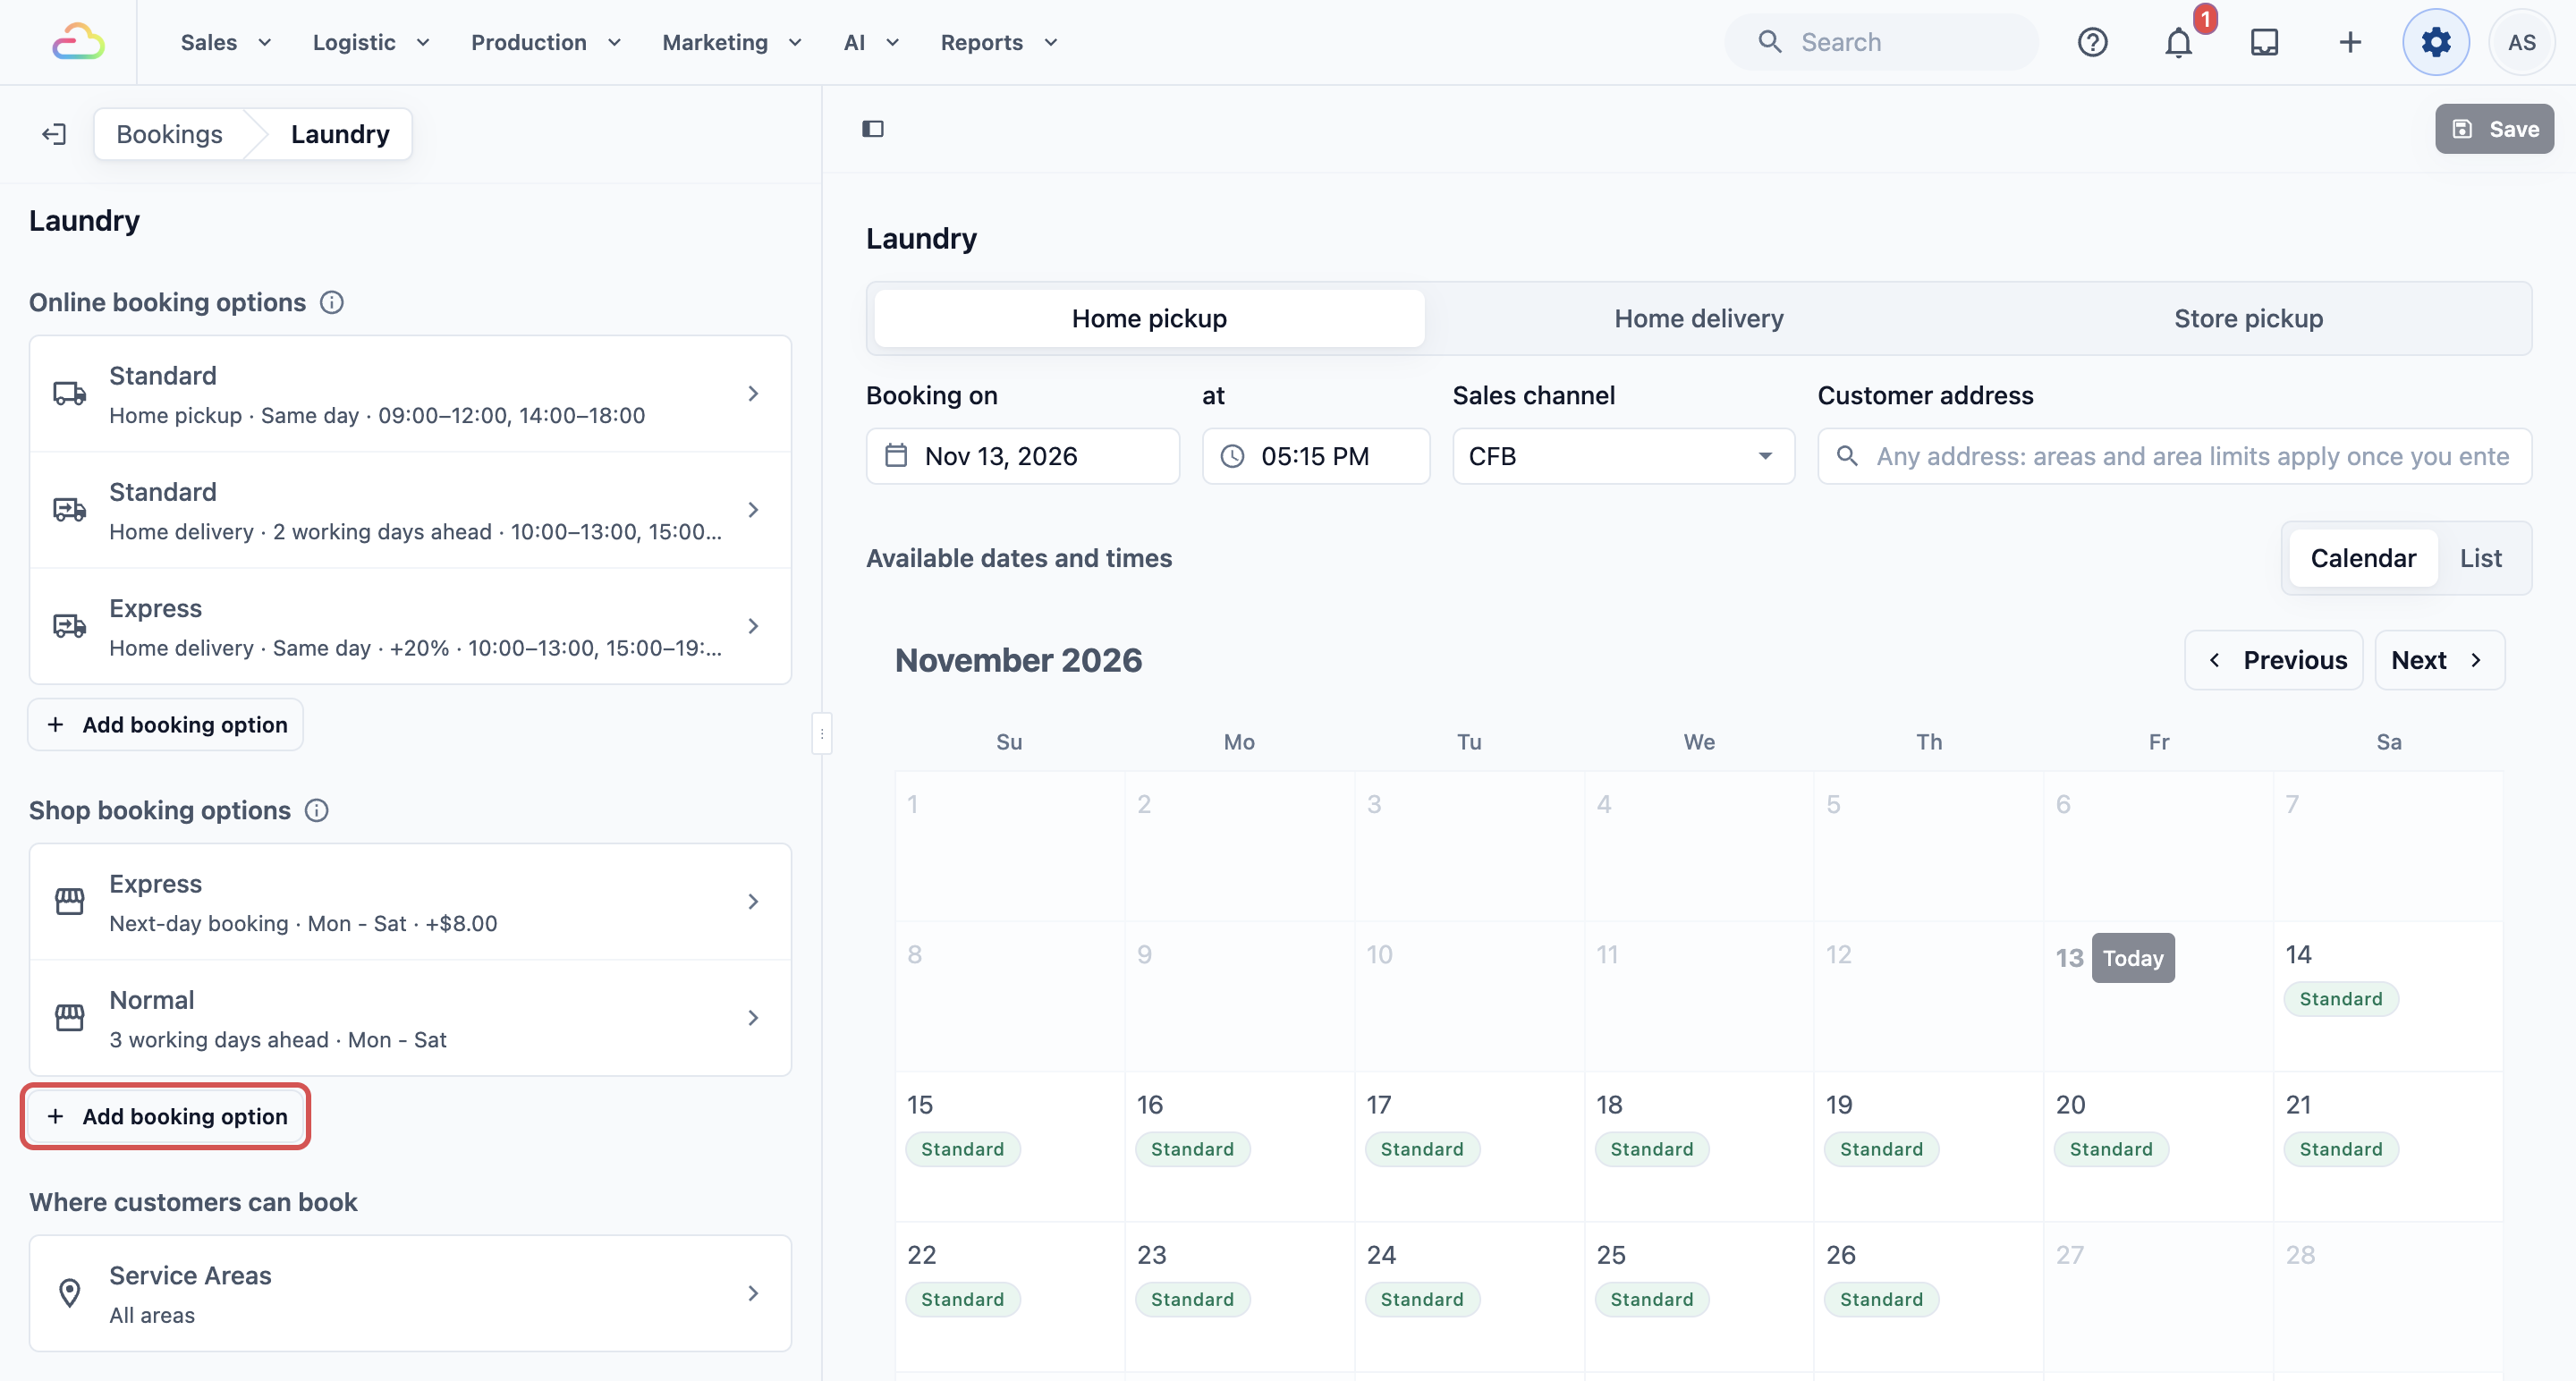
- Fill in the option name, lead time and the days customers can collect, then click Save.
Every setting, including Express options with an extra charge, is explained in Setting Collection Dates for Store Pickup (Shop Booking Options).
Step 3: Give home delivery dates and time windows
Use this only if you deliver.
A delivery always needs a date, so Home delivery needs its own booking option. This is separate from the shop booking option in Step 2.
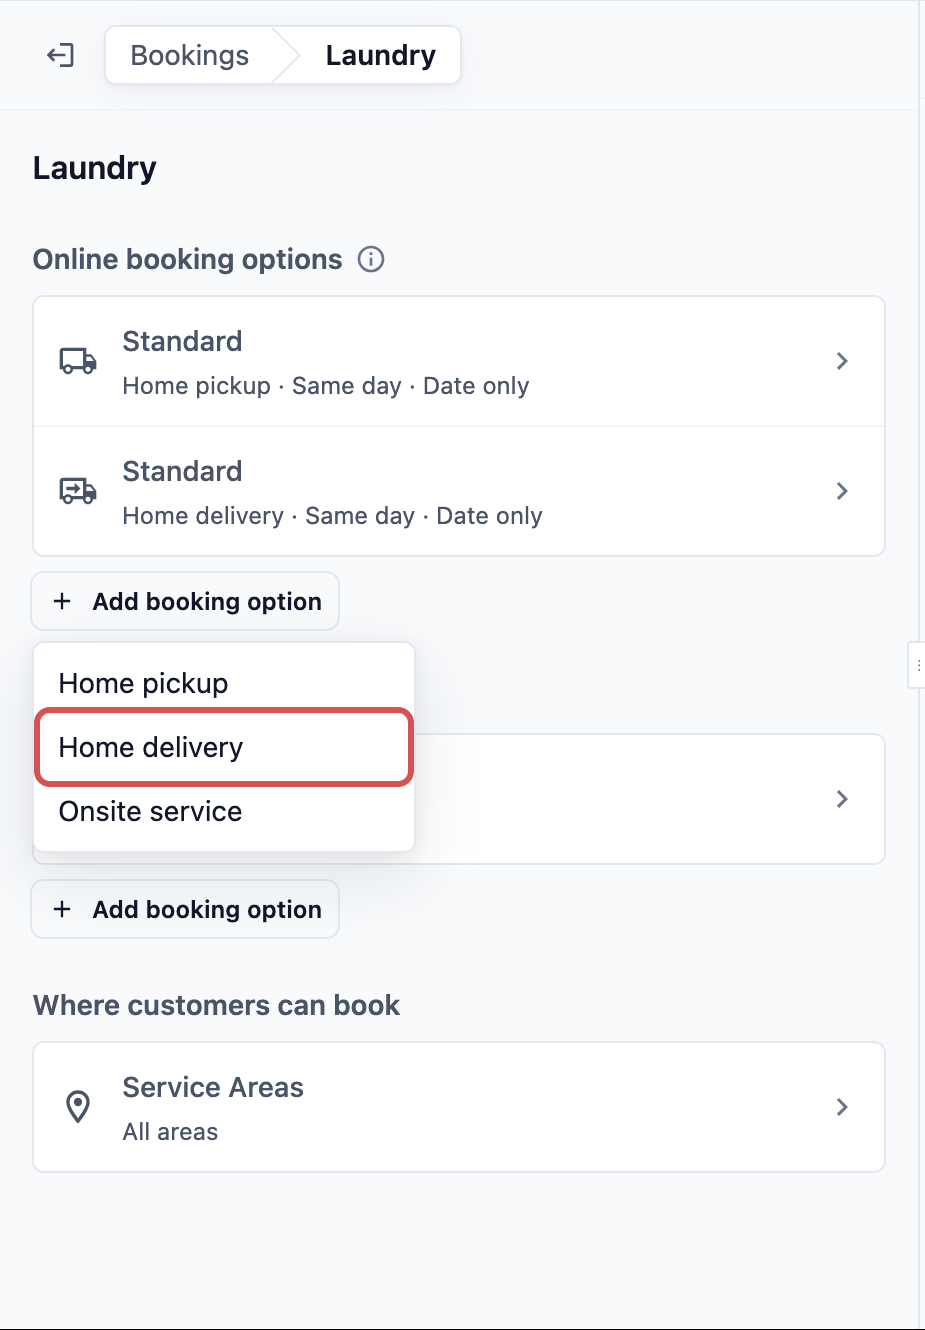
- On the same Bookings page, under Online booking options, click Add booking option.
- Click Home delivery.
- Fill in the option name, lead time and the days you deliver, then click Save.
- Add time windows, such as 9:00 AM to 12:00 PM, so customers know when to expect your driver.
Each setting is explained in Setting Up Online Booking Options, and time windows in Setting Up Time Windows and Daily Limits.
Step 4: Limit where you deliver
Use this only if your drivers don't cover your whole city.
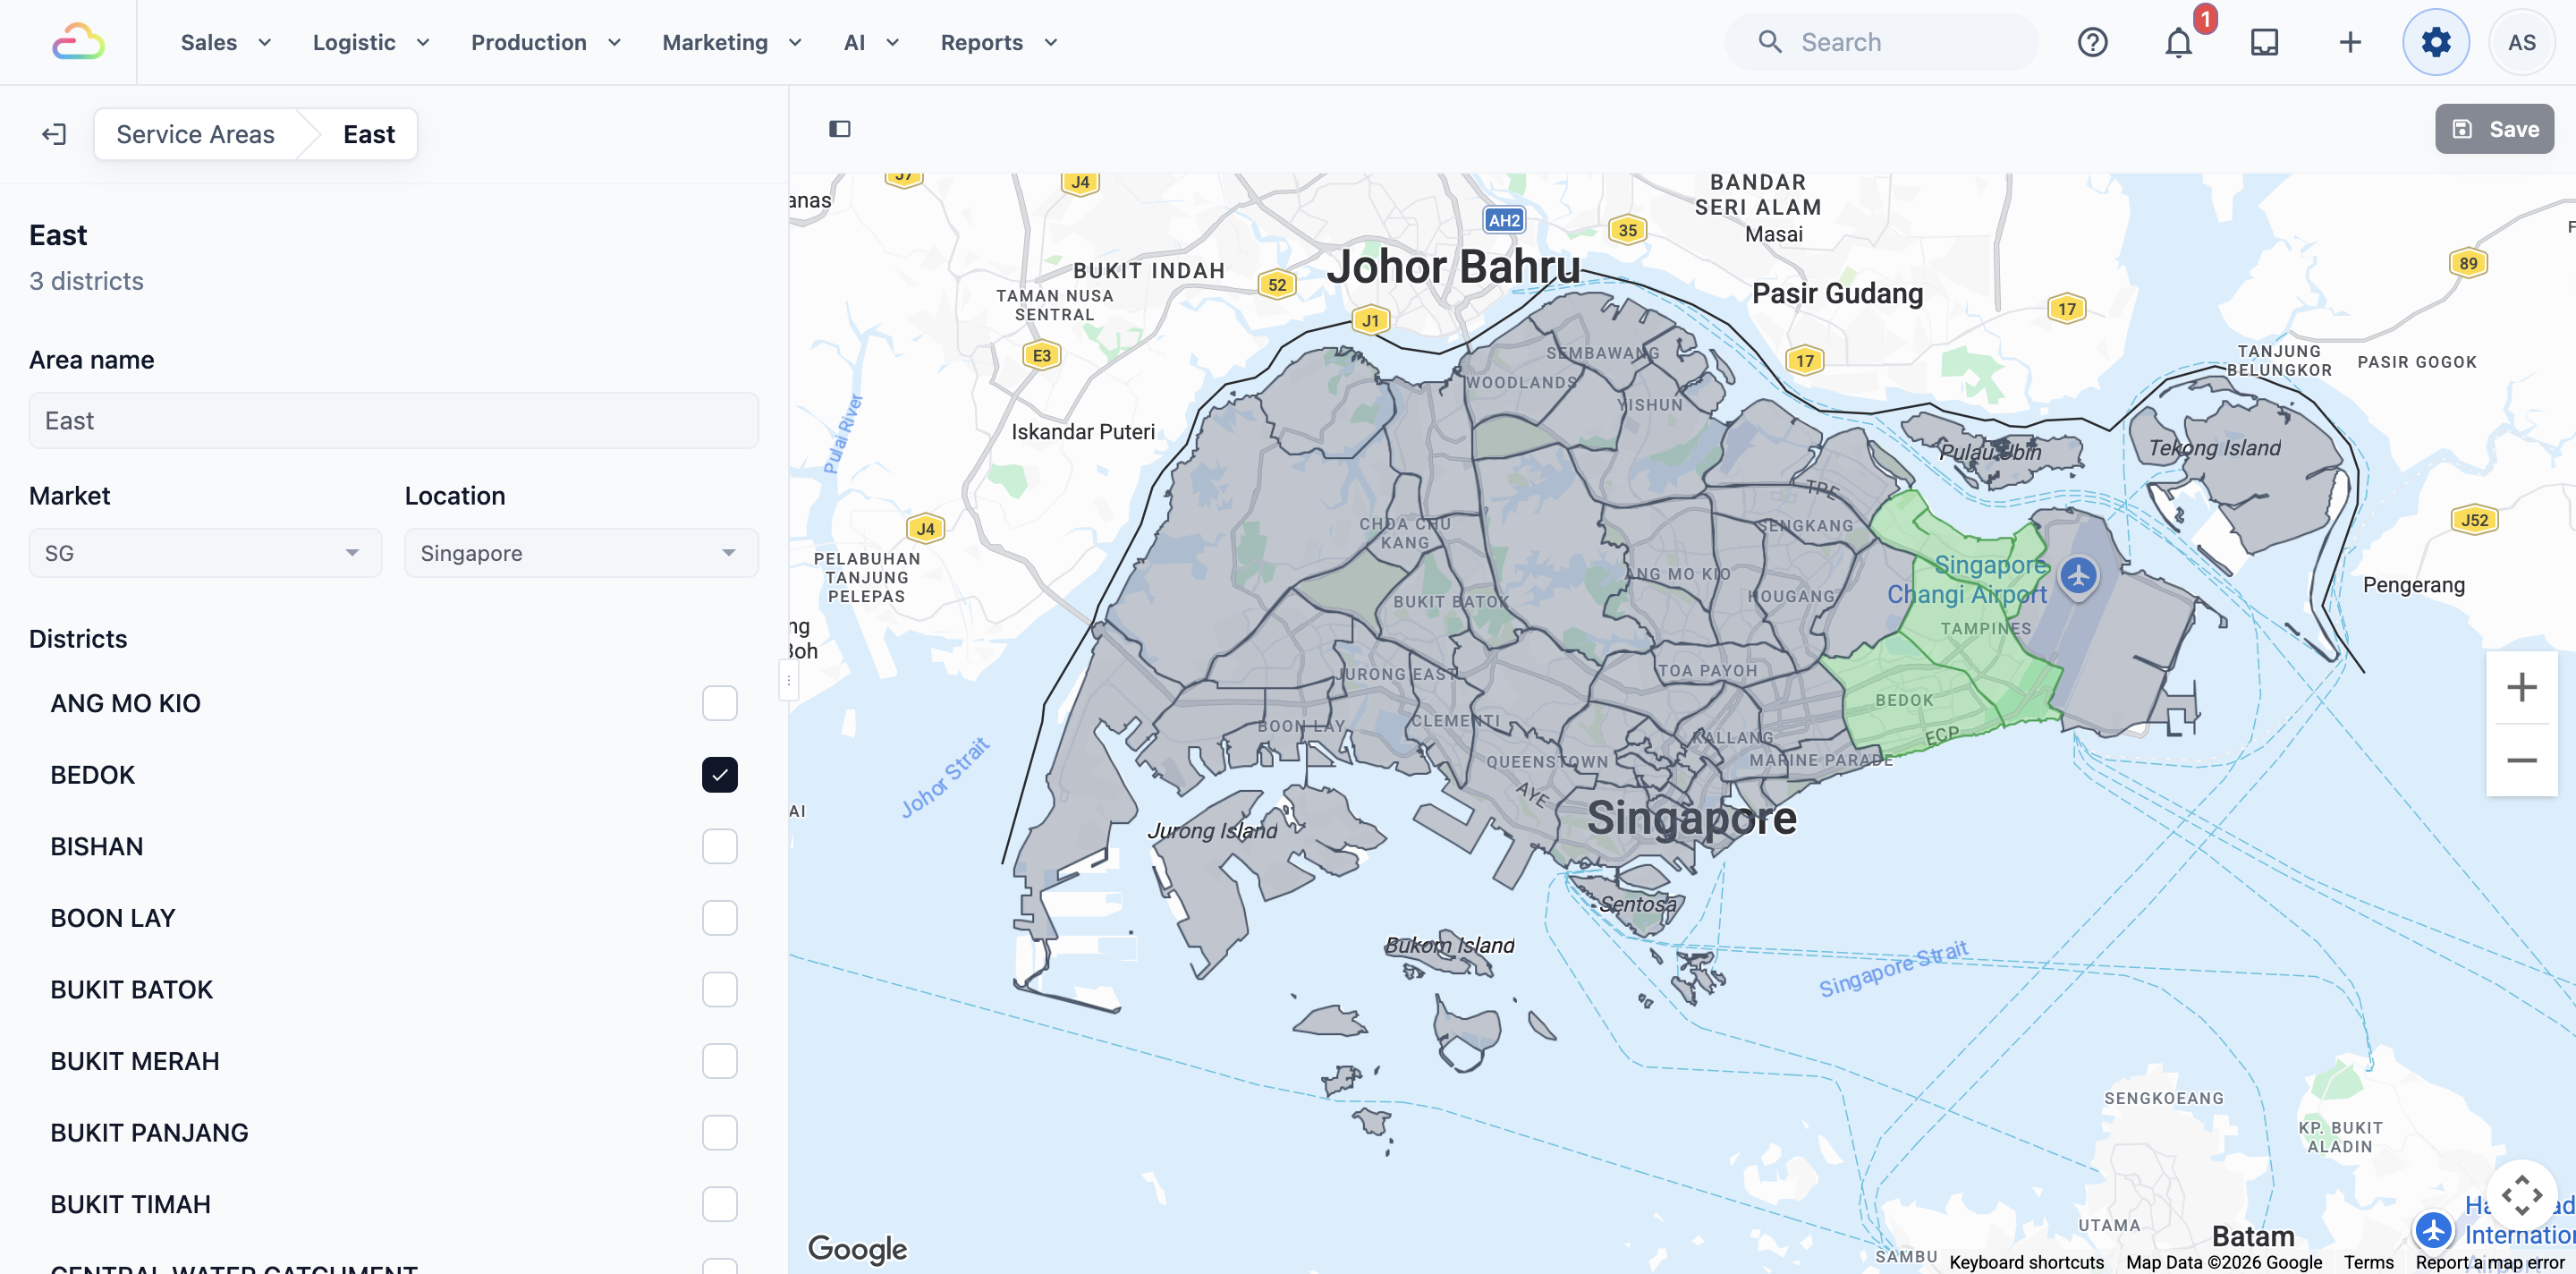
Service areas are the parts of your city you agree to serve, such as East or Jurong. When staff book a home delivery at the POS, the customer's address must be inside the business unit's areas. If it isn't, no dates or times appear, so staff can't promise a delivery your drivers won't make.
- Draw your areas on the Service Areas page. See Setting Up Service Areas.
- Choose which areas each business unit serves, and its minimum order. See Choosing Where Each Business Unit Takes Bookings.
If you skip this, staff can book a delivery to any address in your city.
Example setup
CleanFast Laundry has POS shops in Tampines and Jurong. Most customers drop off and collect. Regular customers in the east can ask for delivery.
| Part | CleanFast's setting |
|---|---|
| Laundry › Completion & Handover | Store pickup on, Home delivery on |
| Shop booking option | Normal: 3 work days, Monday to Saturday. Express: next day, SGD 8 extra |
| Home delivery booking option | Standard Delivery: 3 work days, time windows 9:00 AM to 12:00 PM and 2:00 PM to 6:00 PM |
| Service area | East |
A customer drops off 5 shirts at Tampines on Wednesday 21 October. The cart shows Store pickup at Tampines with Monday 26 October already filled in. She needs them sooner, so staff tap the row and pick Thursday 22 October:
- 5 shirts at SGD 4.00: SGD 20.00
- Express: SGD 8.00
- Total: SGD 28.00
A regular customer in Bedok asks for delivery. Staff tick Home delivery, pick a date and a time window, and the driver sees the job in the EasyBiz app. A customer in Jurong West asks for the same, but her address is outside East, so no delivery dates appear and staff offer collection instead.
What staff see on the POS
After you save, close and reopen the POS. The Delivery / Pickup row sits in the cart, under the items and above the totals. It shows a shop icon for Store pickup or a house icon for Home delivery, with the date when there is one.
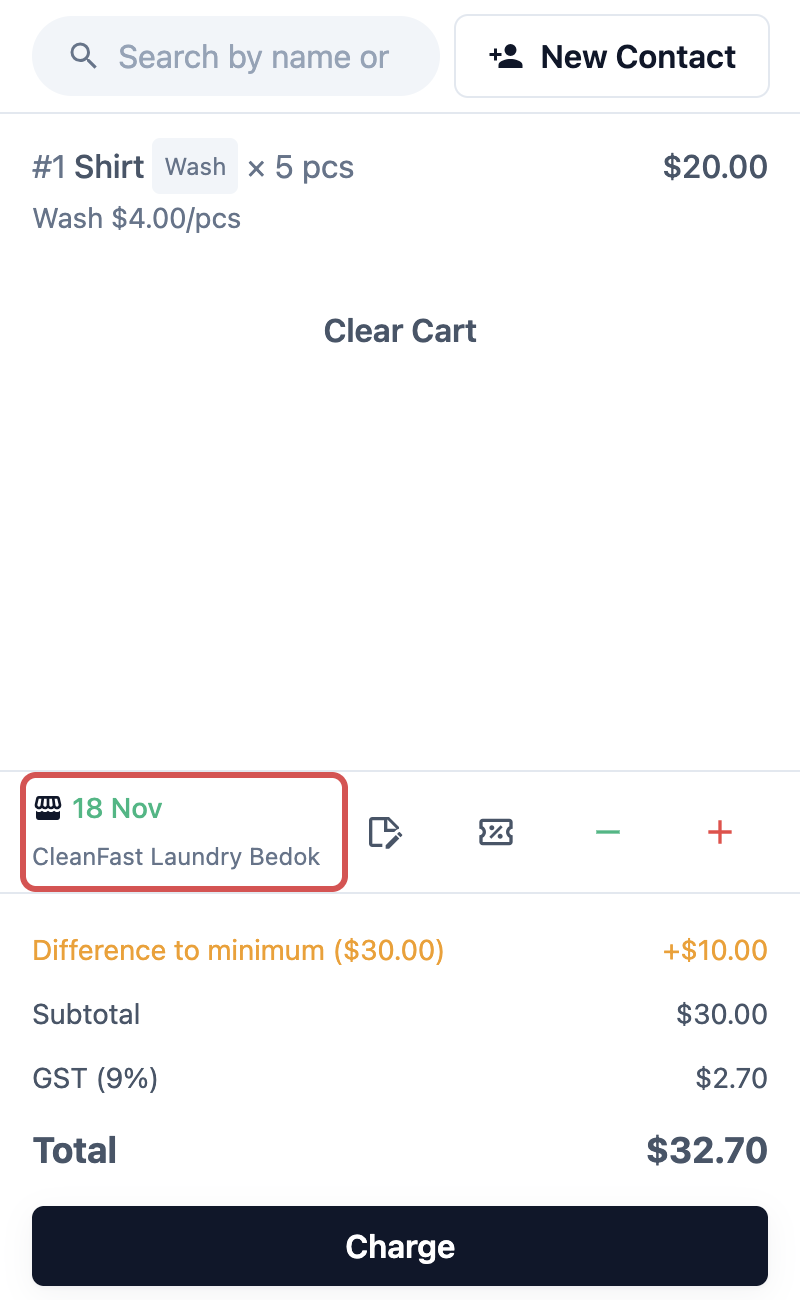
Staff tap the row to open Fulfillment Type, choose Home delivery or a shop under Store pickup, pick a date, and tap Confirm. The full counter steps are in Choosing Pickup or Delivery at the Counter.
Seeing what's due each day
Once your orders carry a collection or delivery date, your staff can plan their day by it instead of searching through receipts. There are three places to see what's due:
- Order list: every order shows Collect or Deliver with its date, so staff see when it's due without opening it.
- Collection page: a separate page on your POS that lists only the orders still waiting to go back to customers, earliest first, with a calendar of how many are due each day.
- A Delivery tab on the Orders page: add a tab with the Return type filter set to Home delivery. See Setting Up the POS Orders Page.
Why use the Collection page
The Orders page shows every order by the day it was taken. The Collection page answers a different question: what has to go back to customers today, and what is coming up.
- Start each day knowing the workload. Staff open one page and see how many orders are due today and this week, so they finish and pack the right ones first.
- Nothing gets forgotten. Orders due up to 7 days ago still show until they are collected or delivered, so a customer who missed their date is easy to spot and remind.
- Pickups and deliveries stay apart. With a Store pickup tab and a Home delivery tab, counter staff see who is coming in, and whoever plans the driver's run sees only deliveries.
- Busy days show early. The calendar shows how many orders fall on each day, so you can add staff or move a delivery before the day gets full.
If you skip it, your POS still works. Staff then find due orders by opening them one by one from the Orders page, which goes by the day each order was taken.
Adding the Collection page to your POS
You add the Collection page once to your POS app, and every shop that uses that app gets it.
- Click the ⚙️ Settings icon in the top-right corner.
- Under the Sales Channels section, click Point of Sale.
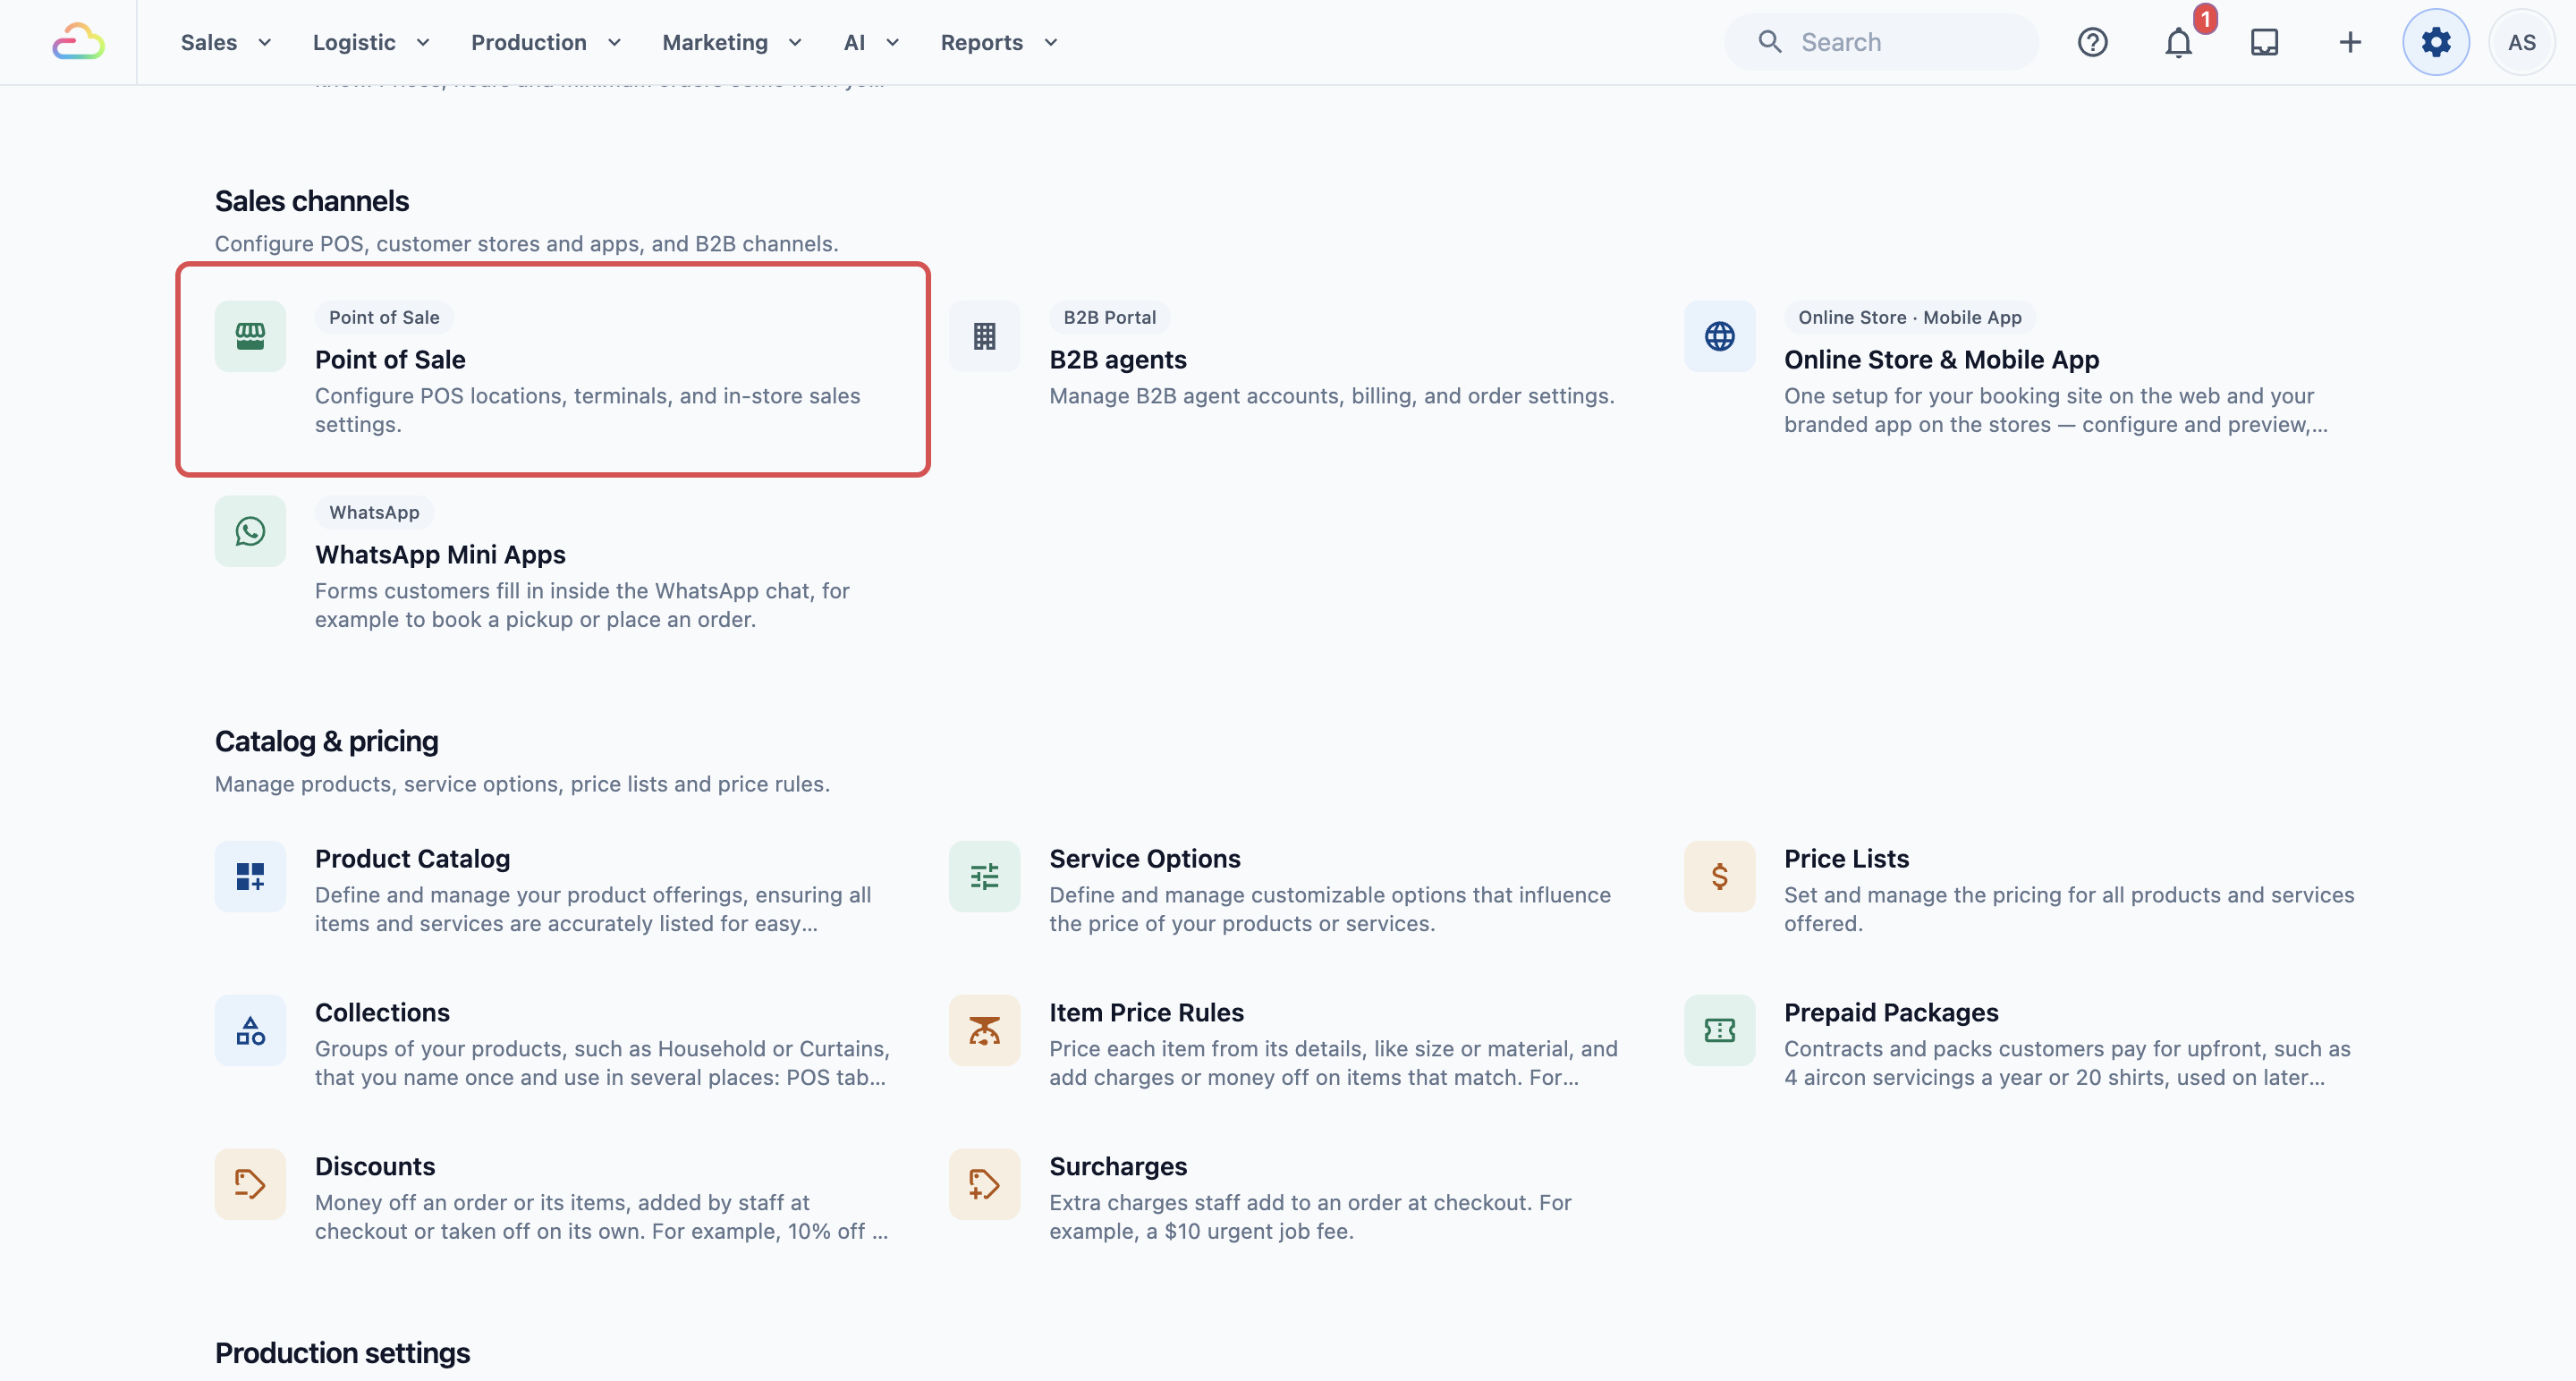
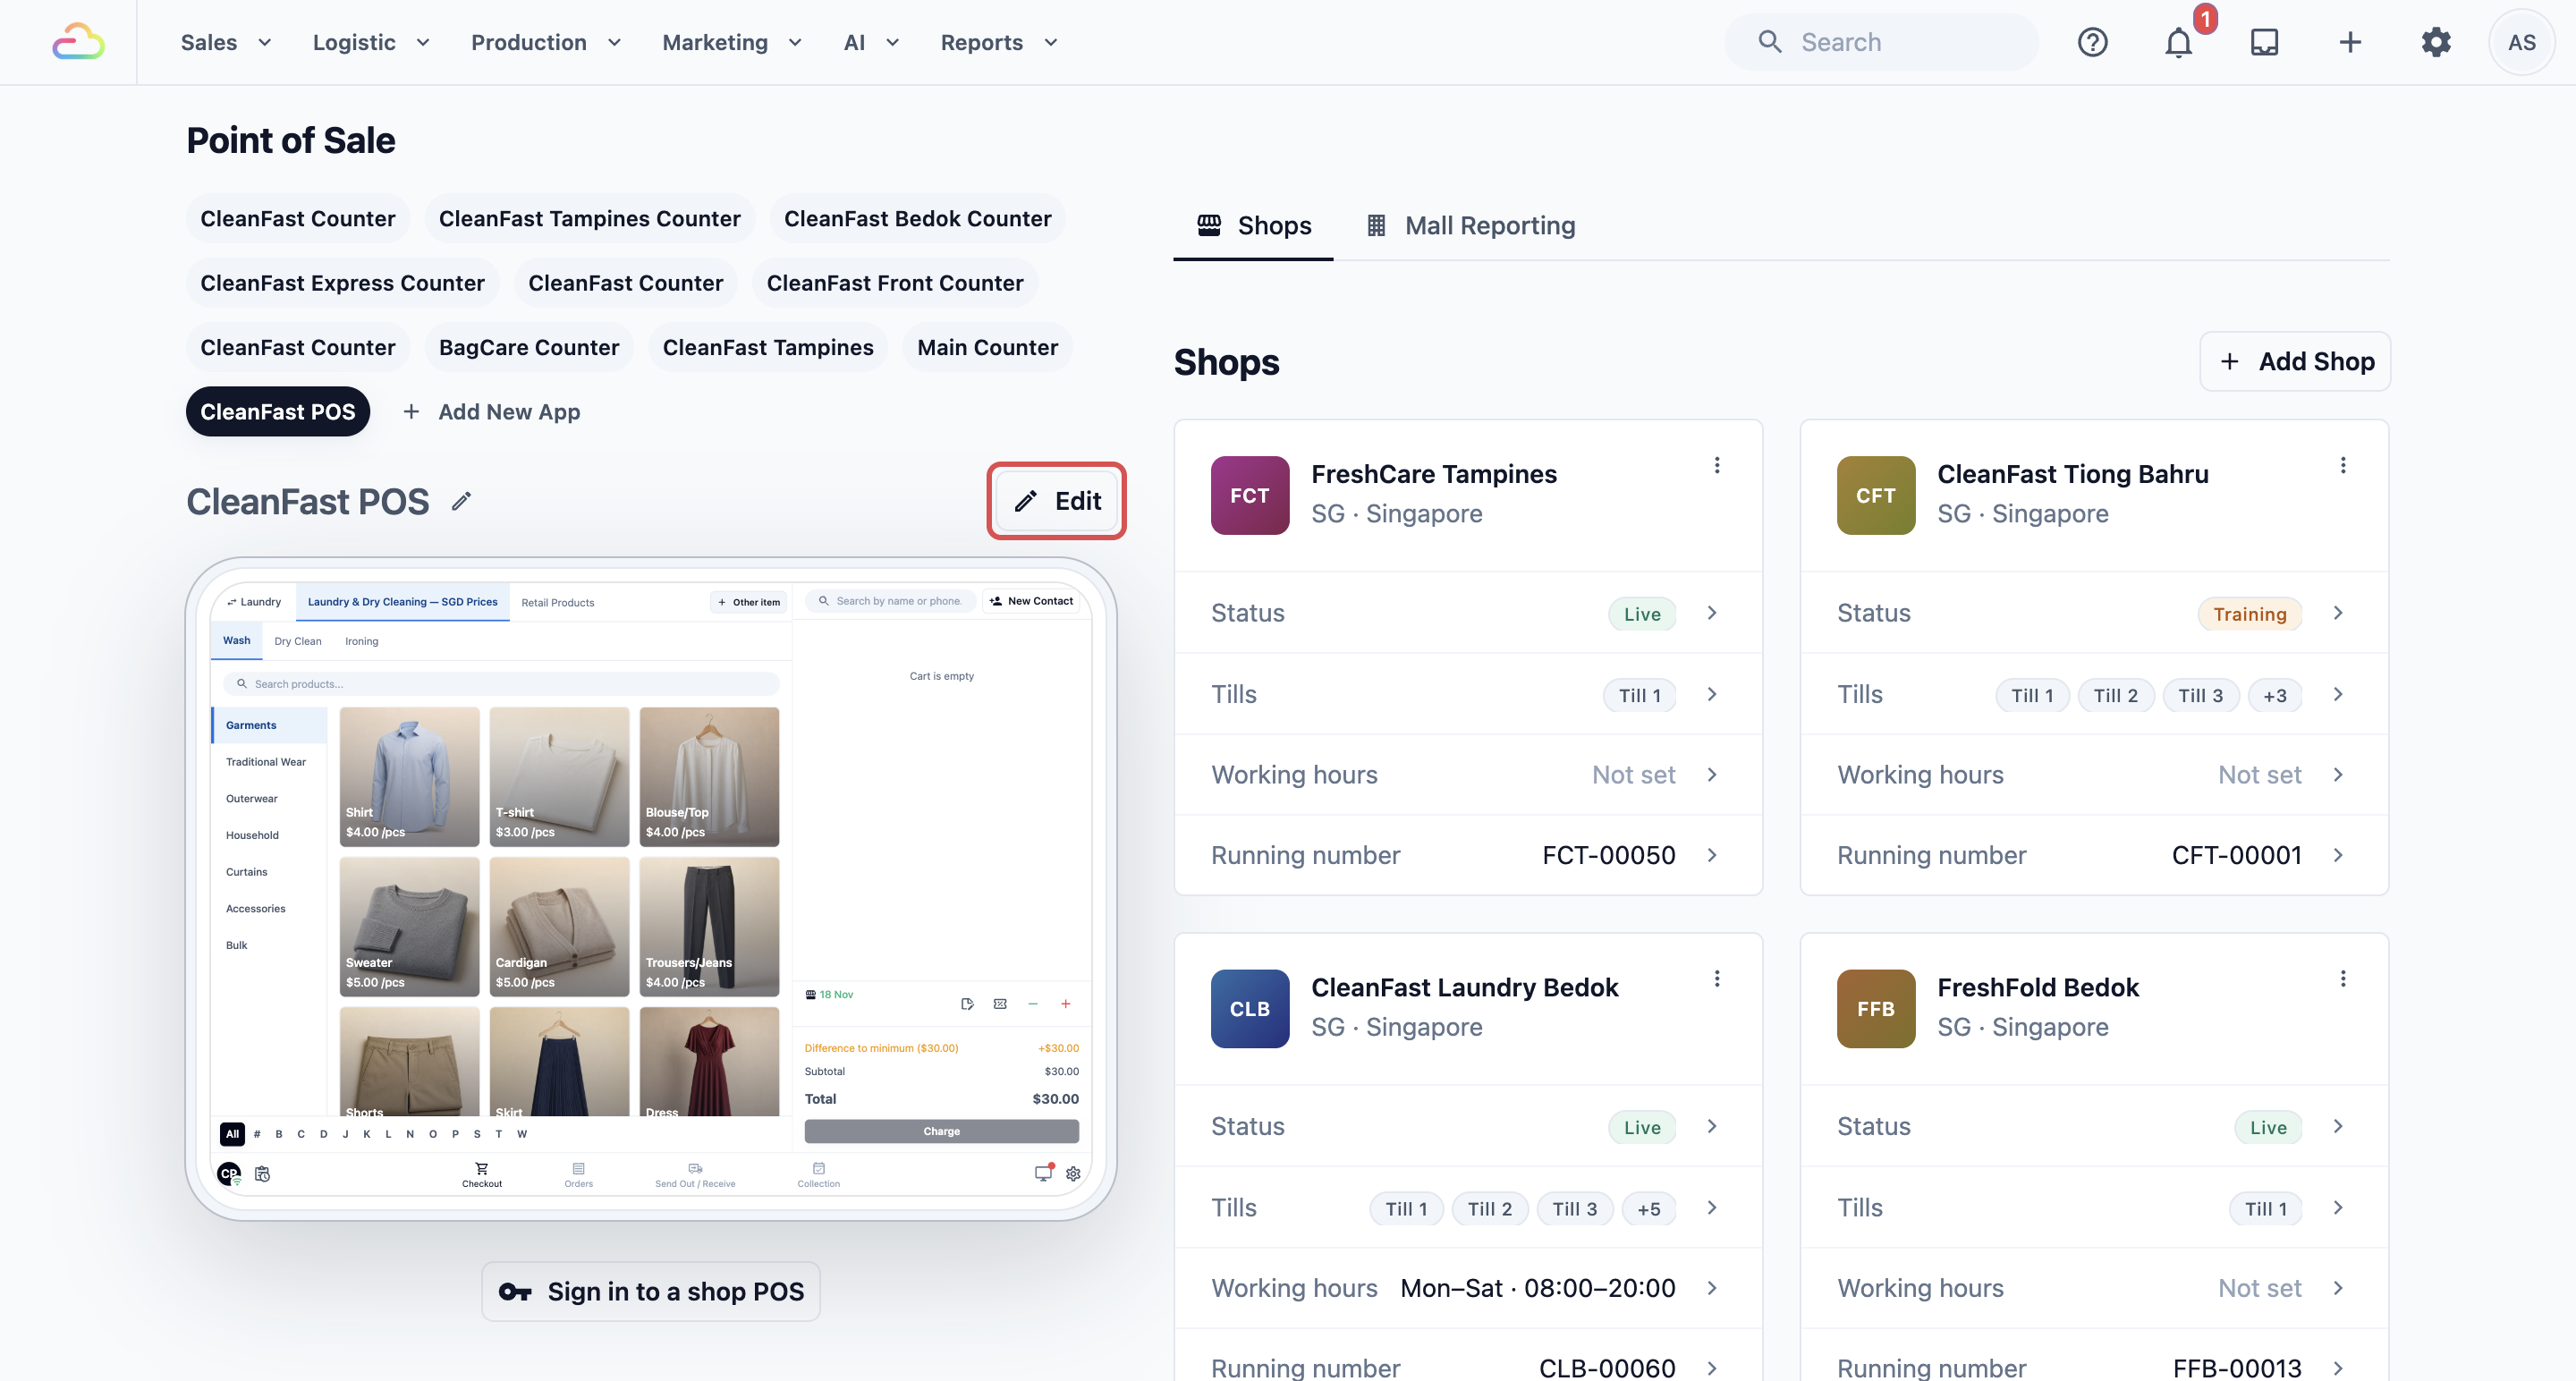
- On the left, under POS Apps, click the app your shops use, for example CleanFast POS.
- Click Edit next to the app's name.
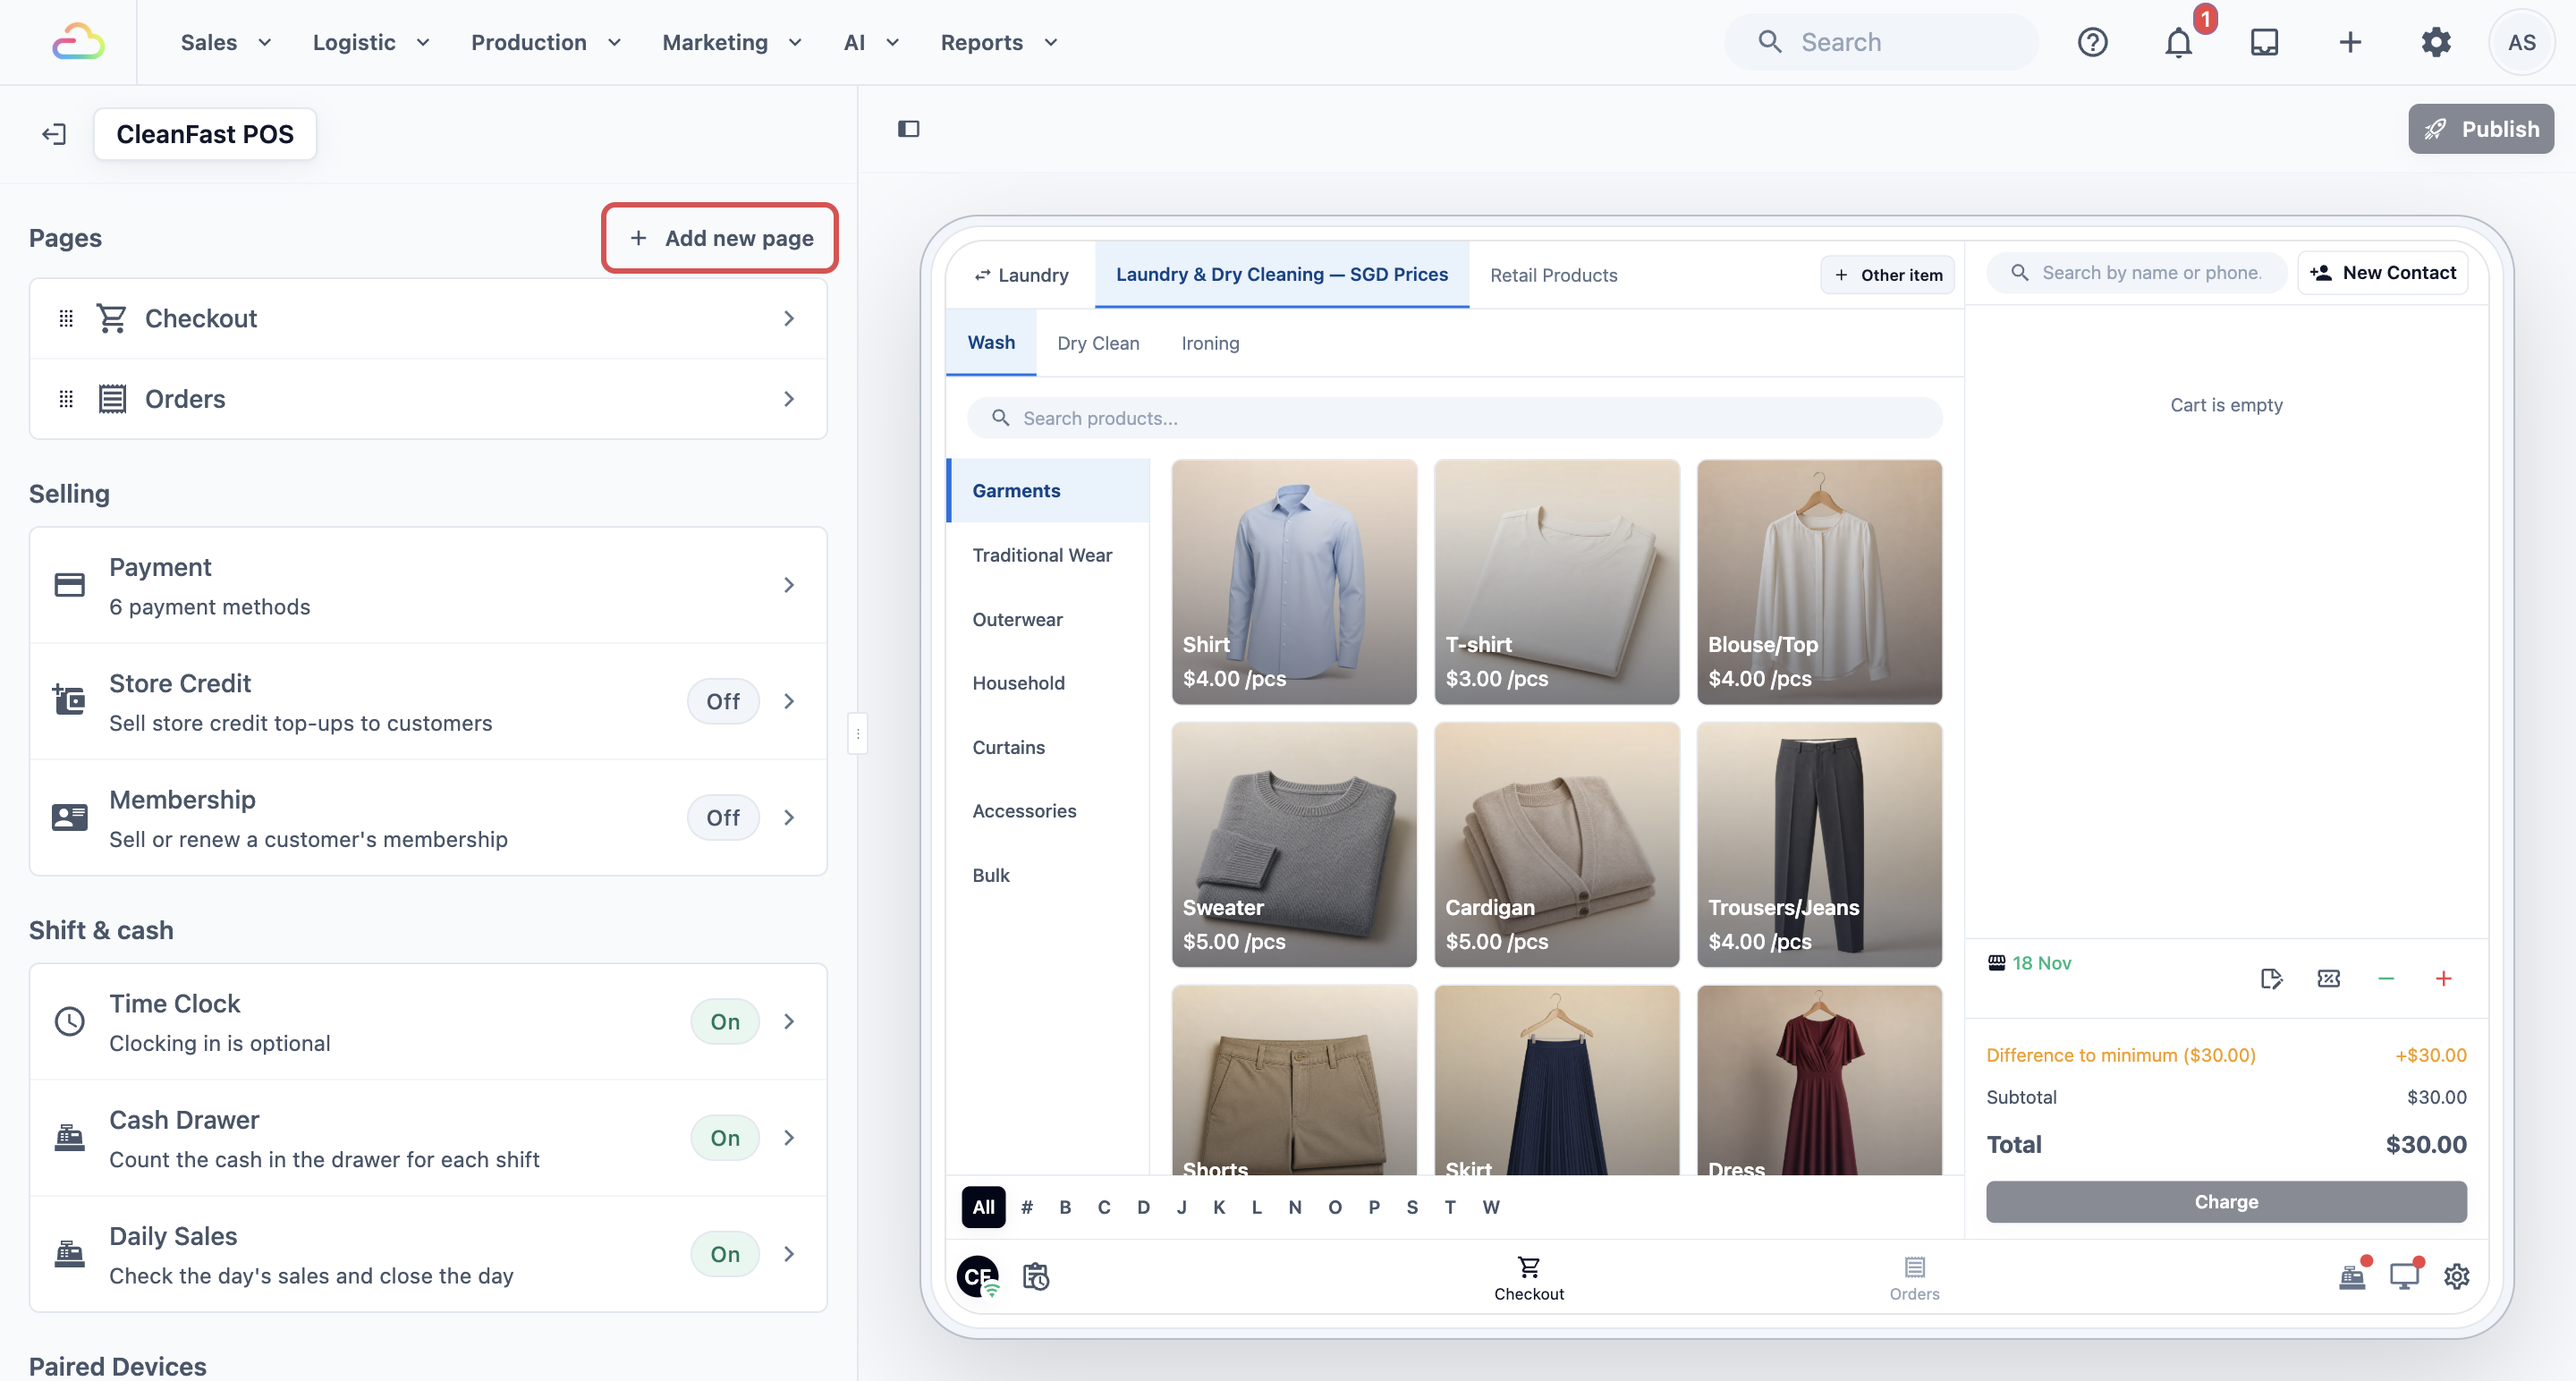
- In the editor, find the Pages card. It lists the page tabs your staff see on the POS, such as Checkout and Orders.
- Click Add new page.
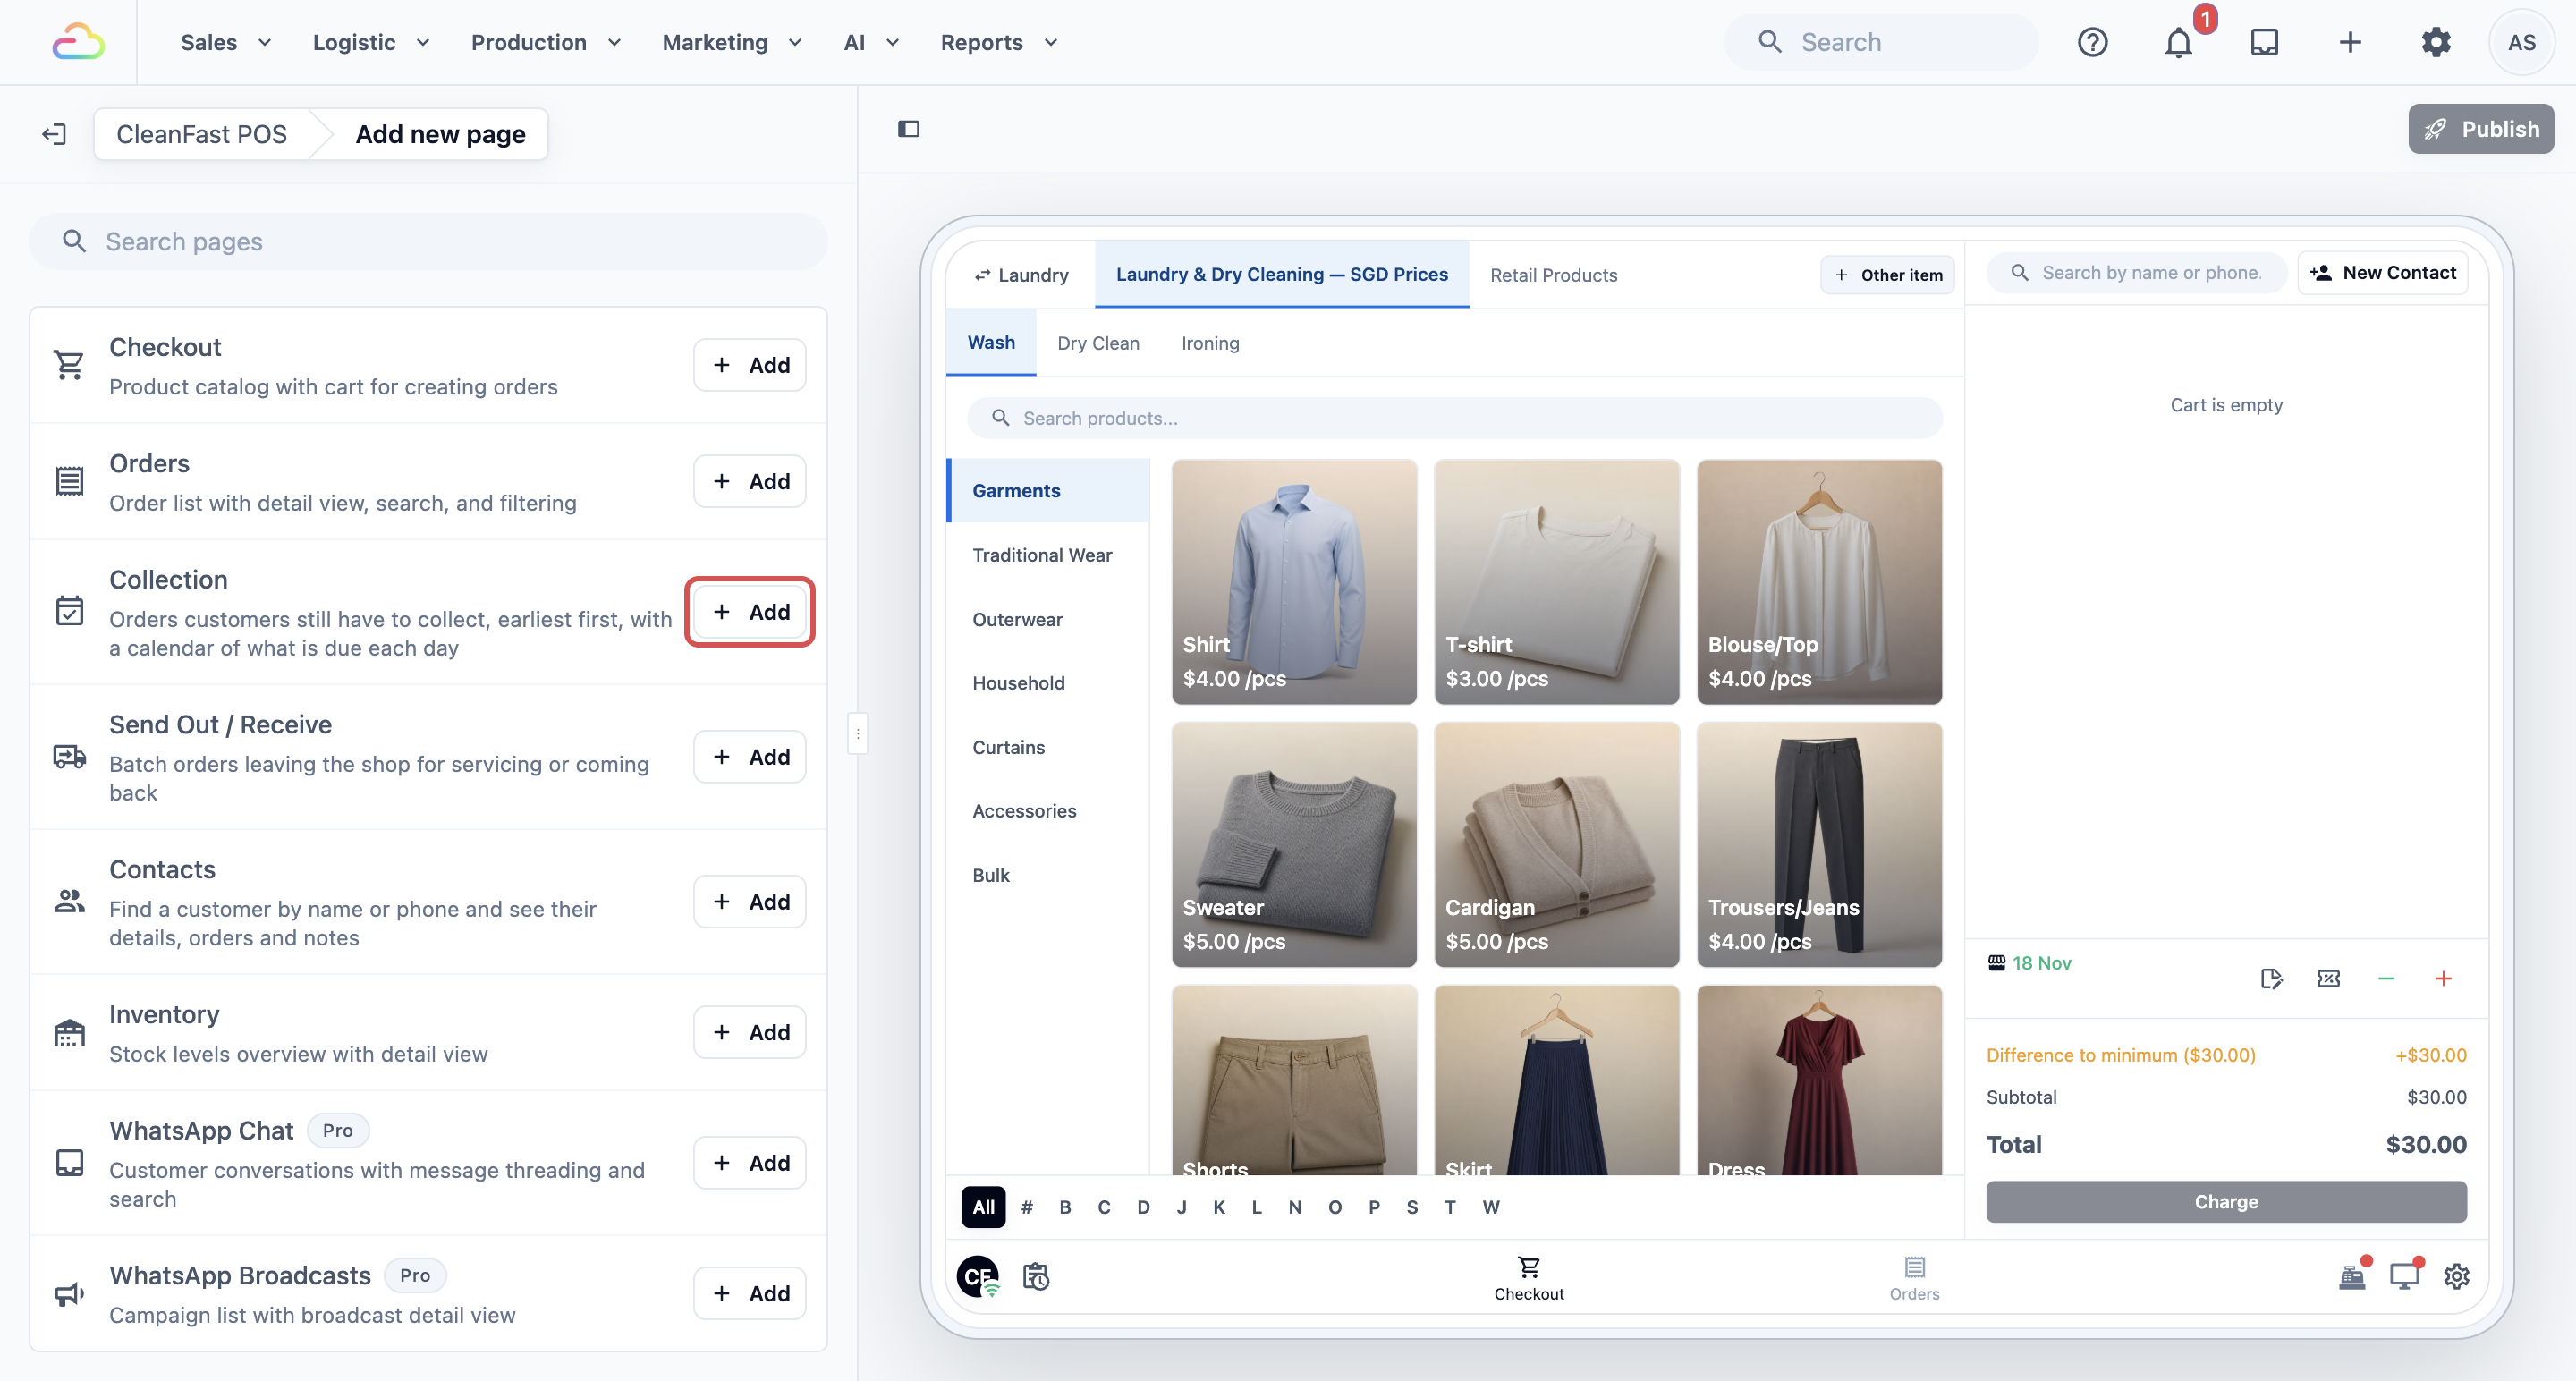
- Find Collection in the list of pages. You can type "Collection" in the Search pages box to find it faster.
- Click Add next to Collection. A "Page created" message appears and Collection joins your Pages list.
- Drag Collection up or down in the Pages list to choose where its tab sits on the POS, for example right after Orders.
- Click Publish in the top-right corner. Check the changes in Review your changes, then click Publish.
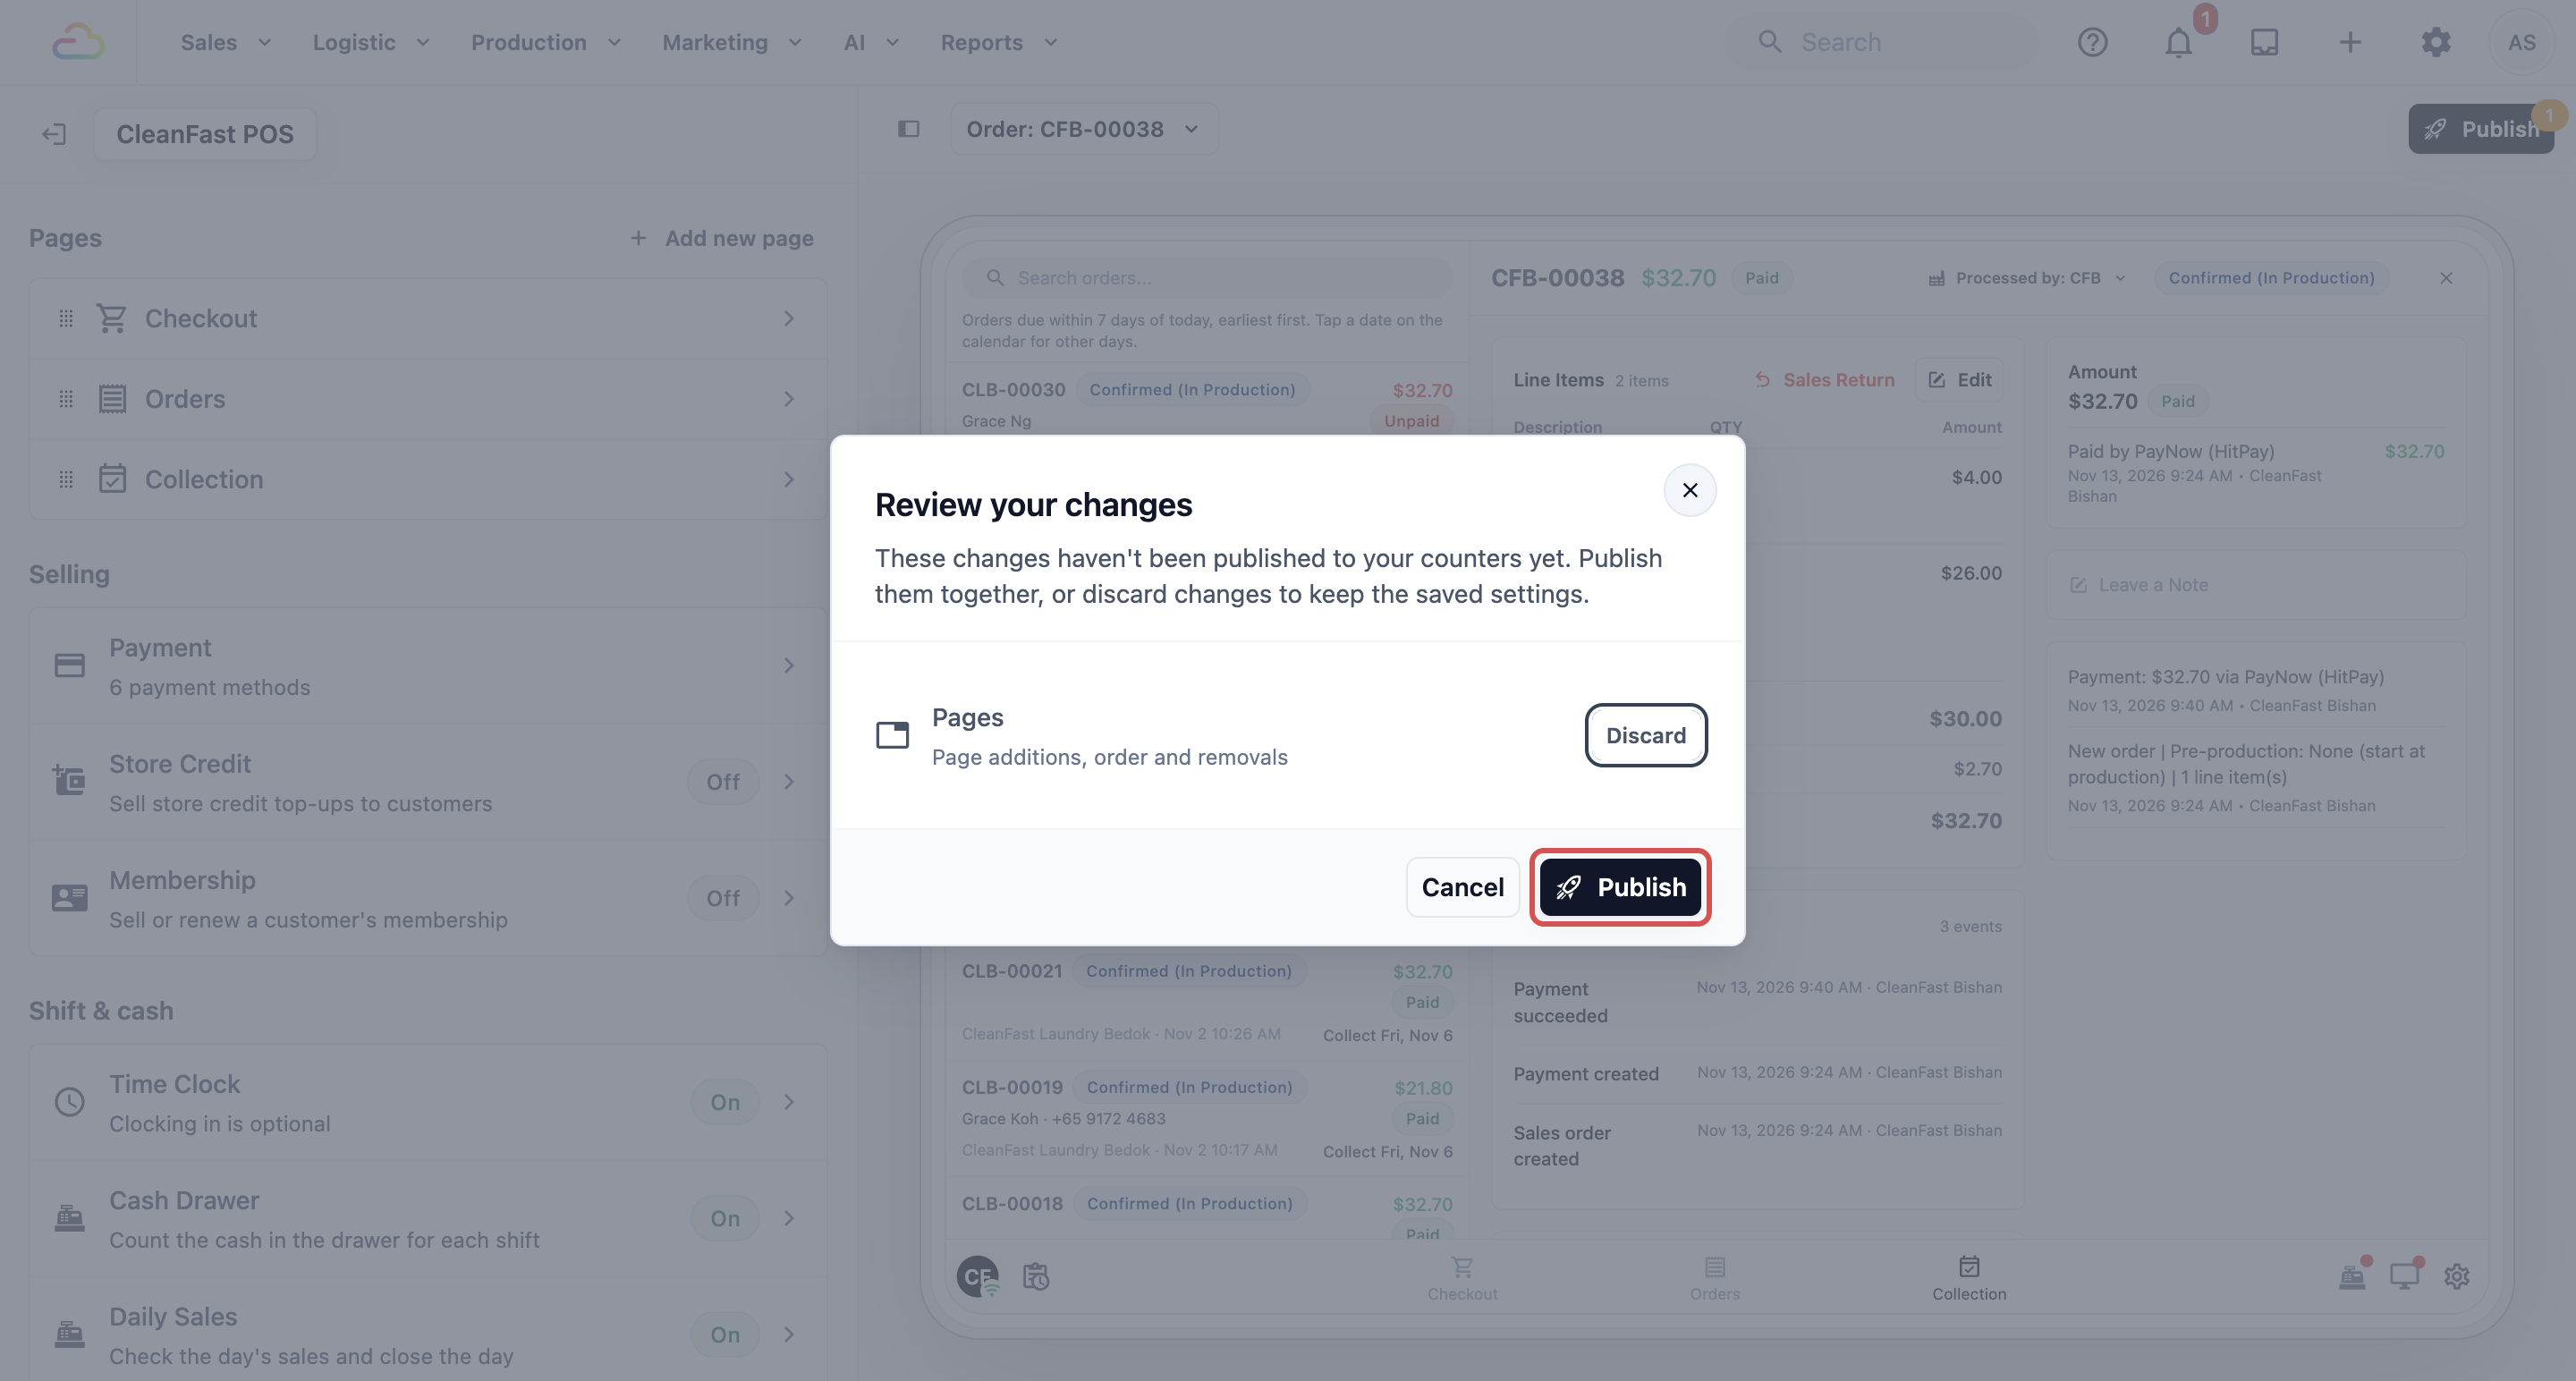
When you see "Published. Your counters have the changes.", Collection shows as a new page tab on the POS of every shop that uses this app.
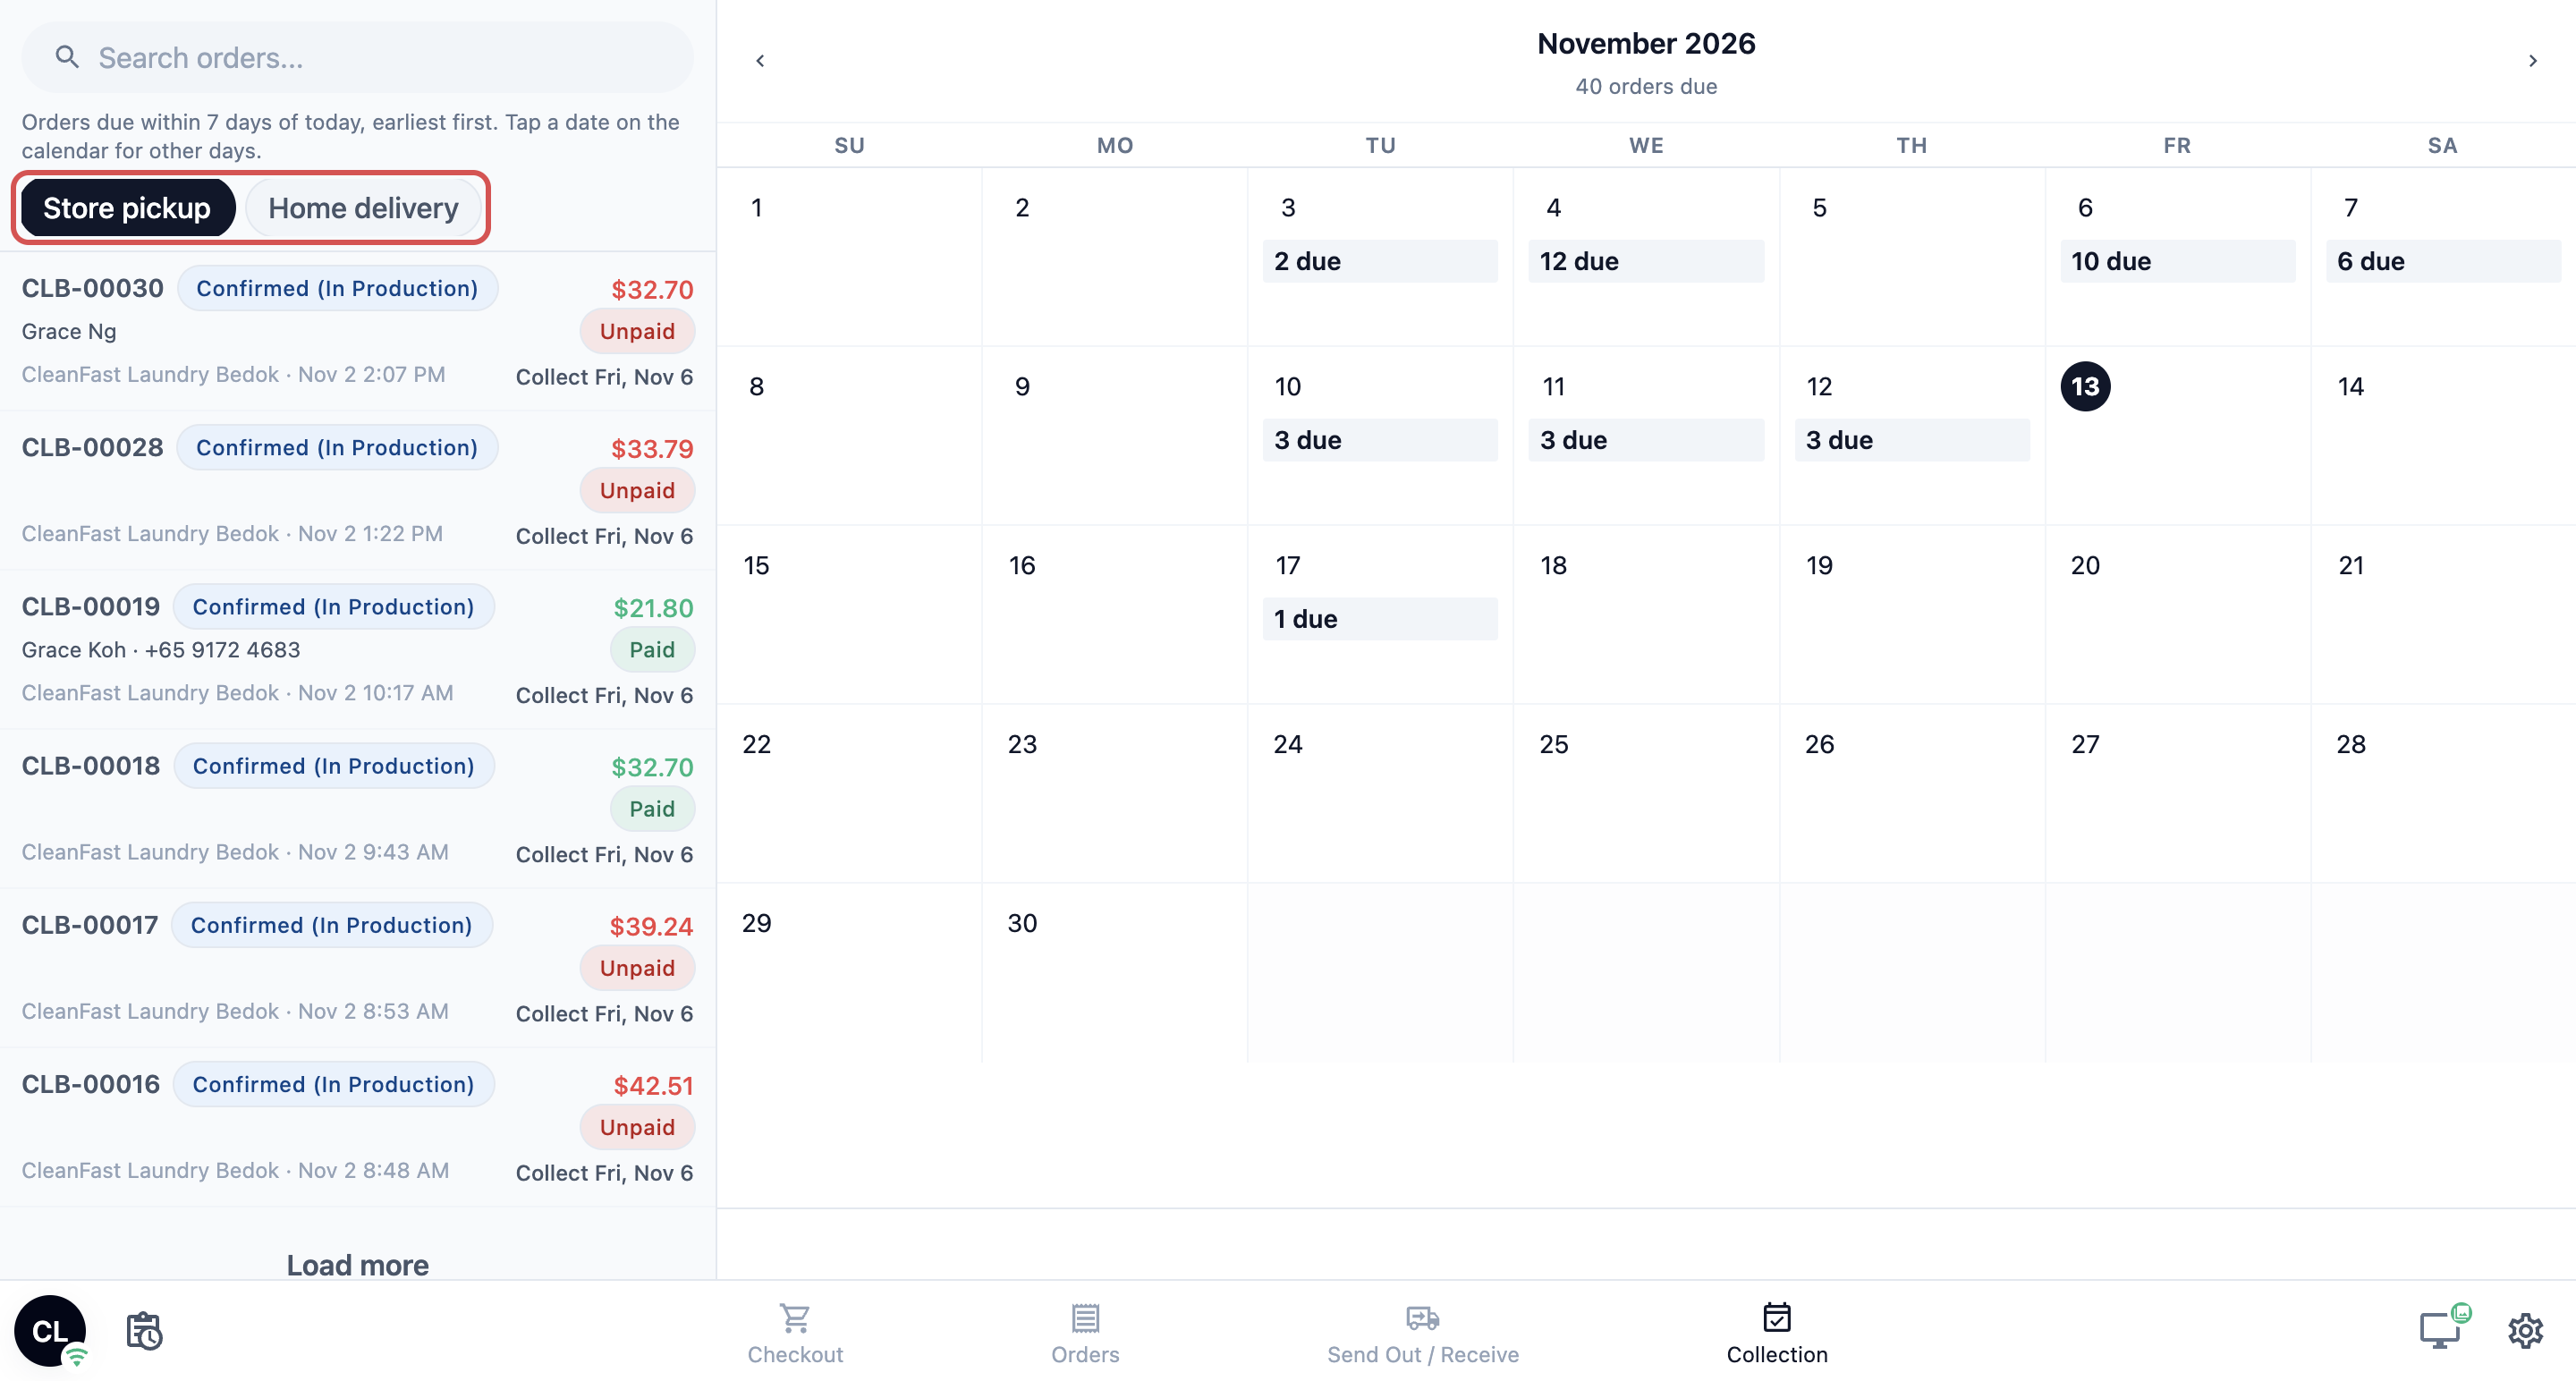
How the Collection page filters orders
The list on the left shows this shop's orders still to hand over that are due from 7 days ago to 7 days ahead, earliest first. Orders that are completed or cancelled never appear. Three things narrow it down:
- Tabs. Each tab shows only the orders that go back to the customer a certain way. On the Store pickup tab, staff see the orders customers collect at your shop. On the Home delivery tab, they see the orders your drivers deliver. If you set no tabs, staff see every order still to collect.
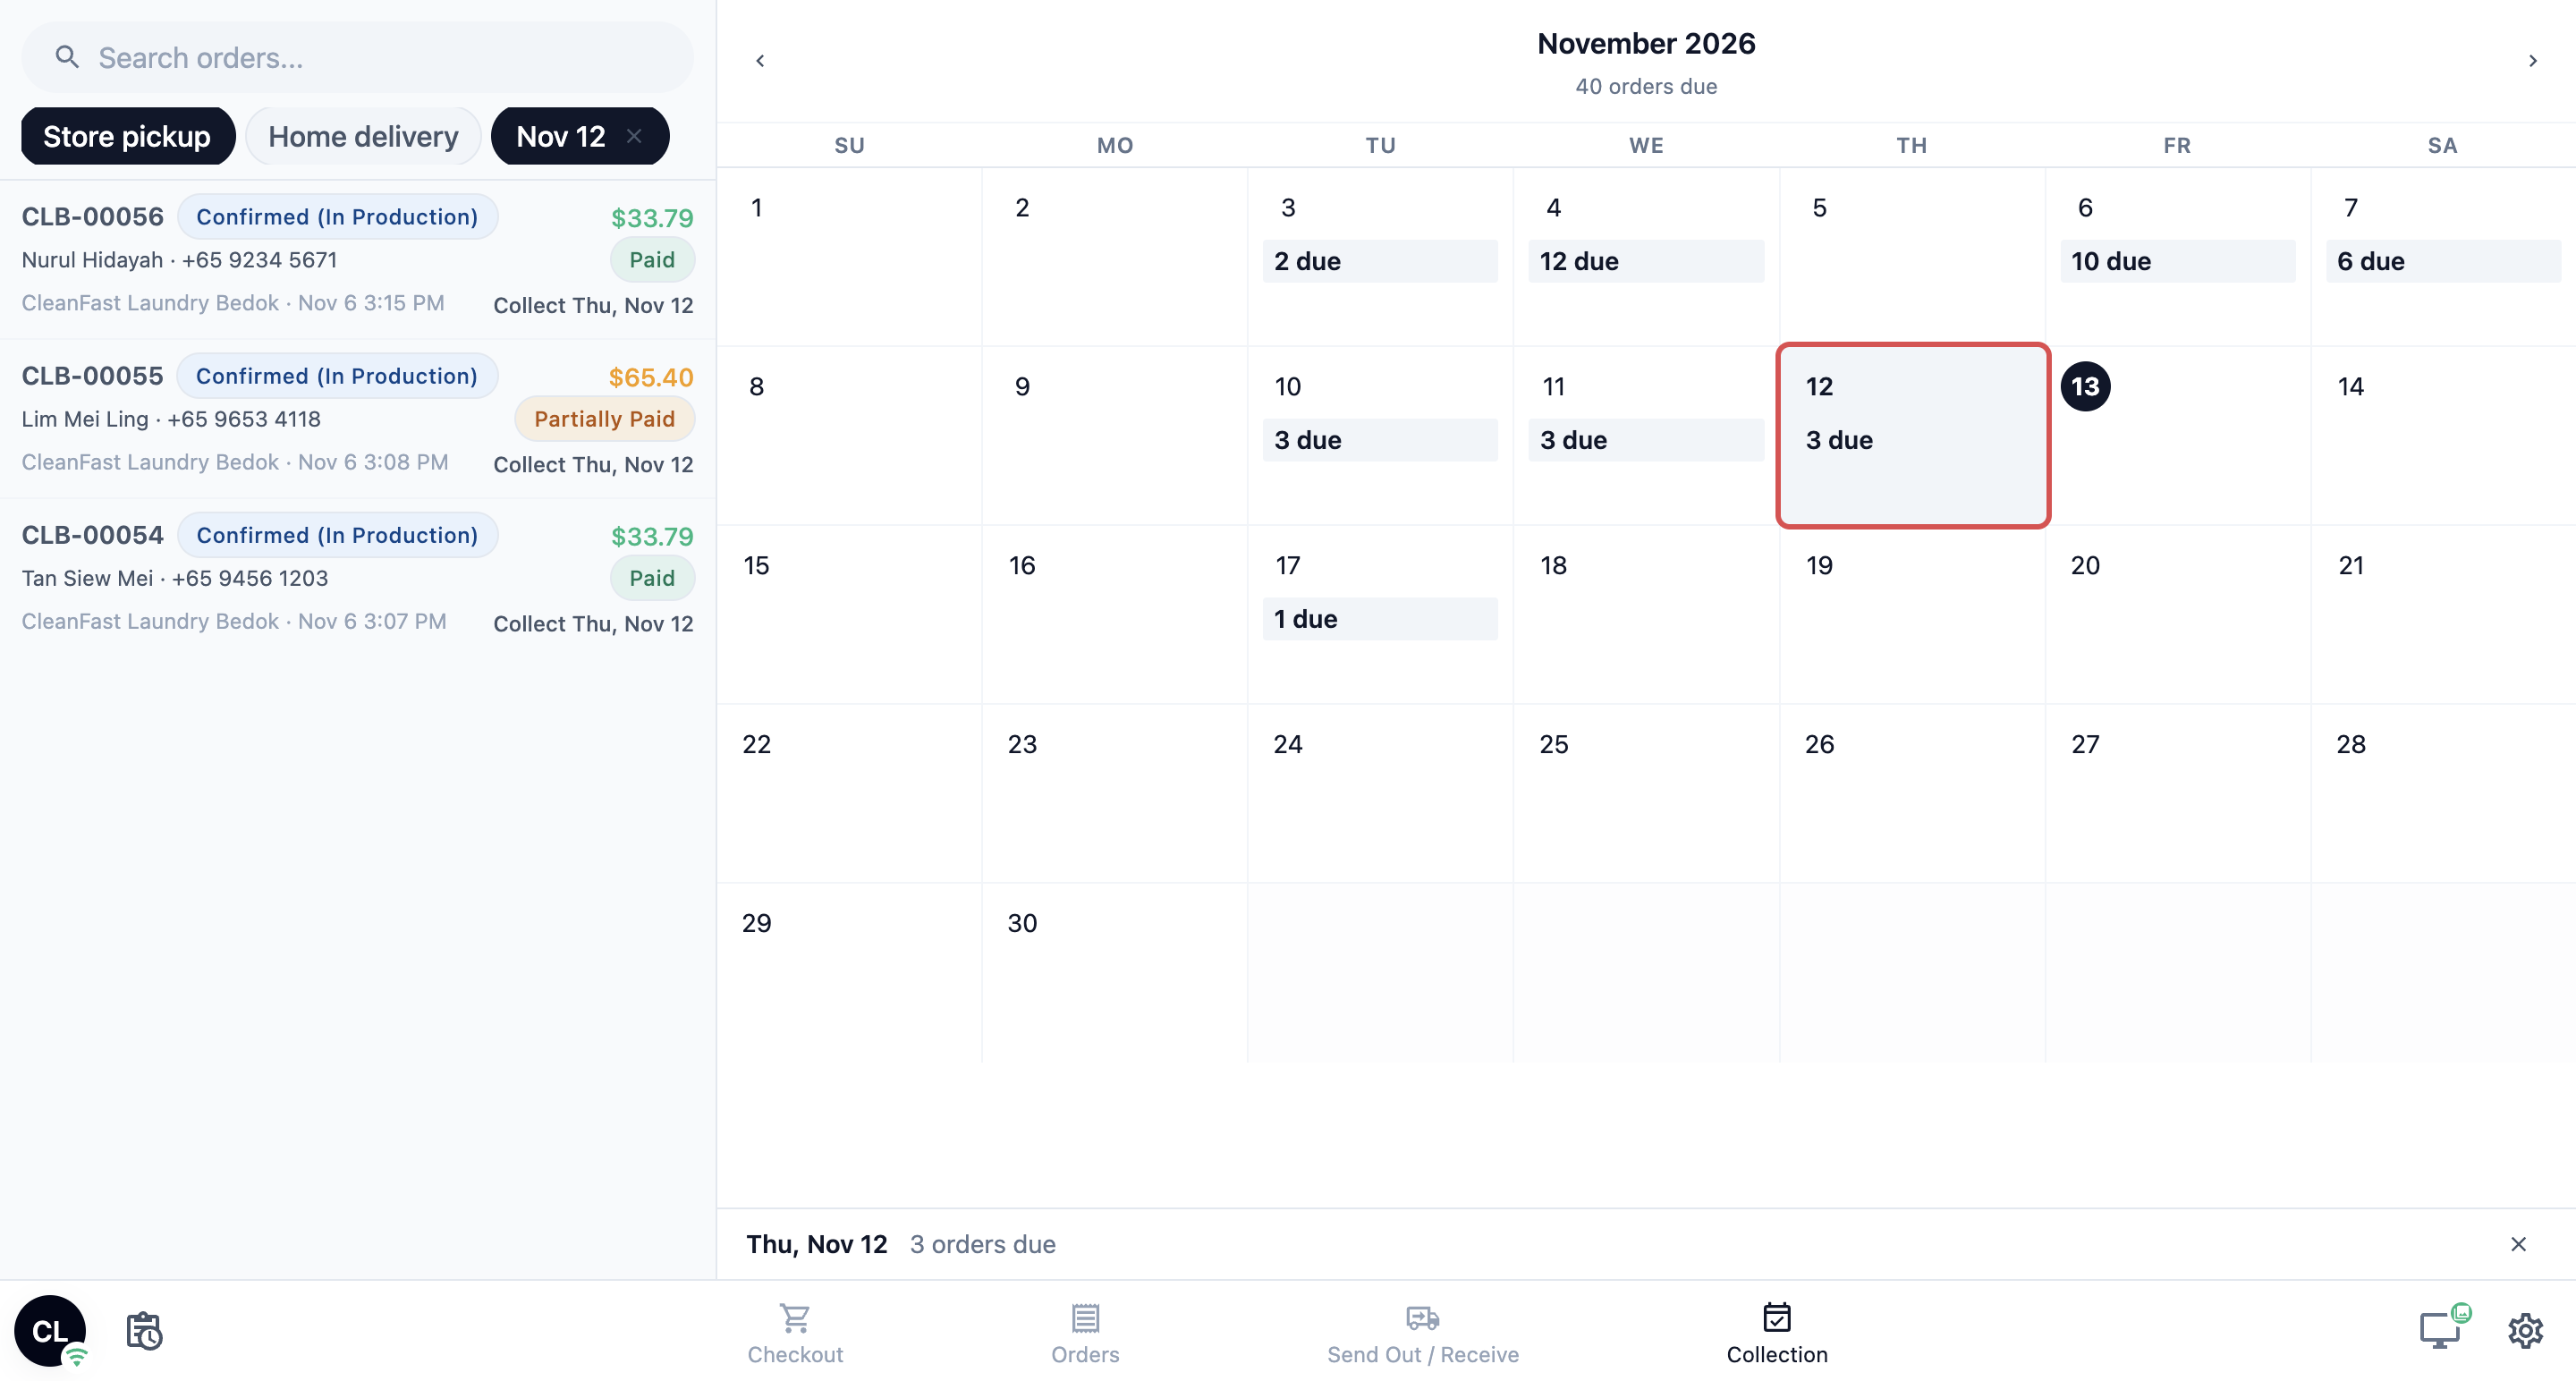
- A date on the calendar. Tap a date to list only that day's orders, even one further ahead than 7 days. A chip with the date, for example Nov 12, appears next to the tabs. Tap the × on the chip to go back to the full list.
- The search box. Type in it to find an order that is still to be collected, whatever its date.
The calendar counts follow the tab you pick. The number under each date, for example 3 due, is how many orders are due that day on that tab, so the count and the list always match.
Adding Store pickup and Home delivery tabs
Use this only if you offer both Store pickup and Home delivery. With one method, the page works without tabs.
- Open your POS app in the editor, as in steps 1 to 4 of Adding the Collection page to your POS.
- Under Pages, click Collection, then click Order List.
- Under Order tabs, click Add tab.
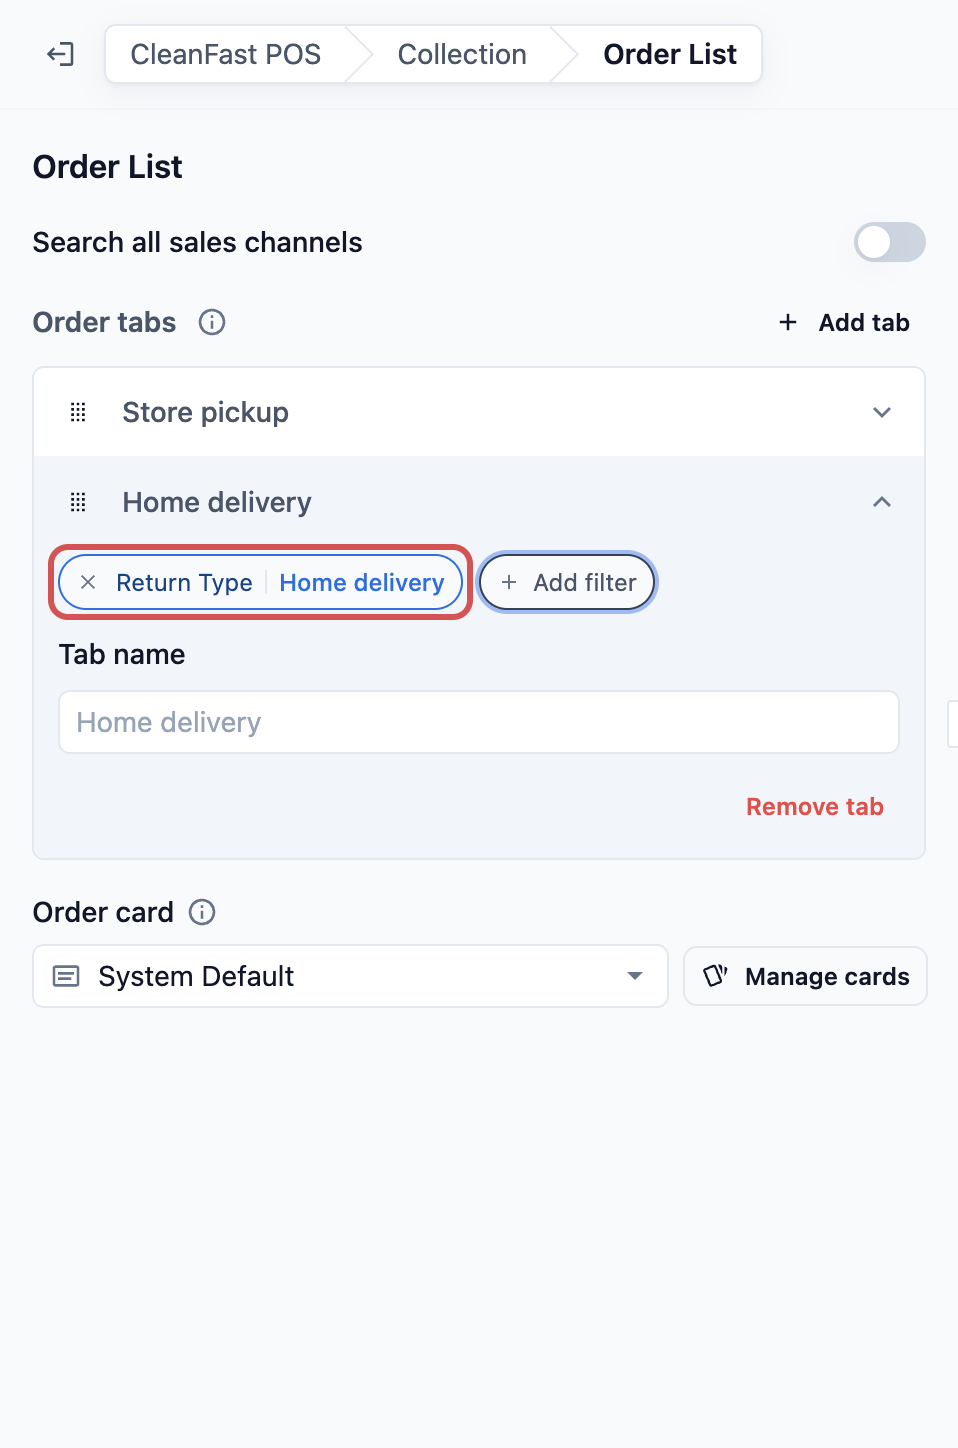
- Click Add filter and choose Return Type.
- Pick Store pickup. The tab takes its name from your choice, and you can type another name.
- Repeat steps 3 to 5 for Home delivery.
- Click Publish when you are done.
The Sales Calendar on the Orders page goes by the day an order was taken, not its collection date. Use the Collection page to plan by collection date.
FAQs
Do I need booking options if my customers always collect?
No. With Store pickup on and no shop booking option, the POS still takes and hands over orders. Add one when you want staff to promise a ready date, or to see what's due on the Collection page.
Will switching these on change orders I already took?
No. Each order keeps the handover method and date it had when it was taken. Your changes apply to new orders after you save and reopen the POS.
Why can't my staff tick Home delivery?
A delivery needs a customer and an address. The POS says "Select a customer account first" or "Add a delivery address first" until both are on the order.
Why do no delivery dates appear for some customers?
Their address is outside the business unit's service areas, or the unit has no home delivery booking option yet. Check both in Steps 3 and 4.
Does the delivery fee come from here?
No. Extra charges come from the booking option staff pick, such as an Express or weekend charge. The minimum order for an area comes from Choosing Where Each Business Unit Takes Bookings.
A customer wants to switch from collection to delivery after paying. What do staff do?
Open the order on the POS, go to the Completion & Handover section and tap Change. This works until the order is completed or cancelled. See Choosing Pickup or Delivery at the Counter.
What's Next
You've now chosen how counter orders get back to your customers, and given them dates your staff can keep. Next, show your staff how to pick pickup or delivery for each order, and change it later, in Choosing Pickup or Delivery at the Counter.