## How to Access
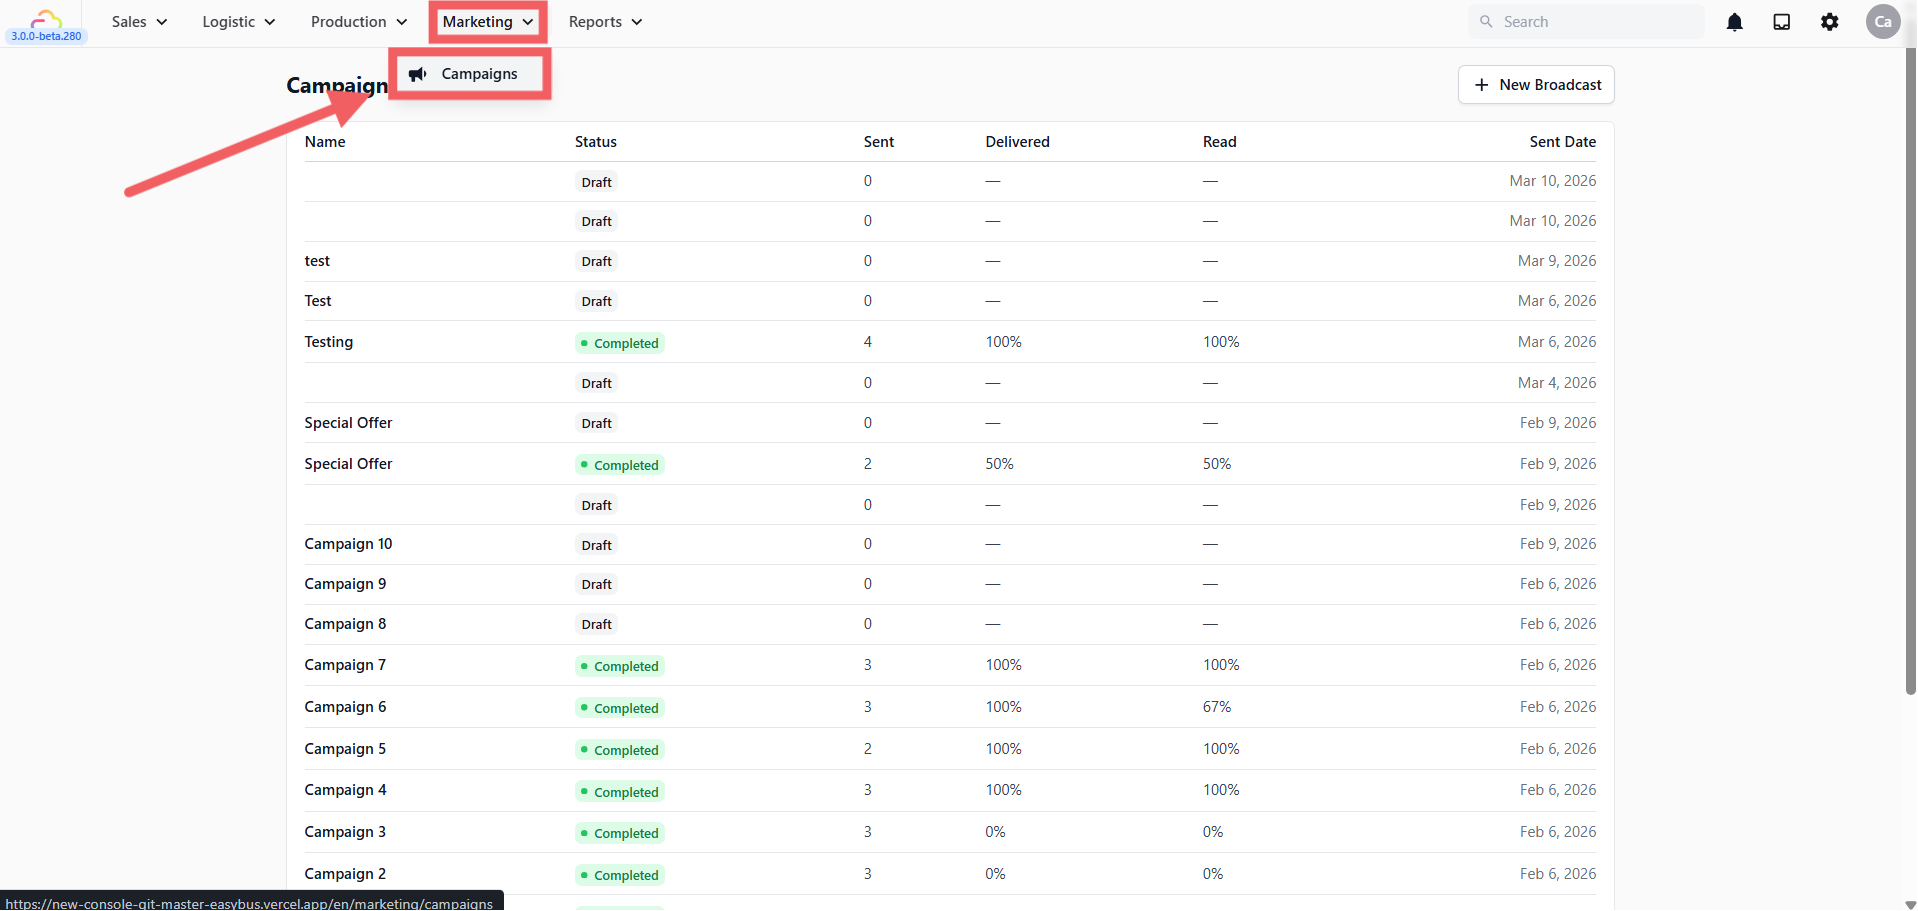
From the top navigation bar, click Marketing, then select Campaigns from the dropdown.
---
## Create a New Broadcast
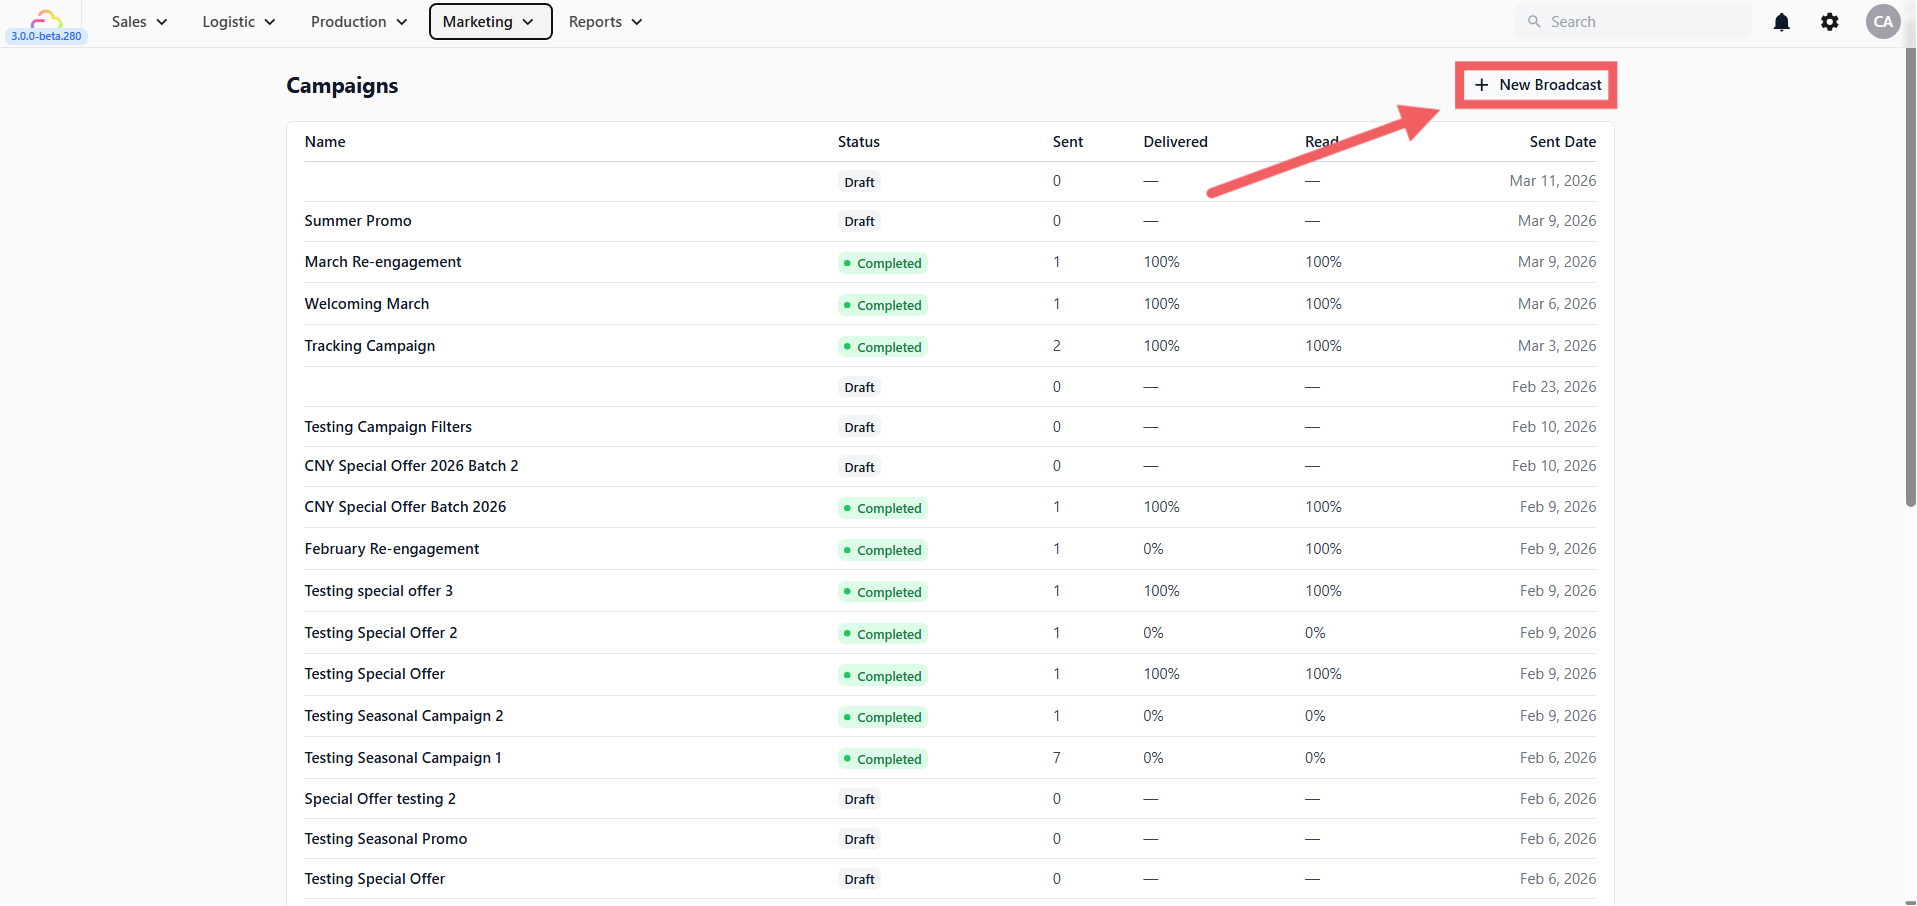
On the Campaigns page, click + New Campaign in the top right corner.
You'll be taken directly to the Setup page.
---
## Setup and Template Selection
You will be directed to the Setup page. Here, you need to define the basics of your campaign.
### Campaign Details
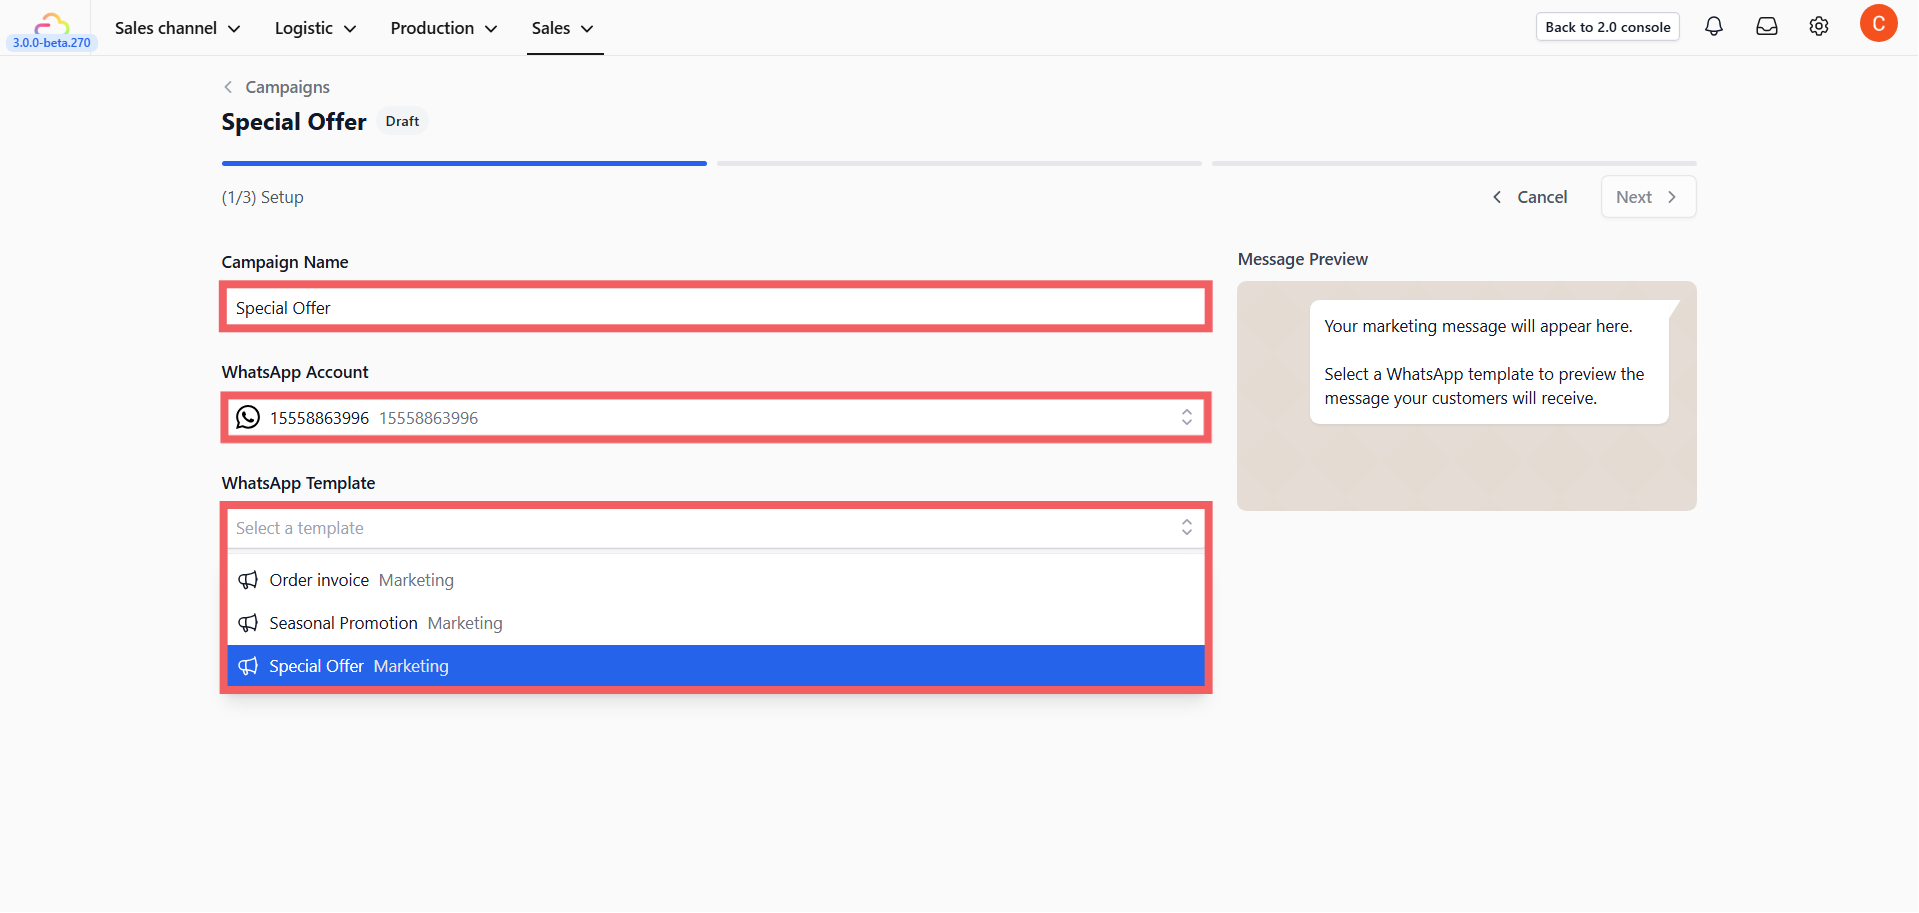
- **Campaign Name:** Give it a name you'll recognize later (e.g., "March Re-engagement" or "CNY 2026 Promo").
- **WhatsApp Account:** Select the WhatsApp business number you want to send from.
If you haven't connected your WhatsApp number yet, please refer to our guide on [Connect and Configure WhatsApp](/docs/connect-and-configure-whatsapp).
---
### Select Your Template
Choose the **Marketing Template** you want to send. This is the actual message your customers will receive.
You **must** have a pre-approved Marketing Template before you can create a campaign. If you haven't created one yet, please read [Setting Up Marketing Templates](/docs/setting-up-marketing-templates) to learn how to set up your templates first.
---
### Preview and Test
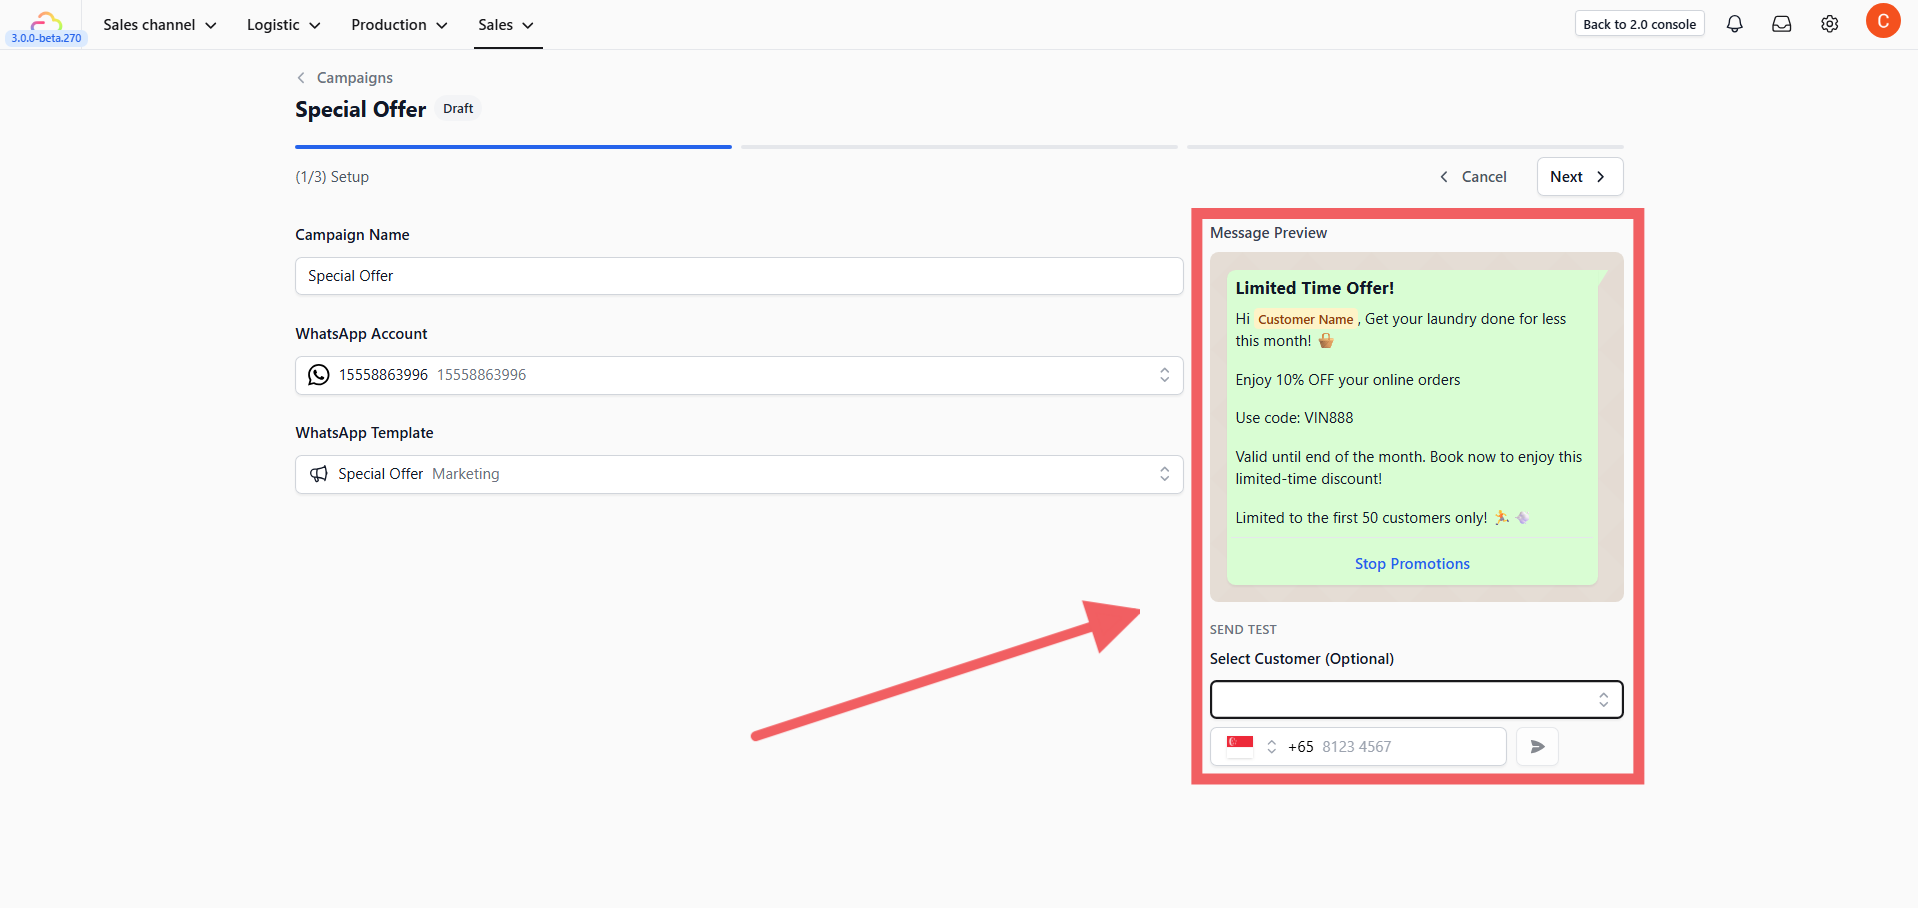
Once you select a template, you'll see a live preview of how it looks on the customer's phone. Before sending it to everyone, you can send a test to your own number, just enter your phone number and click the Send icon.
Always send a test first. Check for typos, make sure the link works, and verify the message looks the way you want.
---
## Select Your Audience
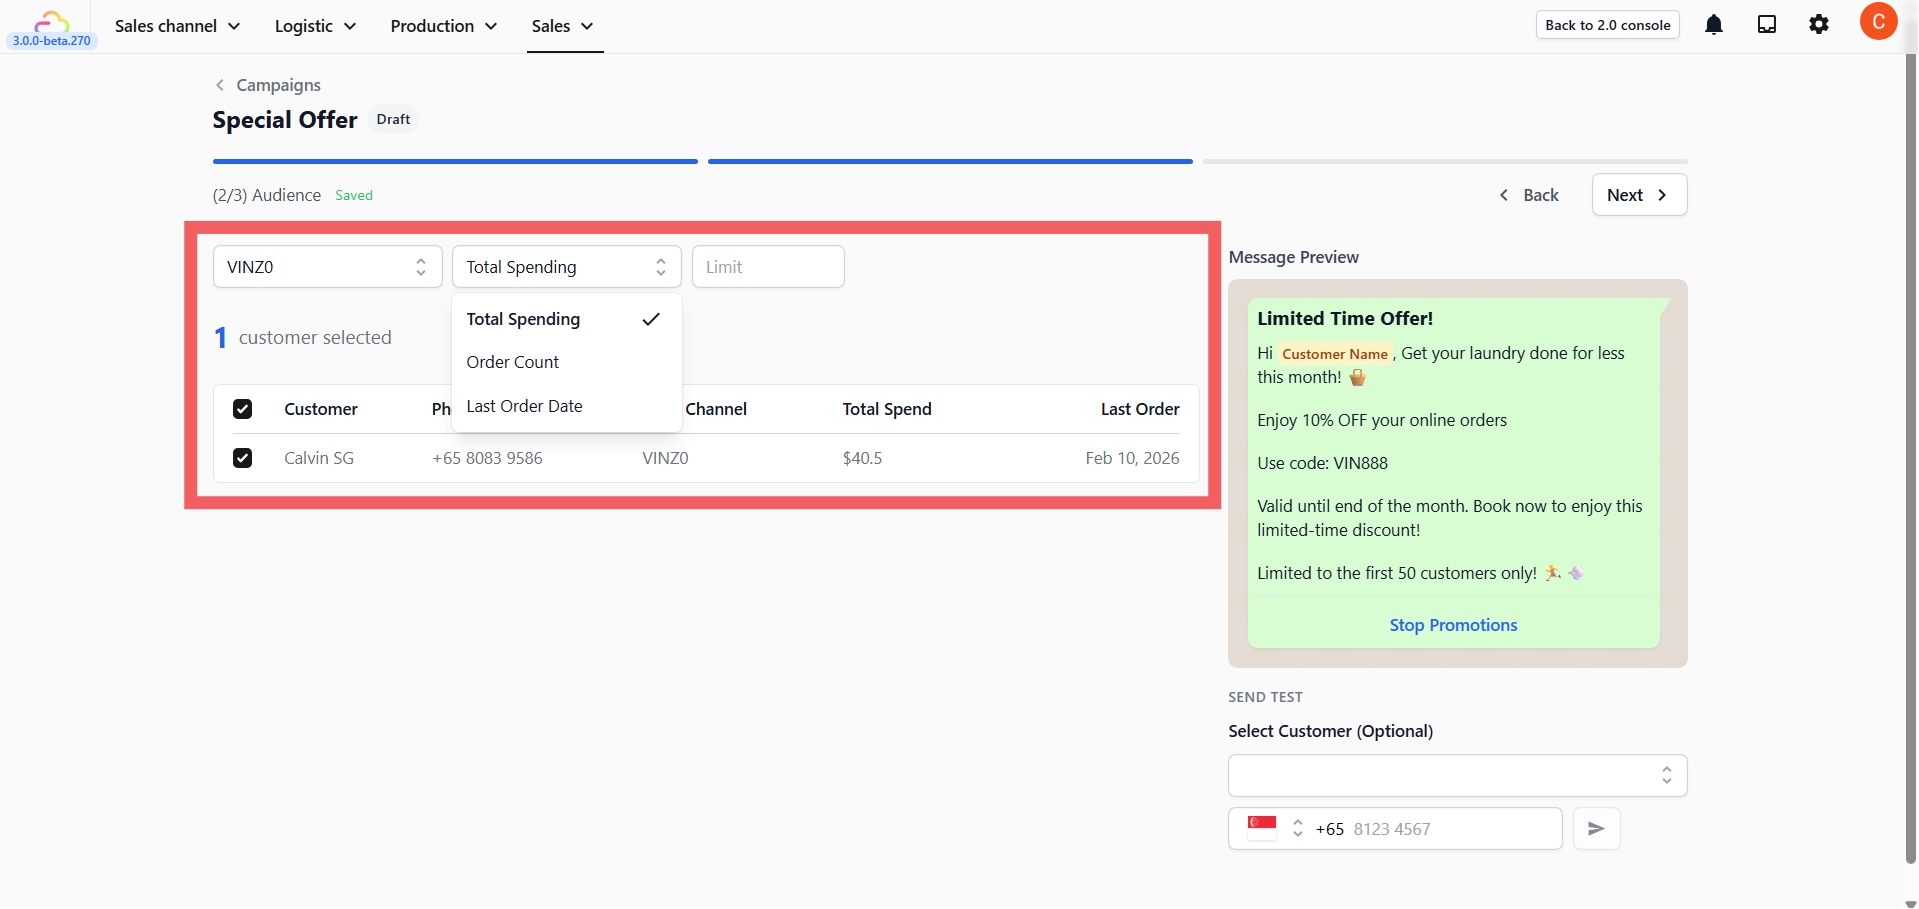
This is where you decide who gets your message. Click Next to enter the Audience stage.
### Step 1: Filter by Registration Place
The first dropdown lets you choose where your customers came from — for example, your Online Store, POS (walk-in customers), or a specific sales channel. This narrows down the list to only customers from that source. **Leave it empty to include customers from all channels.**
### Step 2: Filter by Customer Activity
After selecting the registration place, use the second dropdown to further narrow down your list based on customer activity:
- **Last Order Date** — Select a date range. The system shows customers whose last order falls within that period. For example, select a range from 3 months ago to find customers who haven't ordered recently and bring them back with a re-engagement promo. Or select this week's dates to target customers who just ordered and upsell them with a follow-up offer.
- **Total Spending** — Target customers based on how much they've spent in total. Great for exclusive offers to your highest-value customers.
- **Order Count** — Target customers based on how many orders they've placed. Great for rewarding your most loyal visitors.
### Set a Limit
The **Limit** box lets you cap the number of recipients. For example, if you filter by Total Spending and enter 50, the system automatically selects your top 50 highest-spending customers. This is useful for running exclusive promotions aimed at your best customers.
### Manual Selection
After filtering, the system generates a list. You can manually check or uncheck individual customers if you want to include or exclude specific people.
---
## Review and Launch
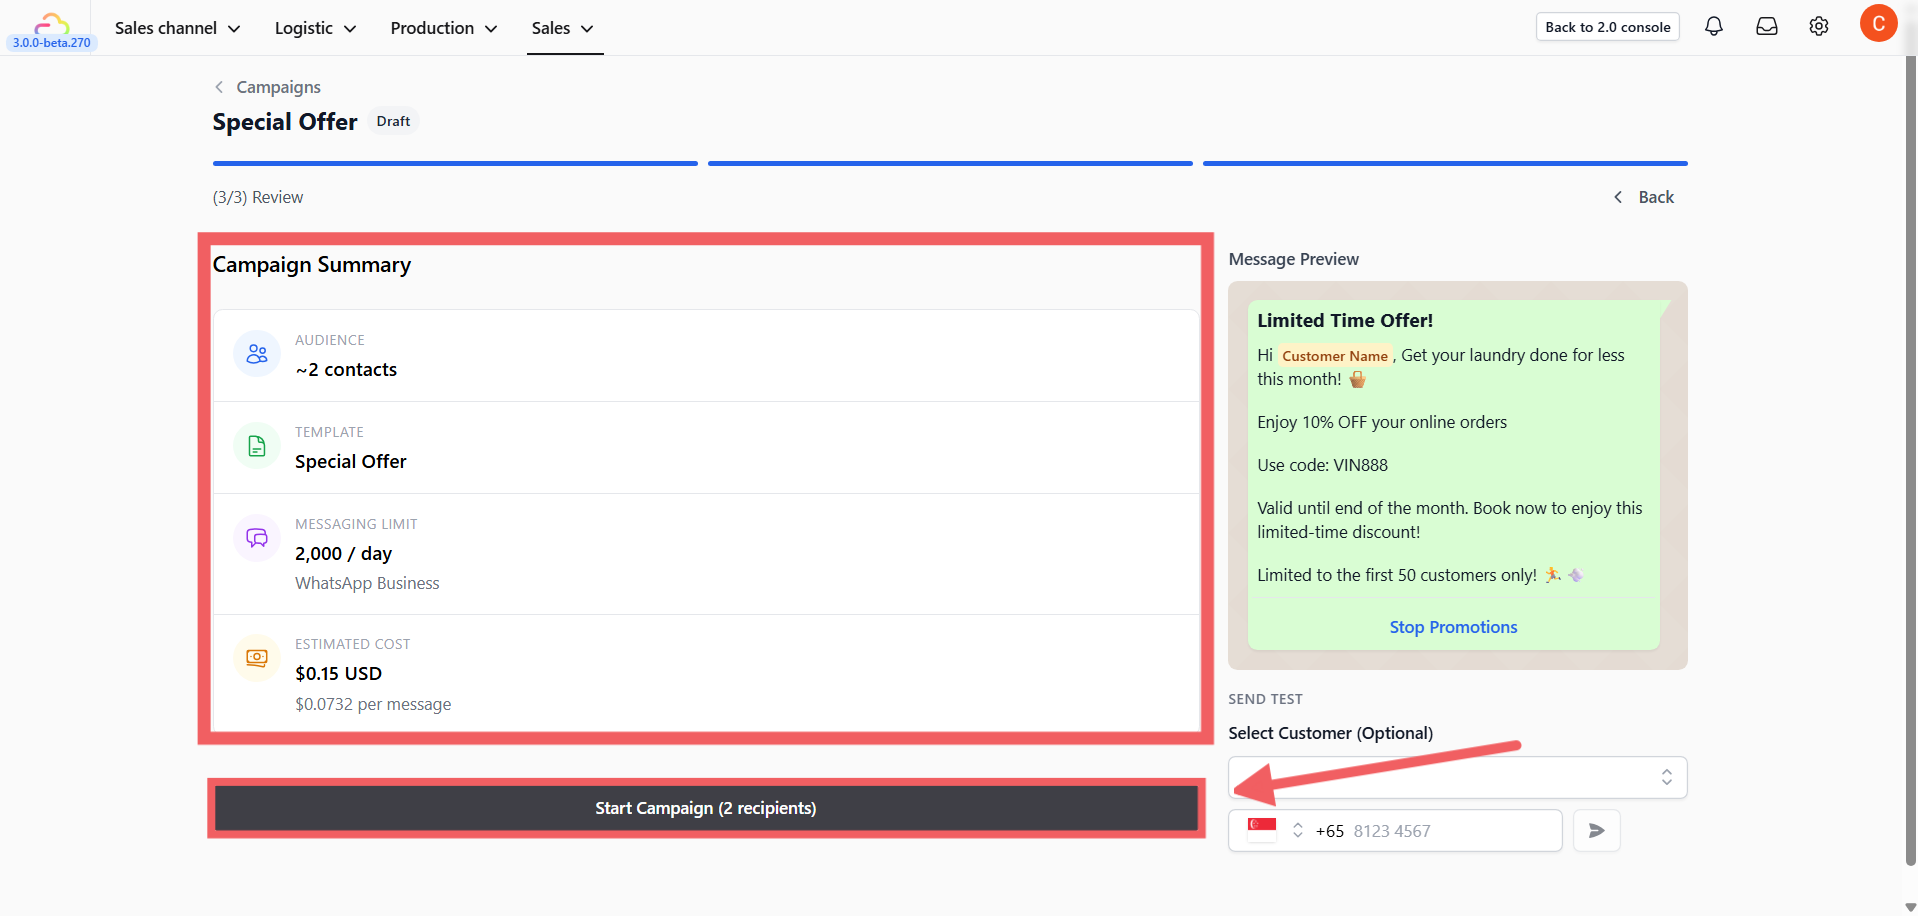
Click Next to proceed to the Summary page. This acts as your final checkpoint. You will see a **Campaign Summary** box containing:
- **Total Audience:** Number of recipients.
- **Template:** The message you're sending.
- **Messaging Limit:** Your current daily limit (e.g., 2,000 messages/day).
- **Estimated Cost:** Projected cost based on META's messaging rates.
EasyBiz Cloud does not charge you for sending campaign messages. All messaging fees are billed directly by META to your linked payment method. The estimated cost shown is based on META's published rates and may vary by recipient country. To manage your payment method, visit [META Business Manager → Payment Settings](https://business.facebook.com/billing_hub/payment_methods). To view rates, visit [WhatsApp Business Platform Pricing](https://business.whatsapp.com/products/platform-pricing).
### Start the Campaign
Once you are ready, click the Start Campaign button at the bottom. The system will begin sending the messages to your selected audience immediately.
---
## Track Performance
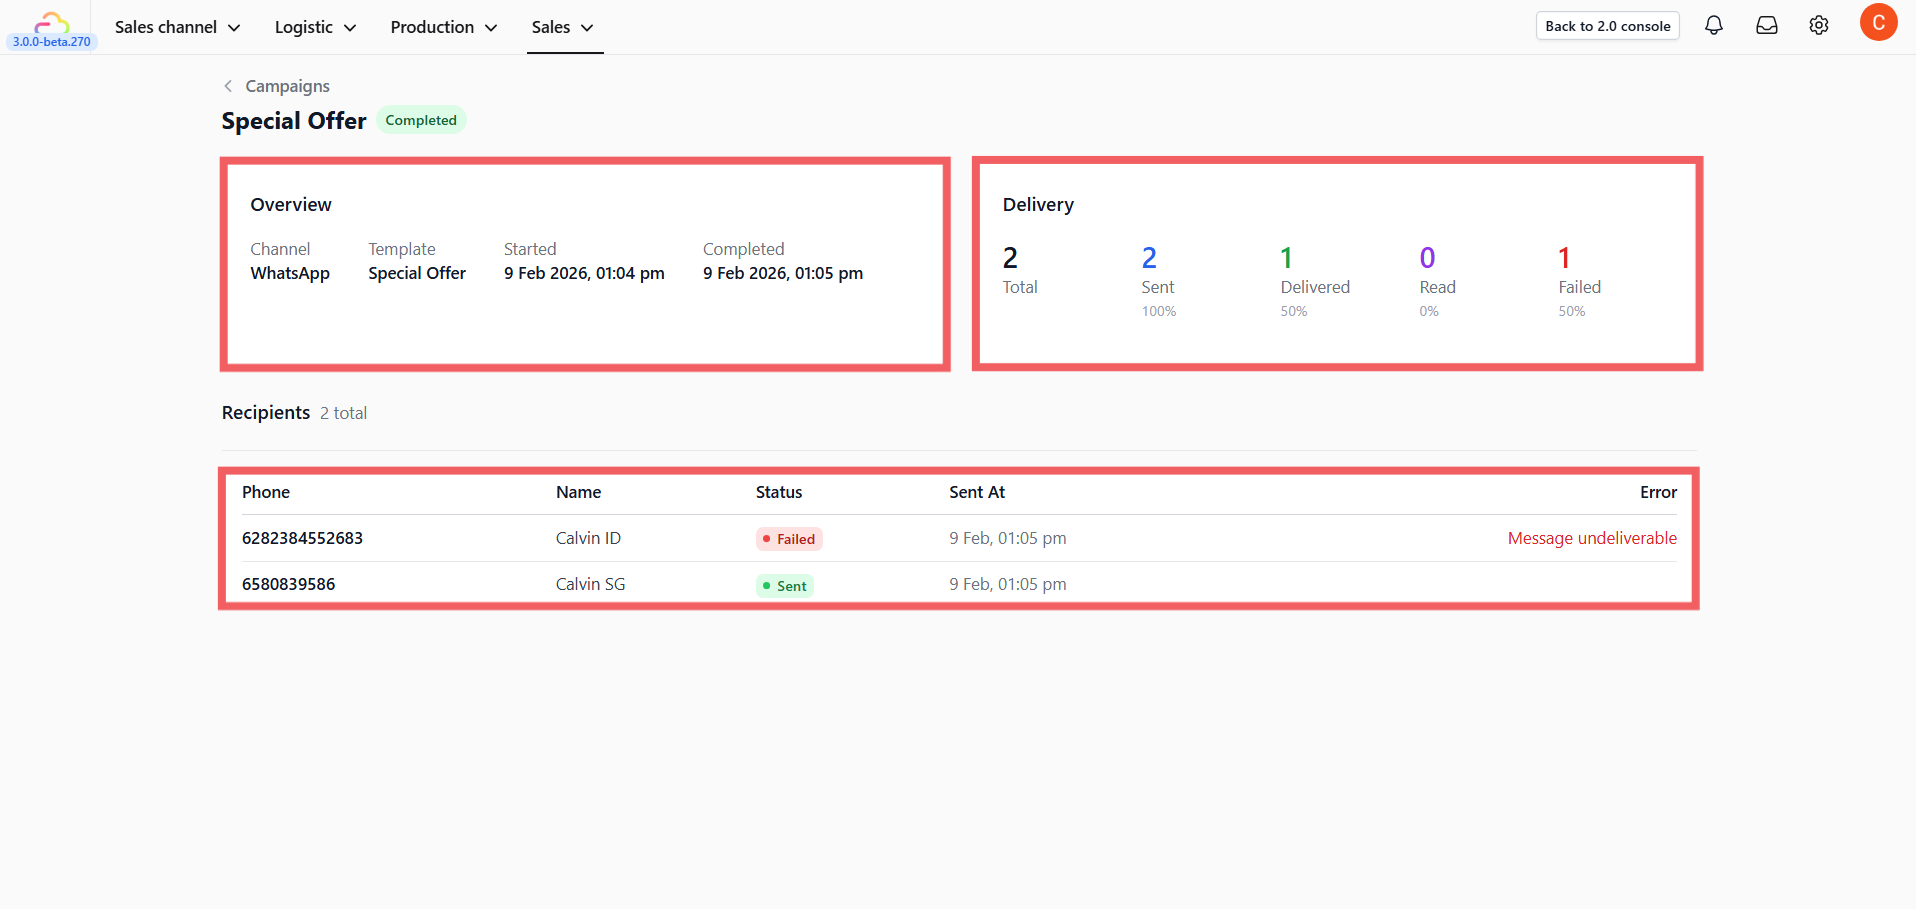
After the campaign starts, you will be taken to the **Statistics Dashboard**. Here you can monitor the results in real-time:
- **Sent** — Messages pushed from the system.
- **Delivered** — Messages that reached the customer's phone.
- **Read** — Messages the customer actually opened.
- **Failed** — Messages that couldn't be delivered (usually invalid numbers).
Messages that fail to deliver (e.g., invalid numbers or unregistered contacts) are generally not charged by META. You will only be billed for messages that are successfully delivered.
You can view a summary list of all your past campaigns on the main **Campaigns** page. Clicking on any campaign name in the list will take you back to this detailed statistics view.
---
## Tips and Best Practices
### Messaging Limits
WhatsApp limits how many new customers you can message within 24 hours. Your limit depends on your account reputation:
- **New / unverified accounts:** 250 per day
- **Verified (starting level):** 1,000 per day
- **Higher tiers:** 10,000 → 100,000 → Unlimited
Start small on your first few campaigns. Sending too many messages too fast can get your number restricted or banned. Build your reputation gradually.
You can check your current limit in [WhatsApp Manager → Phone Numbers](https://business.facebook.com/wa/manage/phone-numbers/).
---
### When to Send
- **Weekday mornings (9 AM – 12 PM)** — People check their phone during their morning routine.
- **Weekday evenings (5 PM – 8 PM)** — Off work, more likely to read and respond.
- **Weekend mornings (10 AM – 12 PM)** — More free time to browse and act on promotions.
- **Avoid** late nights, early mornings, public holidays, and Monday mornings.
Compare read rates across your campaigns over time. If Tuesday mornings consistently get higher engagement than Friday evenings, adjust accordingly.
---
### How Often to Send
Don't send more than 1–2 campaigns per week unless you have something genuinely useful to share. Over-messaging is the fastest way to get blocked. You can see the section below on how to include a Stop Promotions button so customers can opt out cleanly.
---
## Managing Customer Opt-Outs (Stop Promotions)
Give your customers the option to stop receiving promotions. This prevents spam complaints and keeps your messaging reputation healthy.
### Setting Up the "Stop Promotion" Button
Add this button to your Marketing Template before using it in a campaign:
1. Go to Settings → Templates.
2. Select WhatsApp and go to the Marketing tab.
3. Find the template you want to use, click the **three dots (**•••**)**, and select Edit template.
4. In the editor, look at the left panel and find the Buttons section.
5. Click + Add Button and select Quick Reply as the button type.
6. Enter the text **Stop Promotions** in the button text field.
7. Click Update and then Submit the template for approval.
### What the Customer Sees
- When a customer taps **Stop Promotions**, they receive an automatic message confirming they've been unsubscribed. They'll still get order updates and receipts as normal.
- The system automatically excludes them from future campaigns.
- If they change their mind, they can reply **START** to re-subscribe.