The order receipt is the slip your POS prints for an order, for example at drop-off. You set it up in the Console under ⚙️ Settings › **Receipt template**: click **New receipt**, pick a starting point (Customer receipt, Shop copy or Delivery order), change the lines it prints, check it on the preview and click **Save**. Then choose it for each business unit in its **Documents** tab.
Video (1 min): setting up your order receipt and payment methods, step by step.
## What this receipt does
The order receipt shows your shop details, every item and price, the payments taken and the amount still due. Staff hand it over when a customer drops off items or pays. One receipt can be shared by every POS terminal in the same business unit.
It helps you:
- Give every customer the same clear proof of what they handed over and paid.
- Show the order number your staff and customers use to find the order later.
- Print only the details your shop needs, in your own wording.
**Can I skip this?** Only if your shop never prints receipts. Without one, the POS shows "Receipt not configured" when staff try to print.
---
## Before you start
- **[Connecting Your Printers to the POS](/docs/connecting-your-printers-to-the-pos)**: pair your receipt printer first, so you can print a test.
- **[Introduction to Business Units](/docs/introduction-to-business-units)**: a business unit is one line of your business, such as Laundry or Home Cleaning. Each one chooses its own receipt.
- If you set up a receipt before: the editor is now one list of lines, and the logo switch is now a line. See Change what the receipt prints below.
---
## Open the Receipt Templates page
1. Click the ⚙️ Settings icon in the top-right corner of the Console.
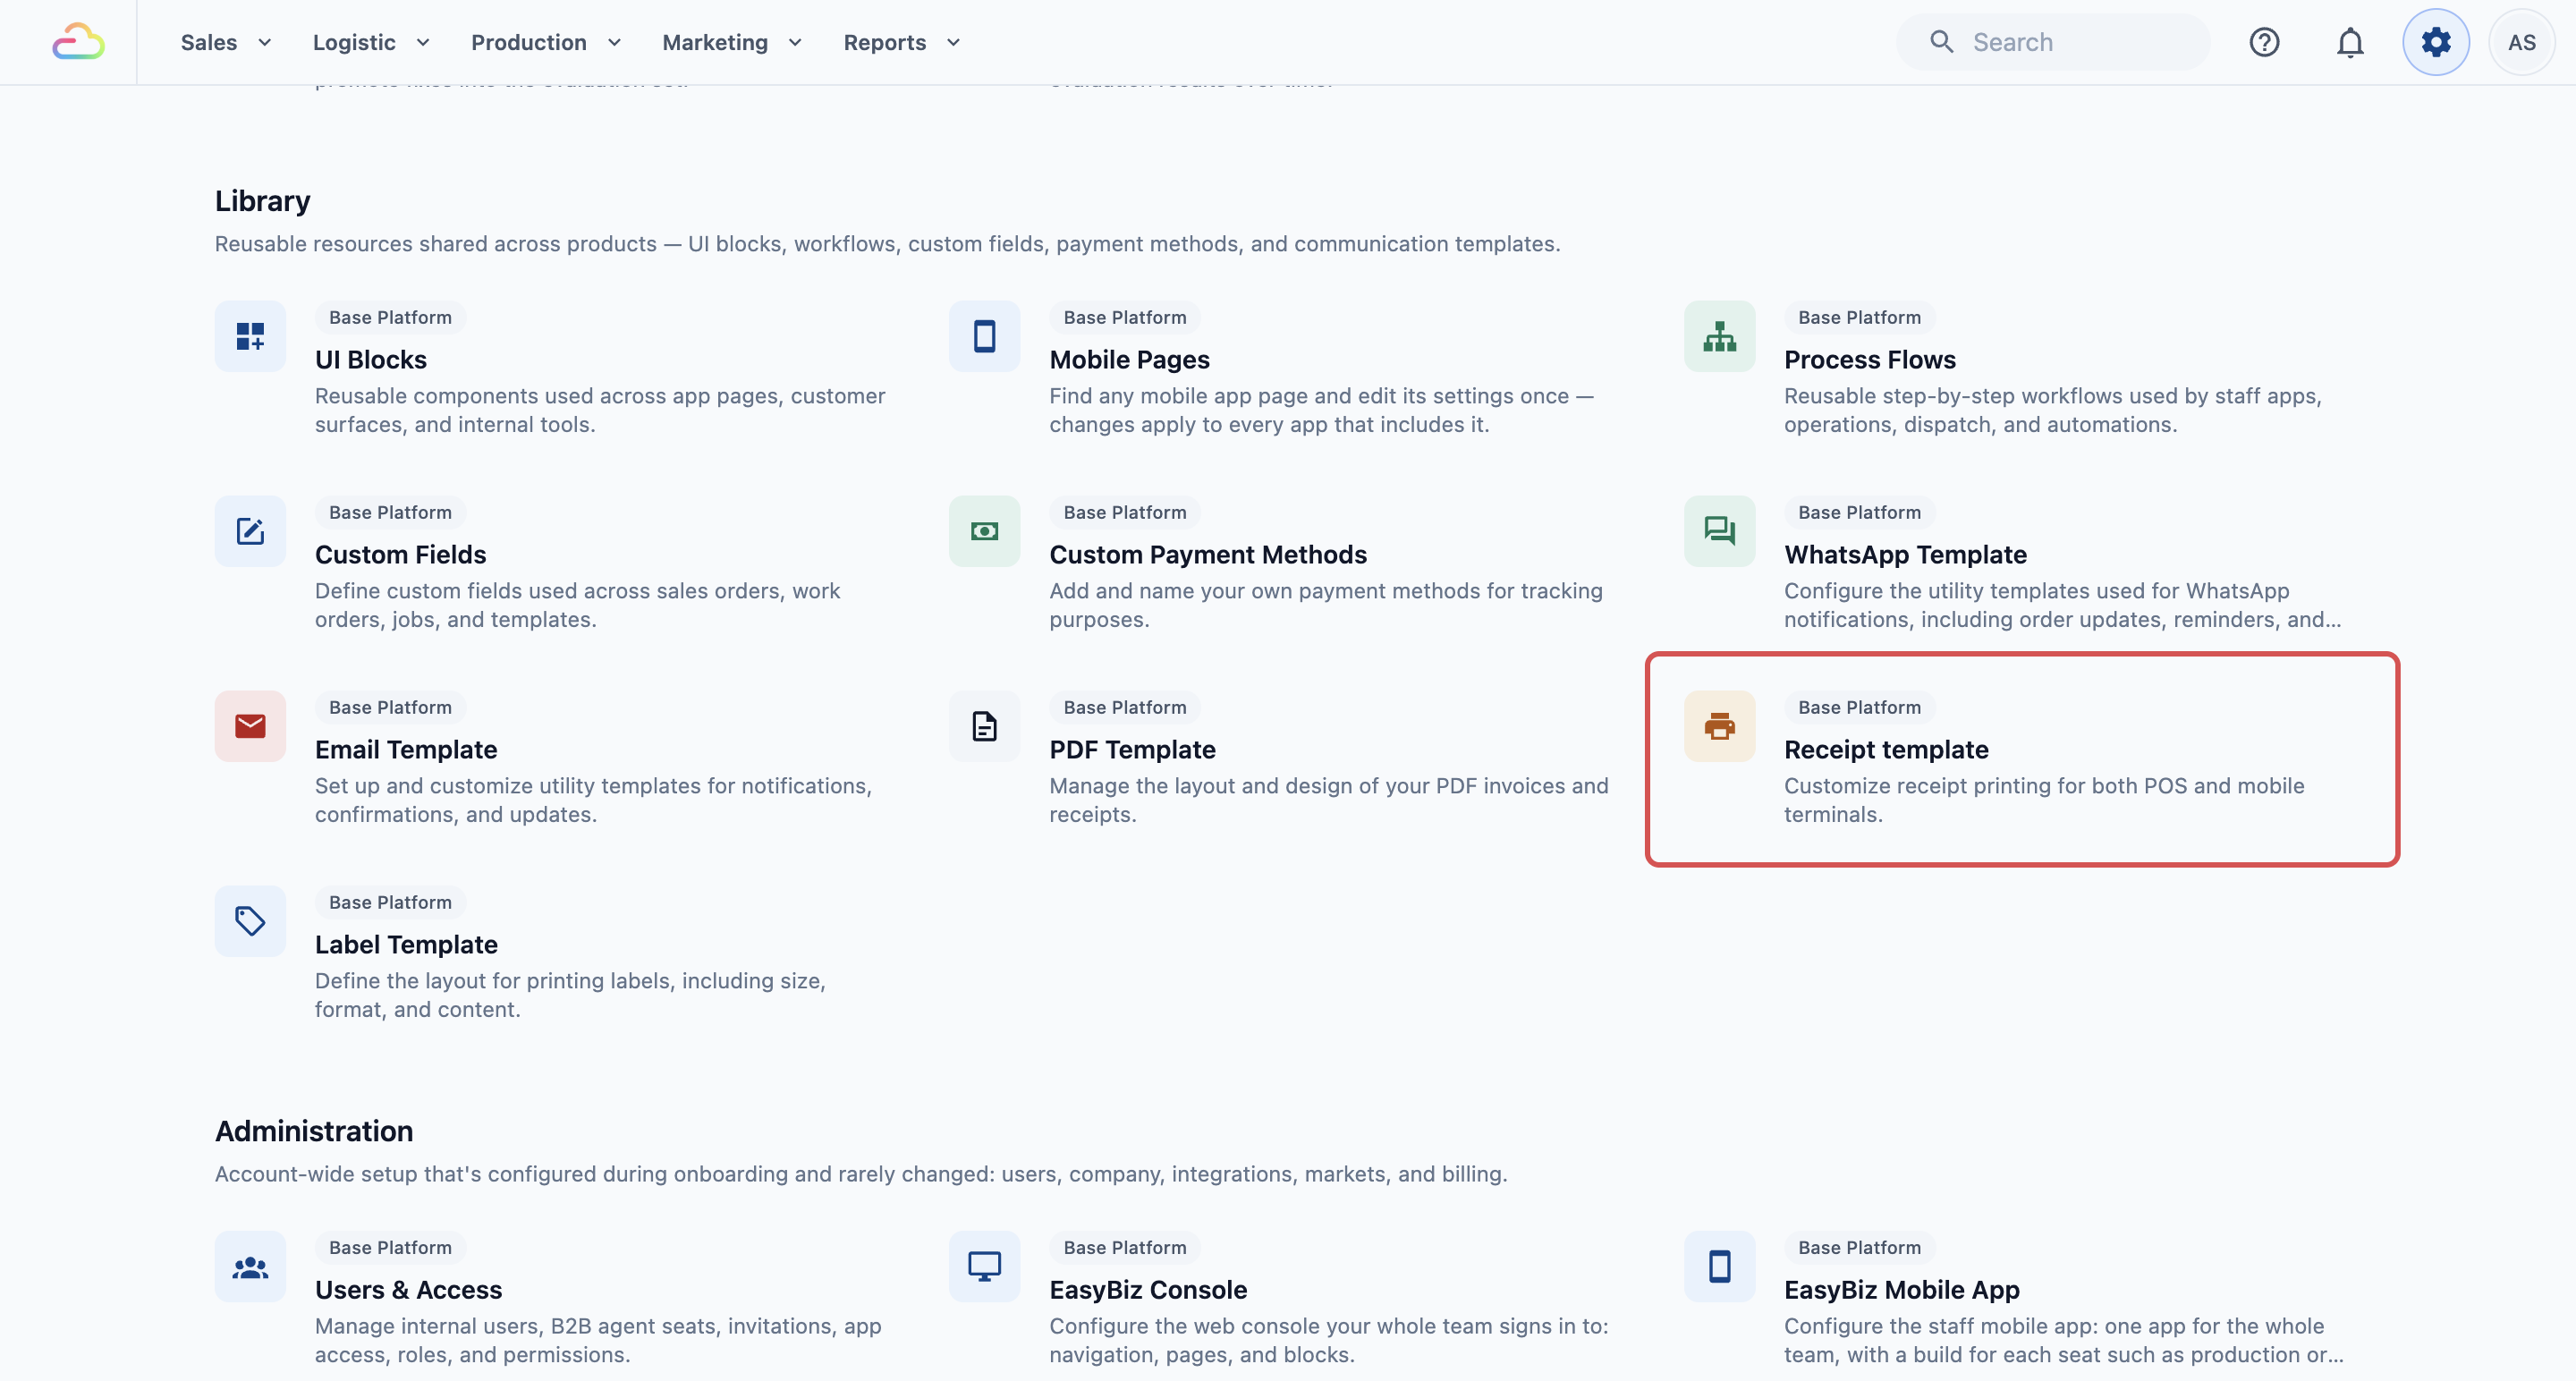
2. Under the **Library** section, click Receipt template.
3. The **Receipt Templates** page opens. It has 2 lists:
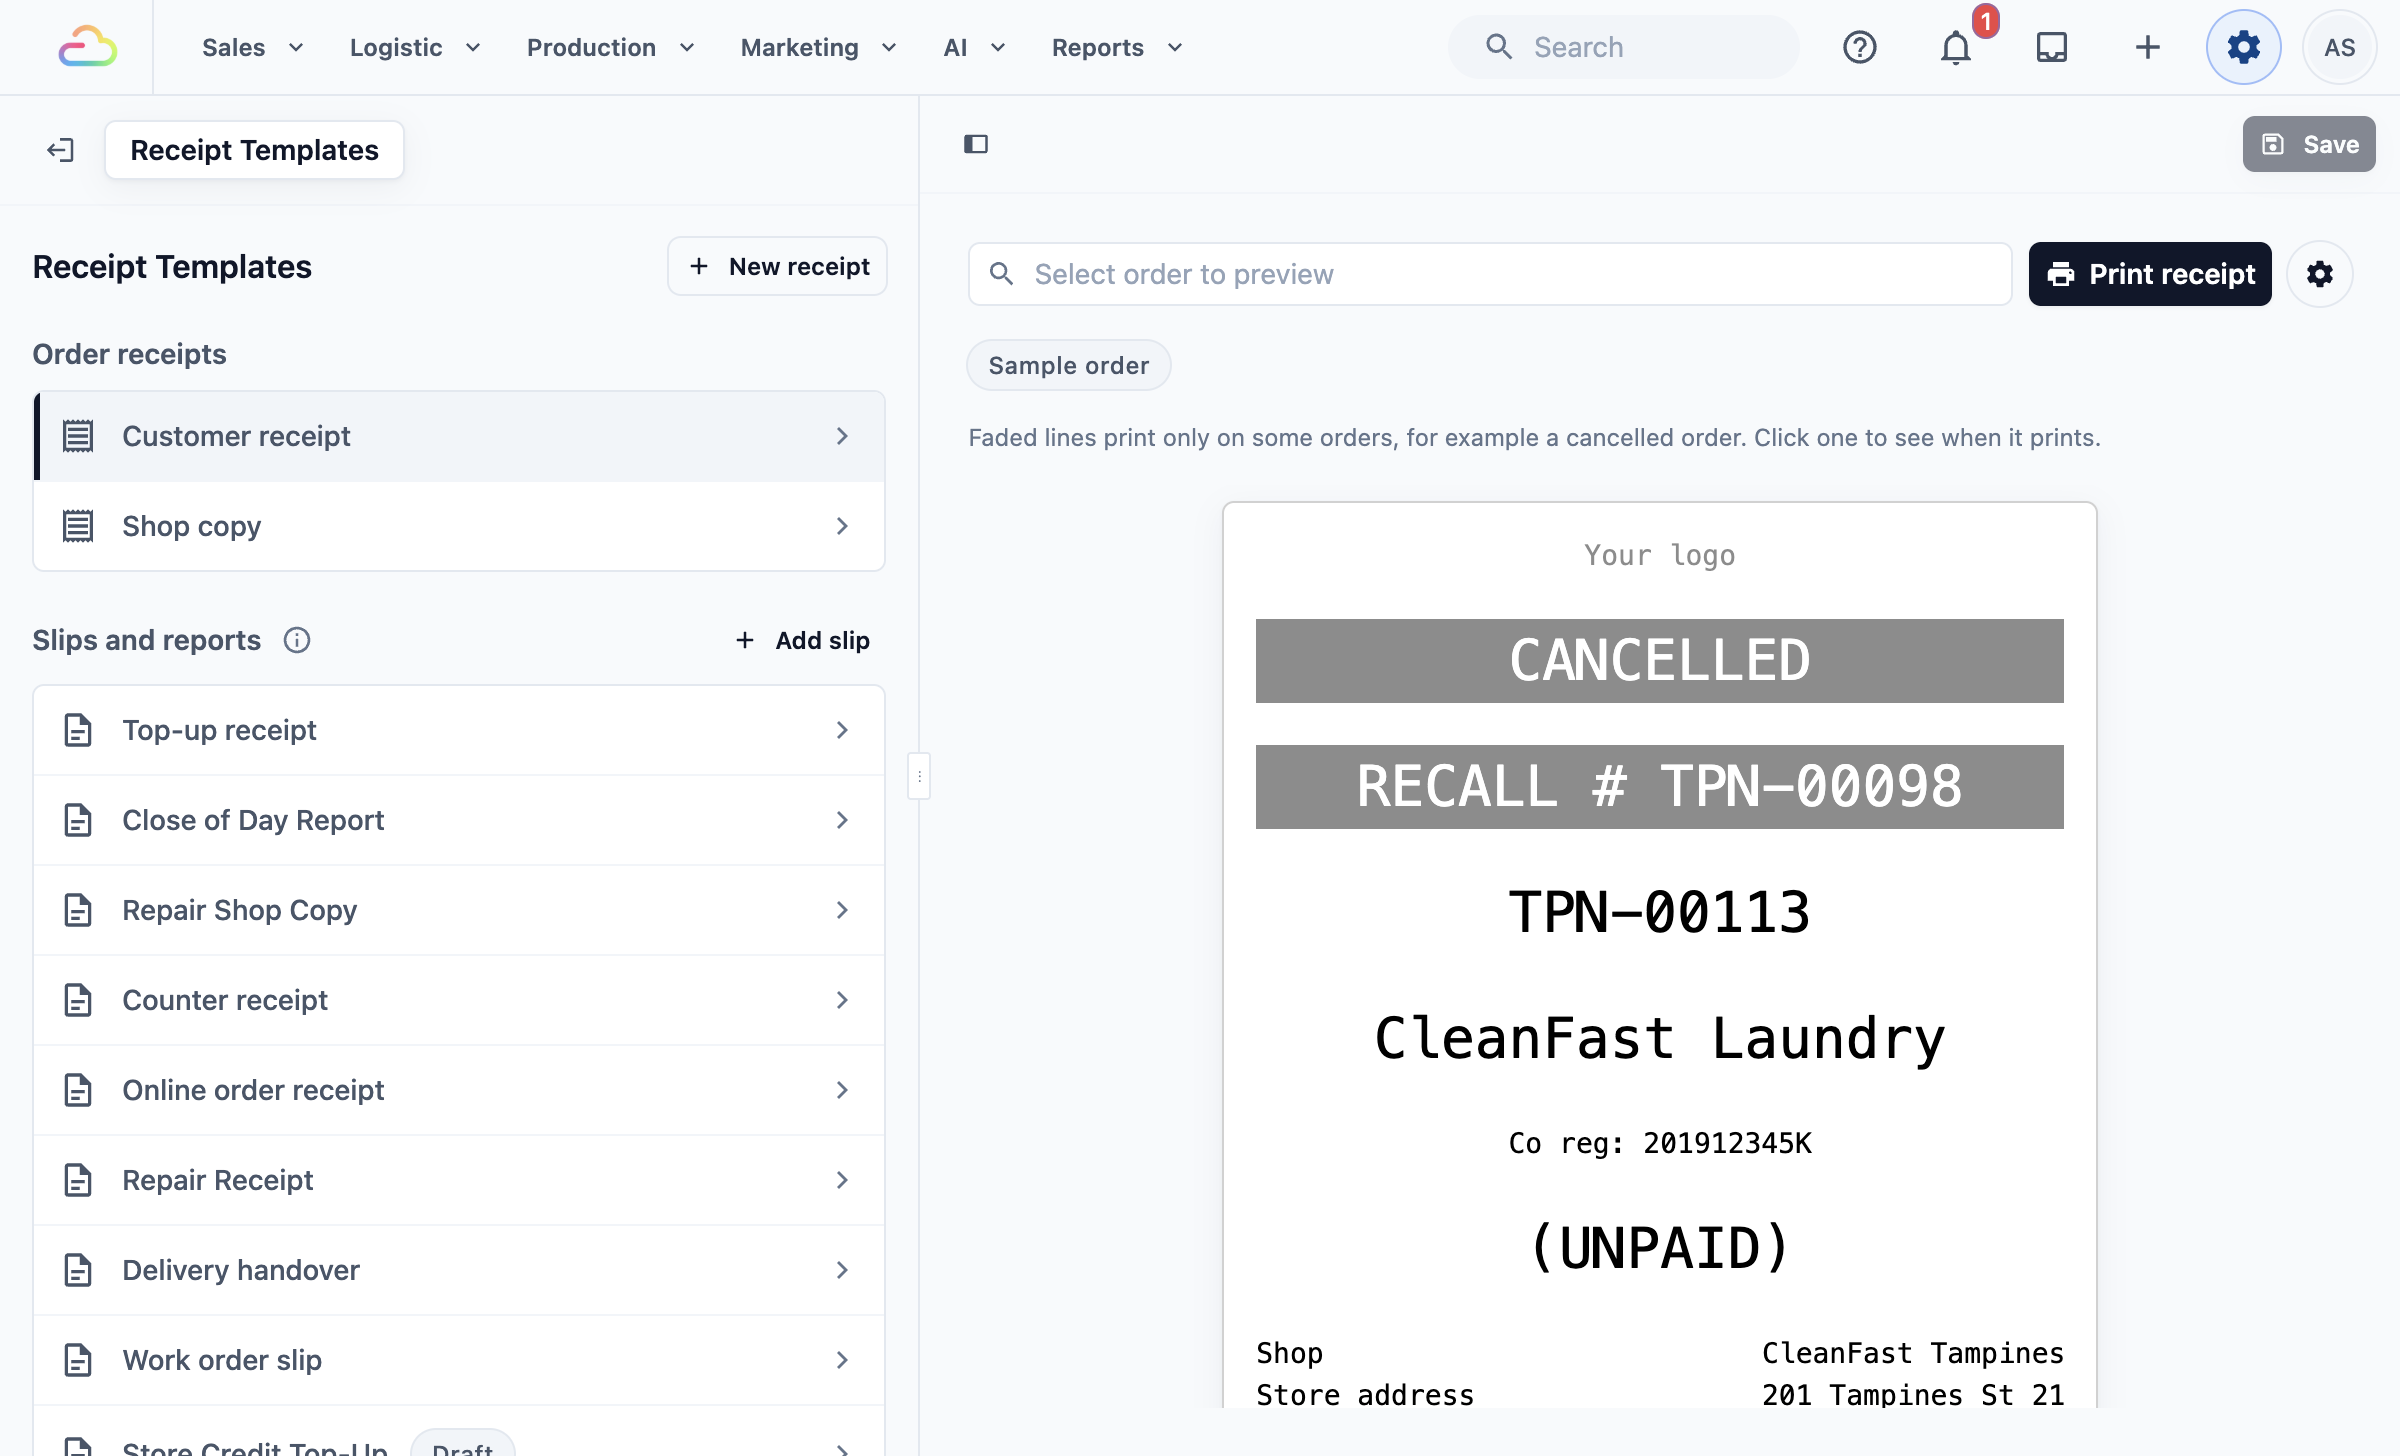
- **Order receipts**: the receipts printed for an order. This article covers these.
- **Slips and reports**: work order slips, handover receipts, close of day reports and other notes staff print. They open in their own editor.
Point at a receipt to see it on the preview. Click it to change it.
---
## Add an order receipt
If **Order receipts** already lists your receipt, click its name and skip to the next section.
1. Click New receipt in the top right.
2. Pick a starting point. The receipt is saved straight away, and you see "Receipt added".
3. The receipt opens. Type a plain name in **Name**, such as "Counter Receipt". Staff see this name when they choose a receipt.
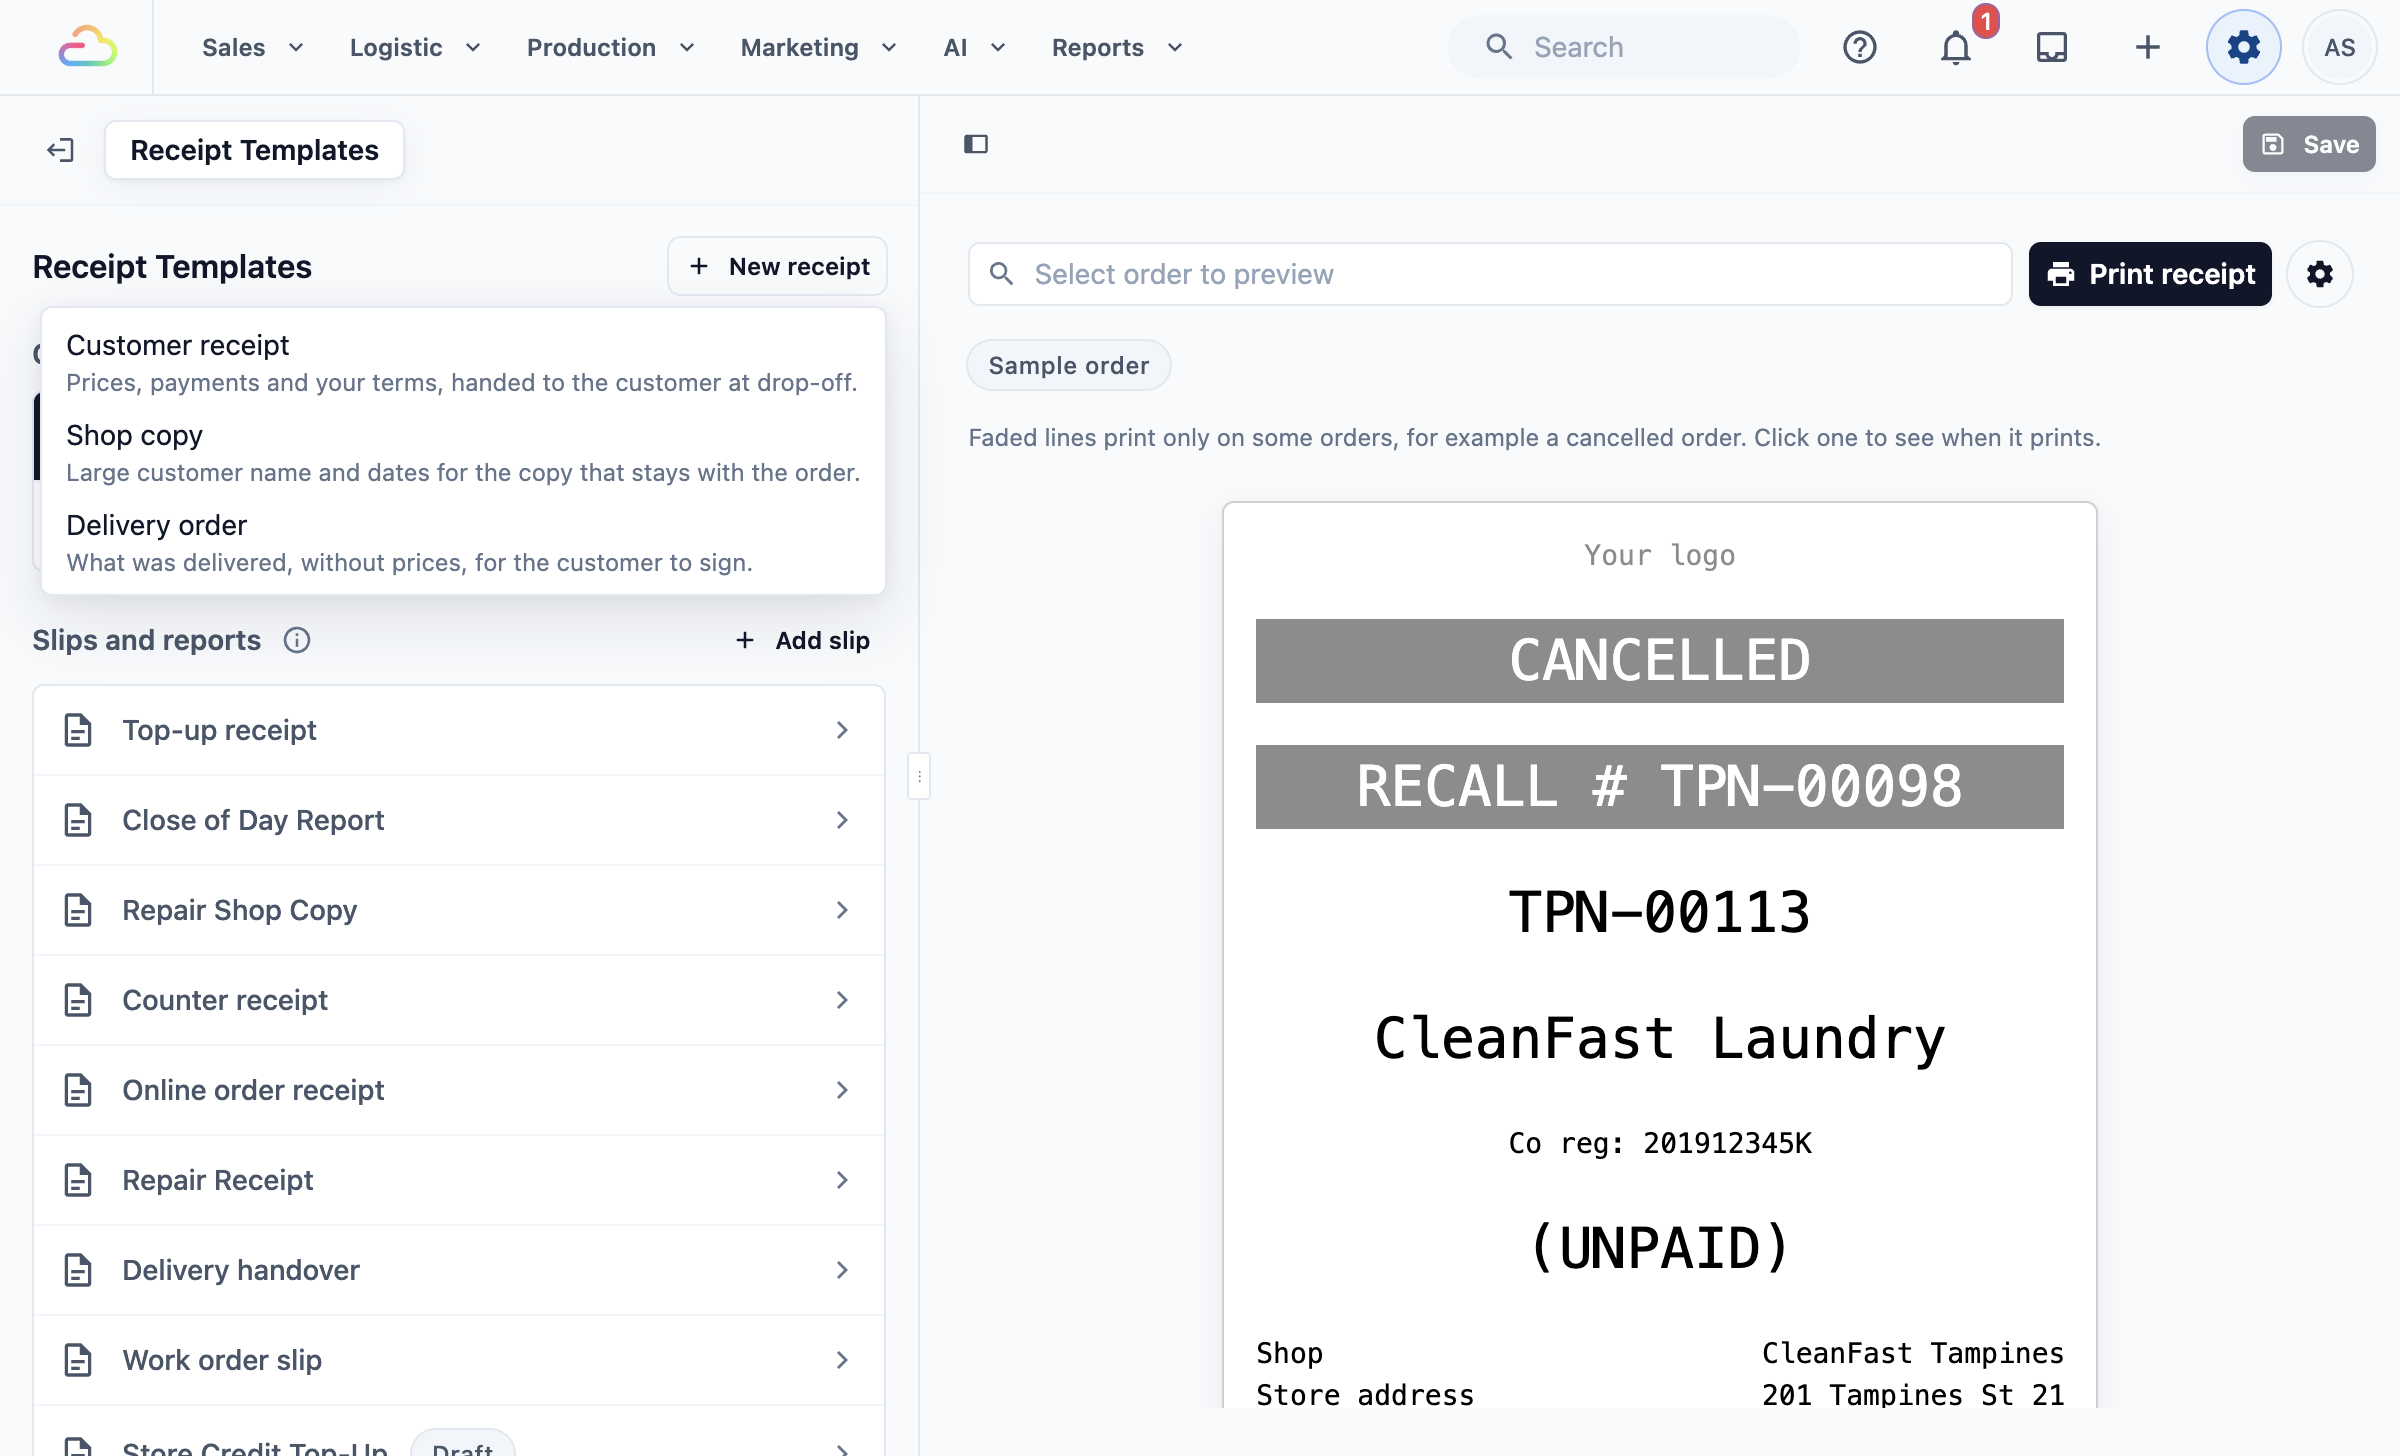
| Starting point | What it is for |
| --- | --- |
| Customer receipt | Prices, payments and your terms, handed to the customer at drop-off |
| Shop copy | Large customer name and dates for the copy that stays with the order. No prices |
| Delivery order | What was delivered, without prices, for the customer to sign |
You can change everything afterwards, so the starting point only saves you typing.
---
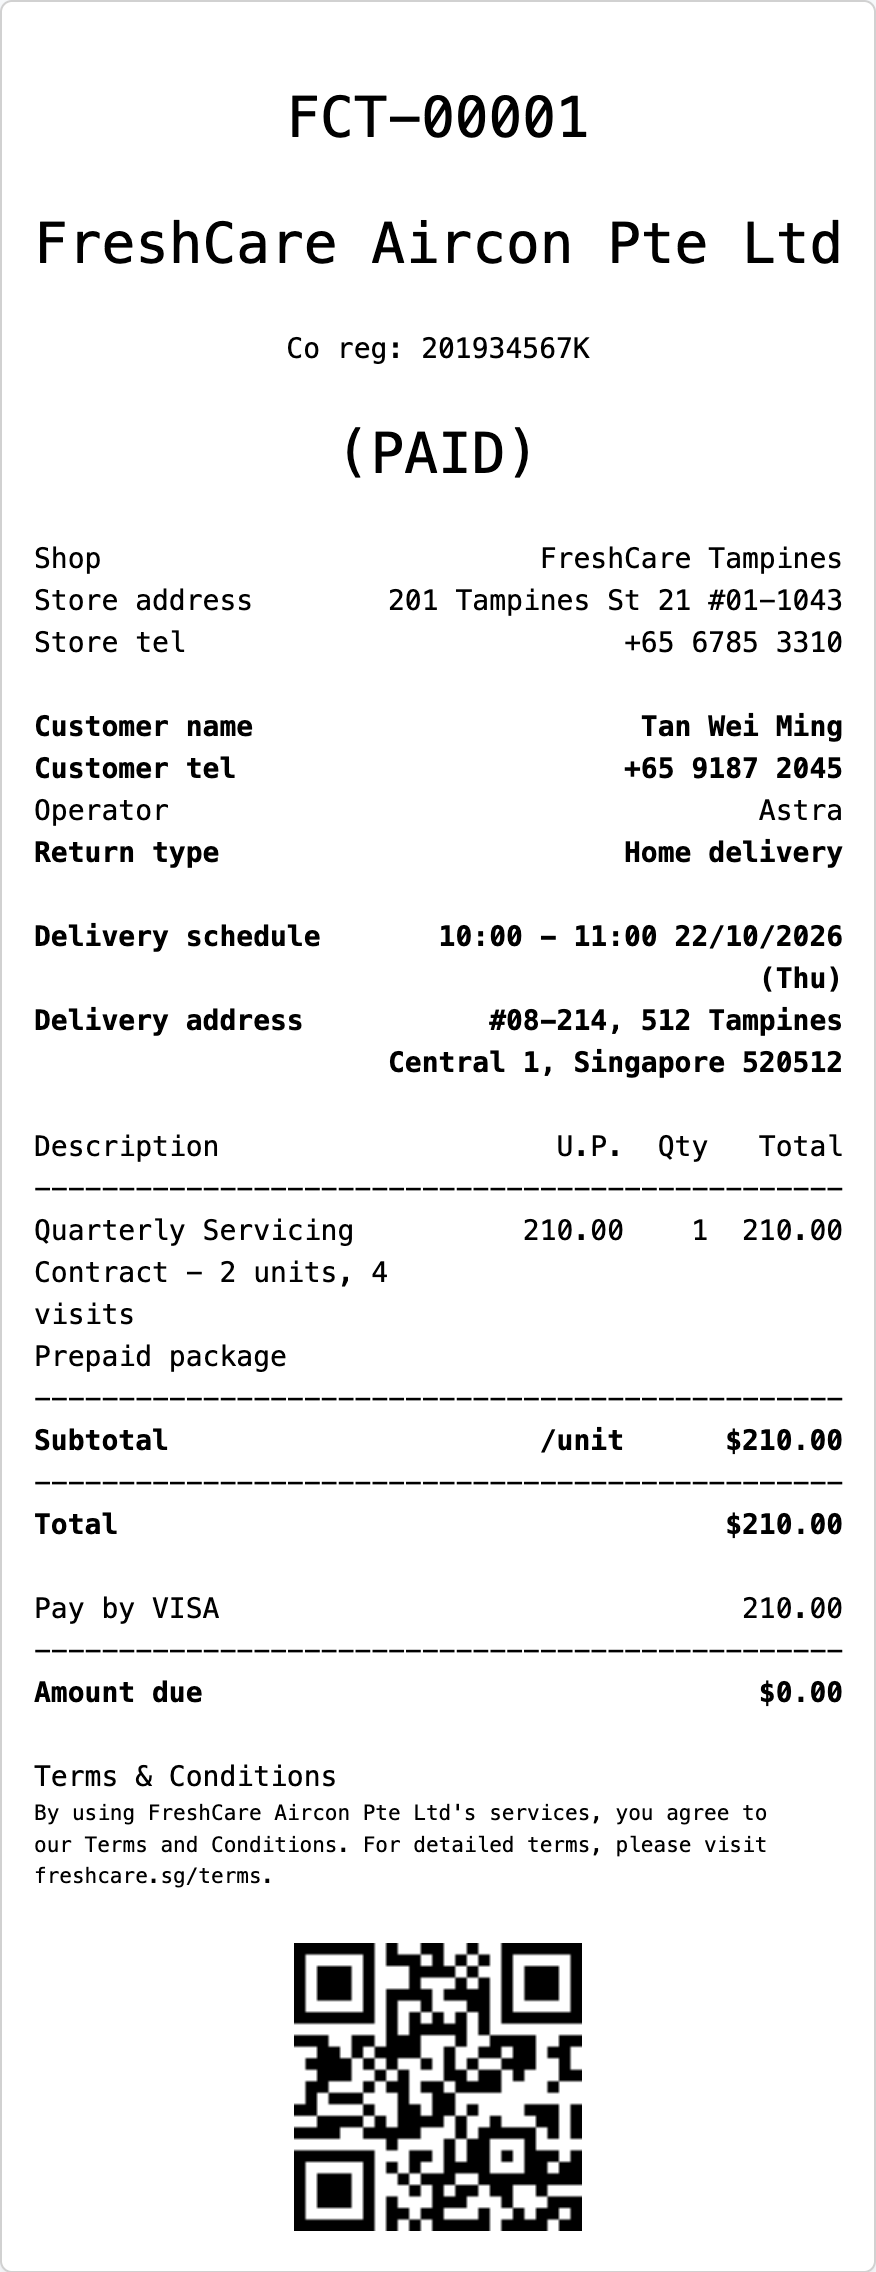
## What a new Customer receipt prints
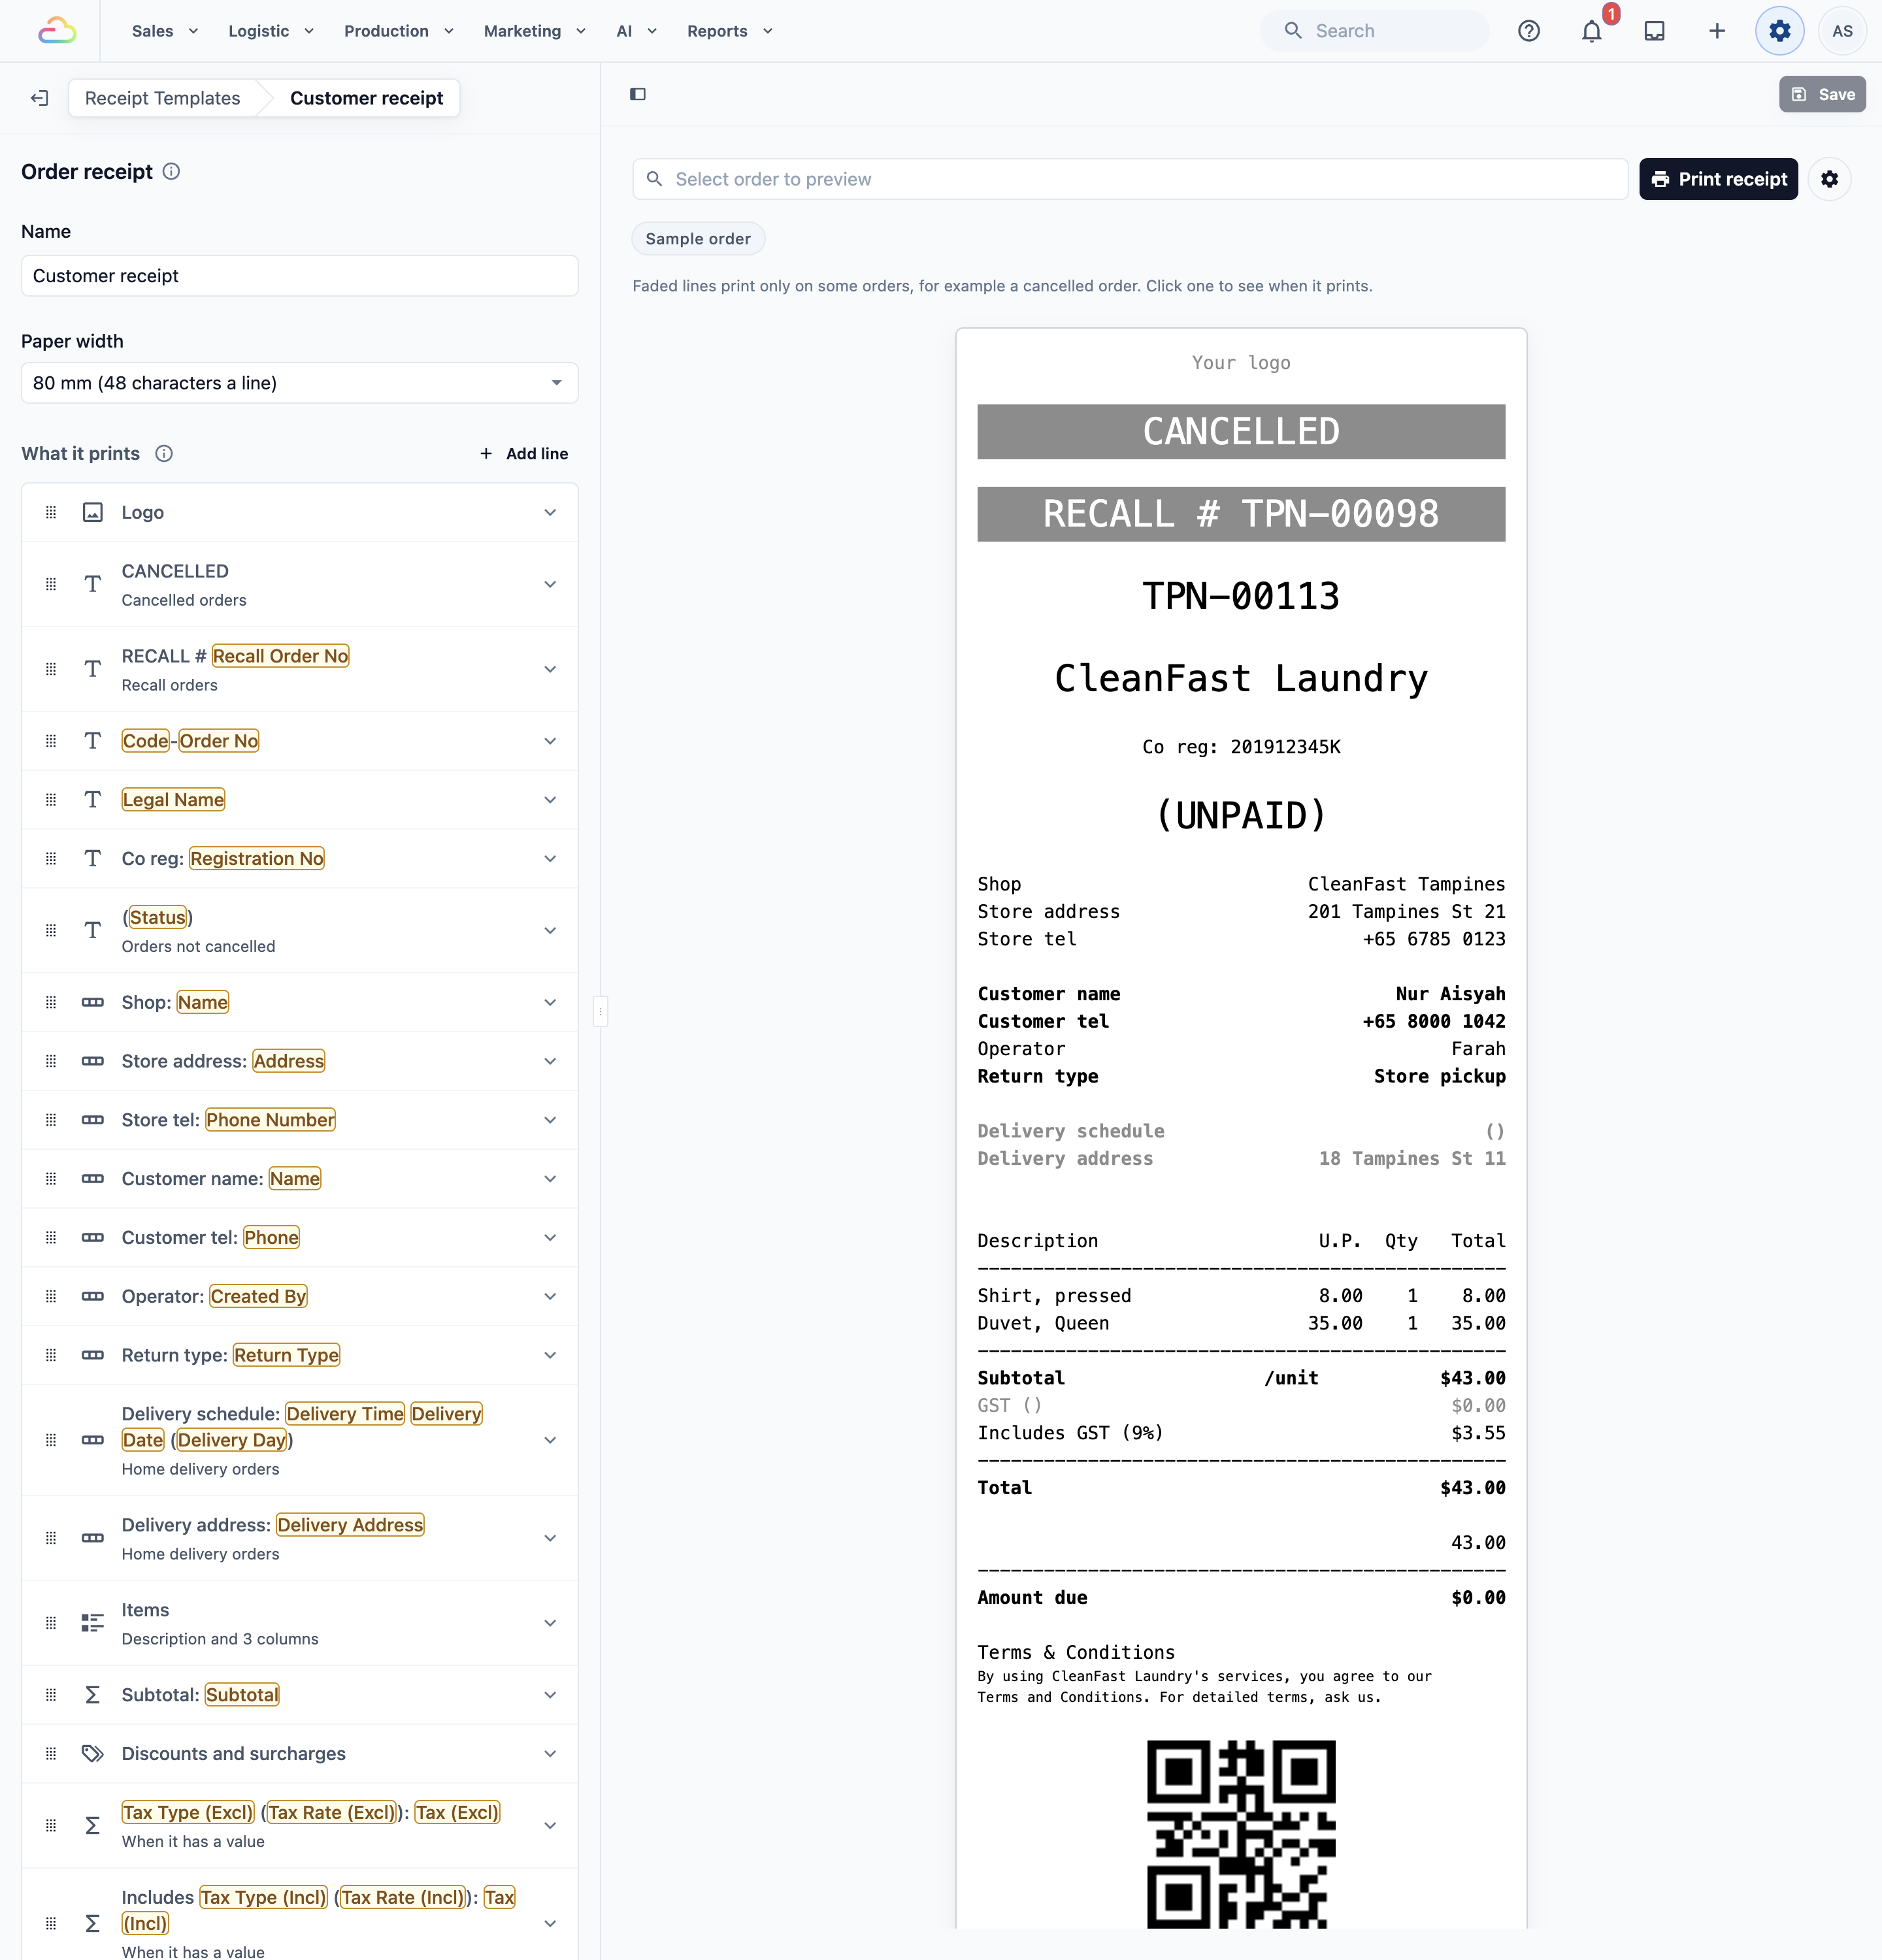
- Your logo at the top, and a large **CANCELLED** or **RECALL** notice when the order is cancelled or is a recall.
- The sales channel code and order number, such as VINZ1-00113. A sales channel is the shop or counter that took the order.
- Your company name and registration number, and the order's status.
- The shop's name, address and phone number.
- The customer's name and phone number, the staff member who served them ("Operator") and the return type.
- The delivery schedule and address, only on home delivery orders.
- Each item, with Description, U.P. (unit price), Qty and Total.
- Subtotal, any discounts and surcharges, tax, Total, each payment taken and the Amount due.
- A short Terms & Conditions note and an order QR code staff scan to open the order.
A **Shop copy** prints the order number, shop, customer name, drop-off date, number of pieces and collection date in large text, then the items and quantities. A **Delivery order** prints the items and quantities without prices, a line for the customer to confirm the goods arrived in good condition, and a signature space.
---
## Change what the receipt prints
An order receipt has these settings, from top to bottom:
- **Name**: what staff see when they choose the receipt.
- **Paper width**: choose **80 mm (48 characters a line)** for a normal counter printer, or **58 mm (32 characters a line)** for a small handheld printer.
- **What it prints**: every line the receipt prints, in one list from top to bottom.
- **Blank lines at the end**: extra paper after the last line, from 0 to 6, so the receipt tears off cleanly.
The 5 parts (Top, Details, Items, Totals and Bottom) and the **Print your logo at the top** switch are gone. Every line now sits in one list, and the logo is a line of its own that you can move or remove.
### What it prints
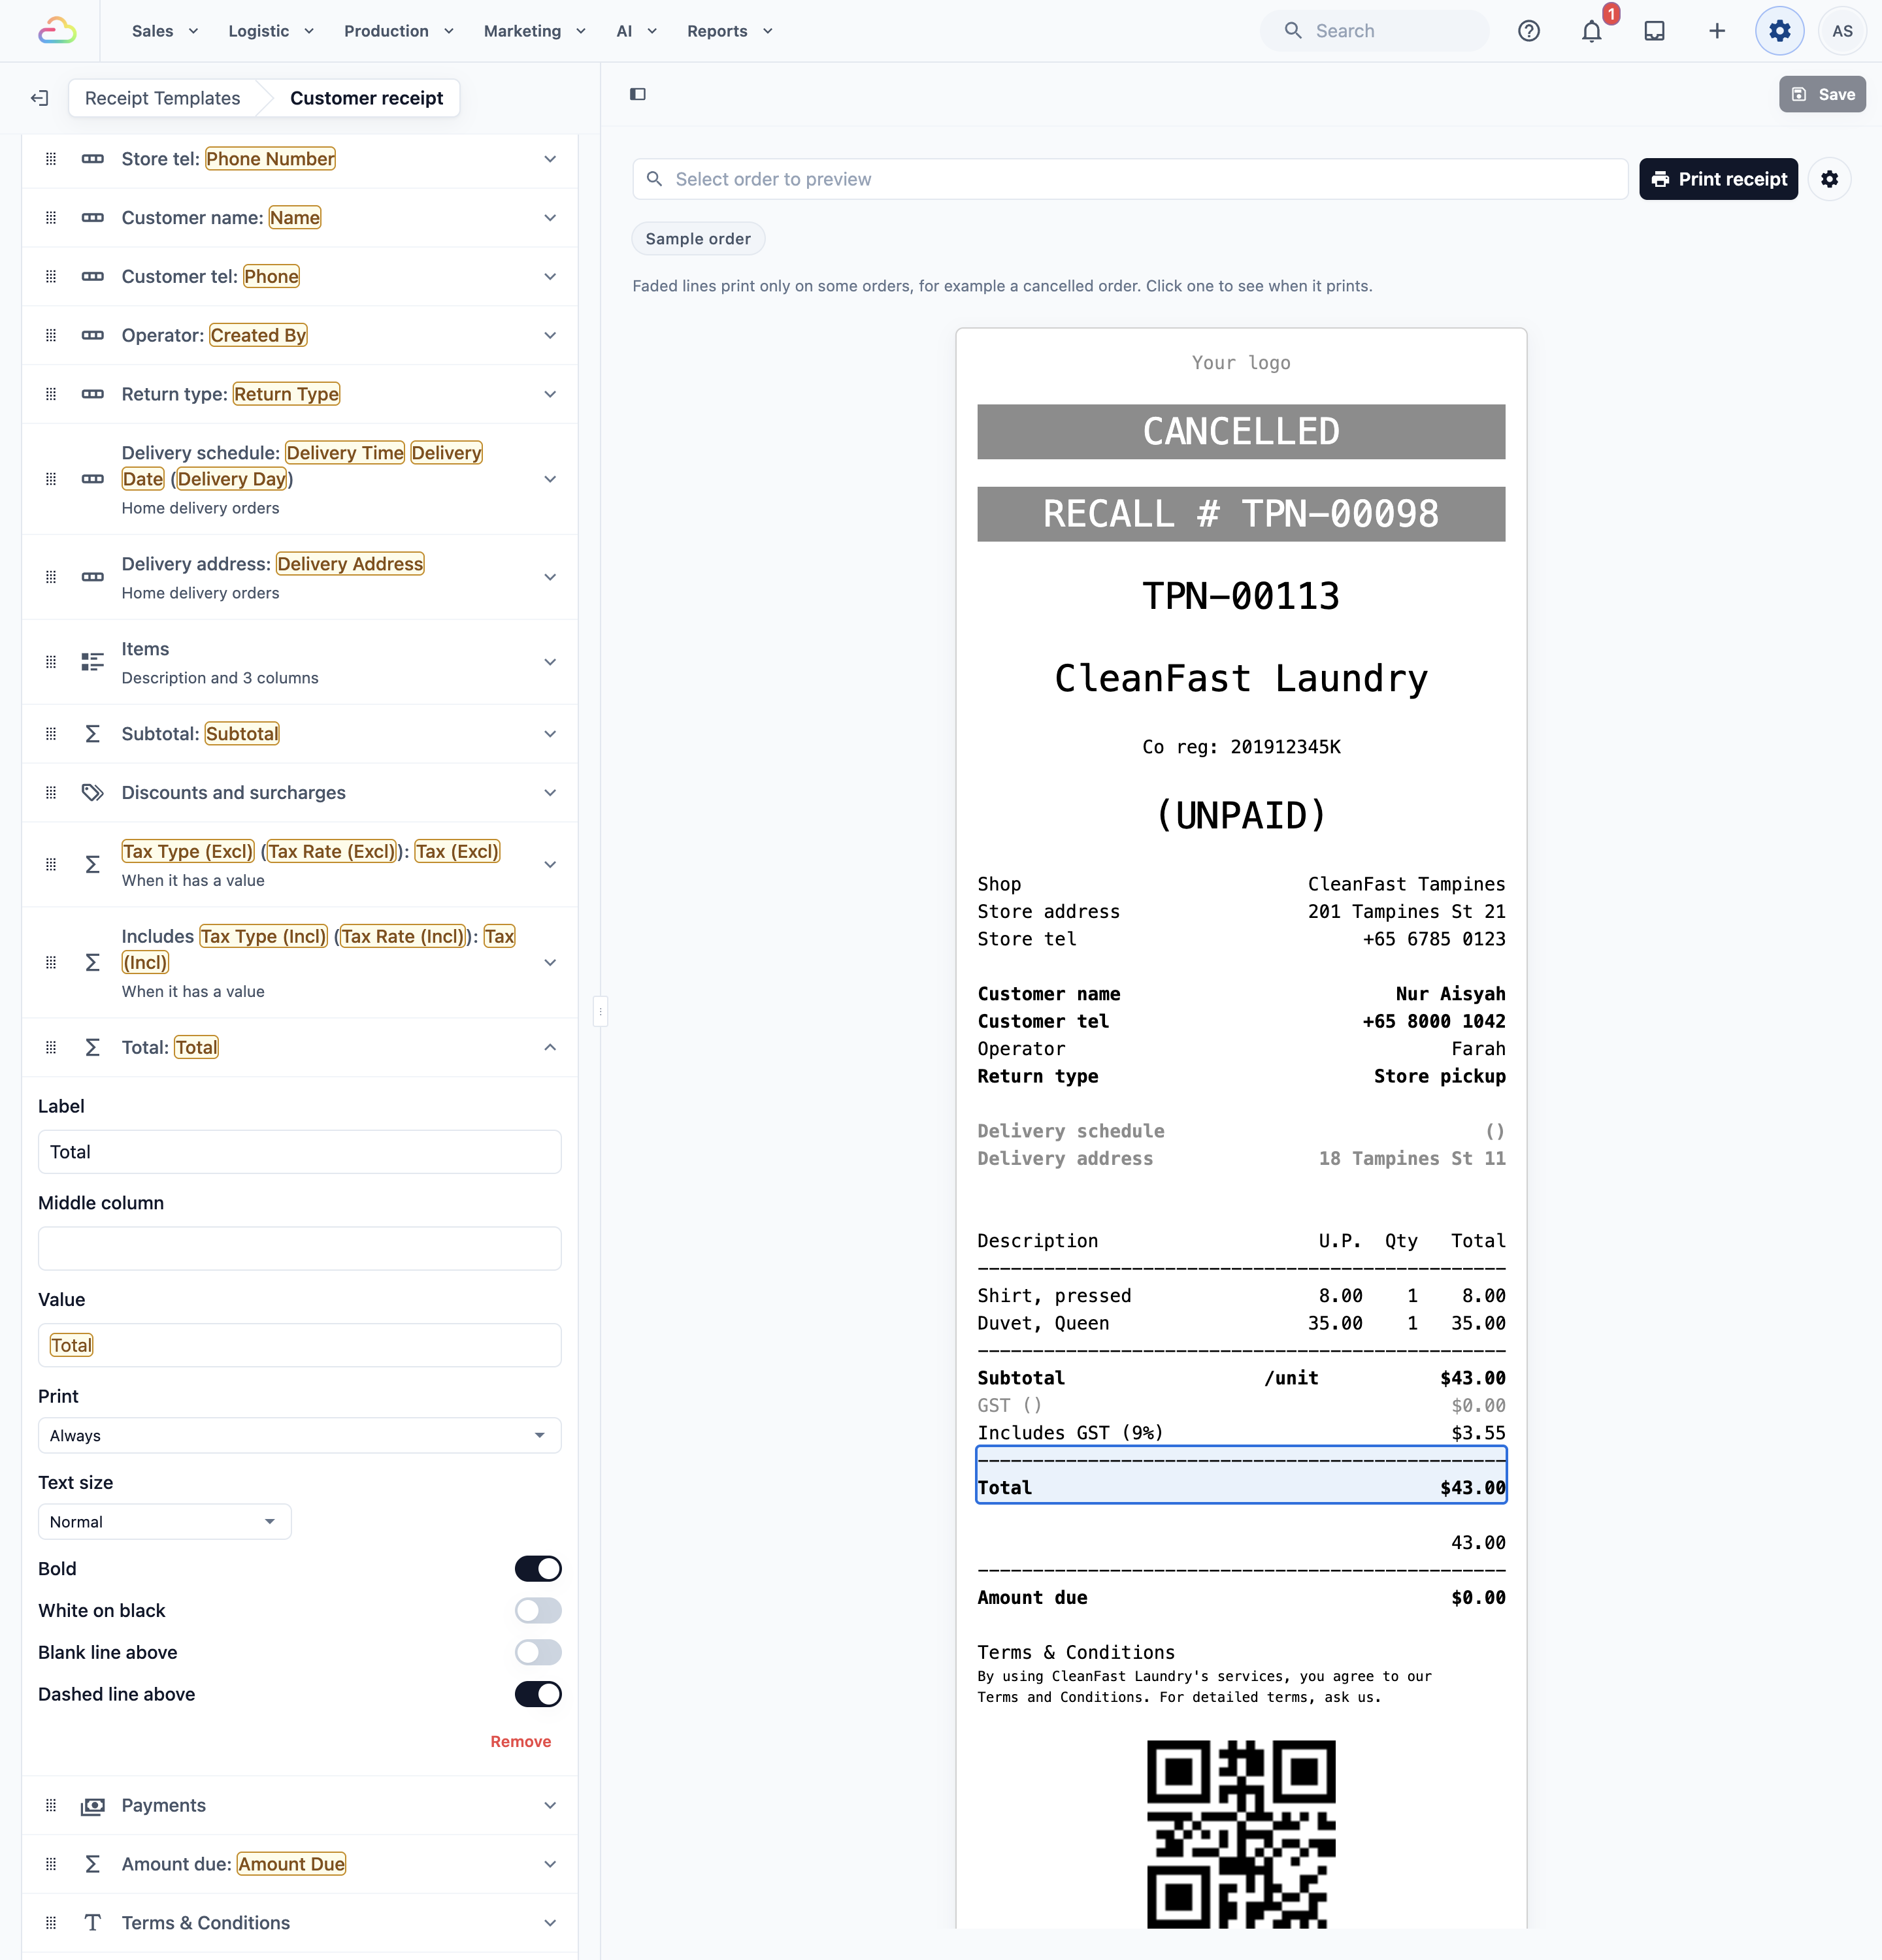
The list shows each line in the order it prints, so what you see in the list is what you get on paper.
- Click a line to open it. The preview marks what that line prints.
- Drag a line up or down to move it on the receipt.
- Click Remove in an open line to take it out.
- Click a line on the preview to open that line in the list.
To add a line, open the line you want it to follow, then click Add line and pick a type. The new line goes under the open line. If no line is open, it goes at the end.
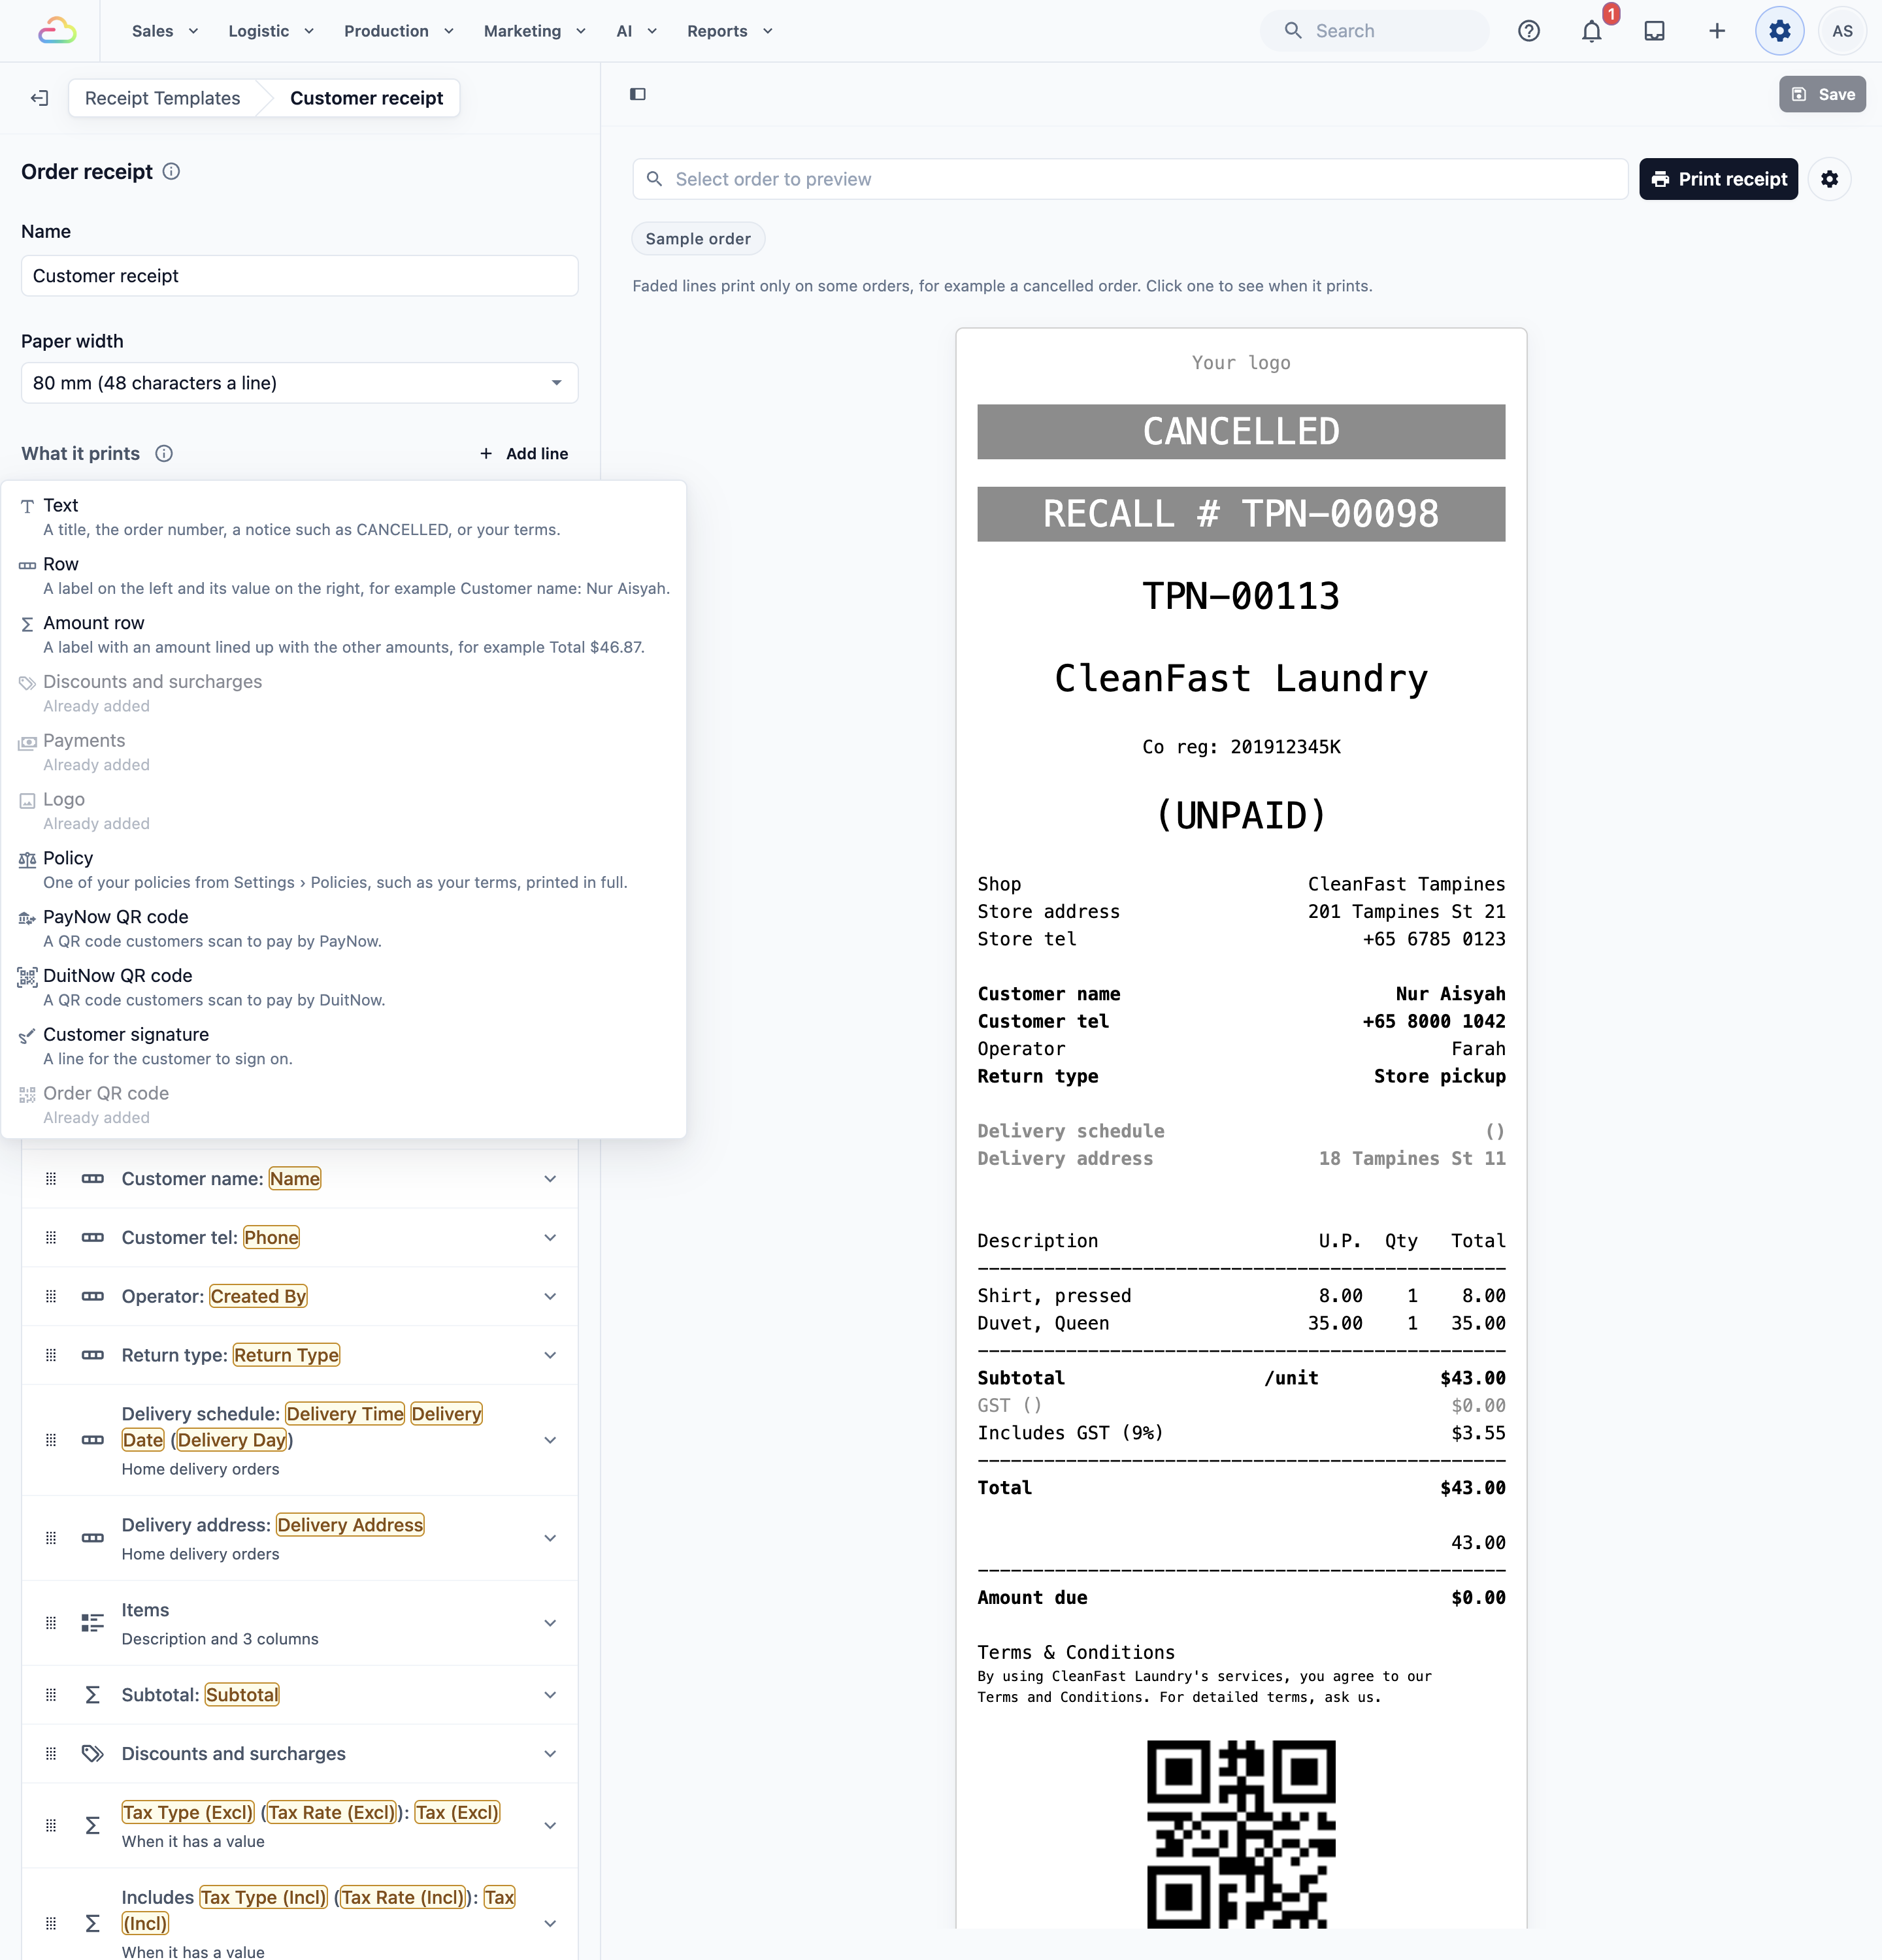
**Add line**
| Line | What it prints |
| --- | --- |
| Text | A title, the order number, a notice such as CANCELLED, or a short note |
| Row | A label on the left and its value on the right, for example Customer name: Mei Ling Tan |
| Amount row | A label with an amount lined up with the other amounts, for example Total $46.87 |
| Discounts and surcharges | One line for each discount or surcharge on the order |
| Payments | One line for each payment the customer made |
| Logo | Your shop's logo |
| Policy | One of your policies, such as your terms for lost items, printed in full |
| PayNow QR code | A QR code customers scan to pay by PayNow |
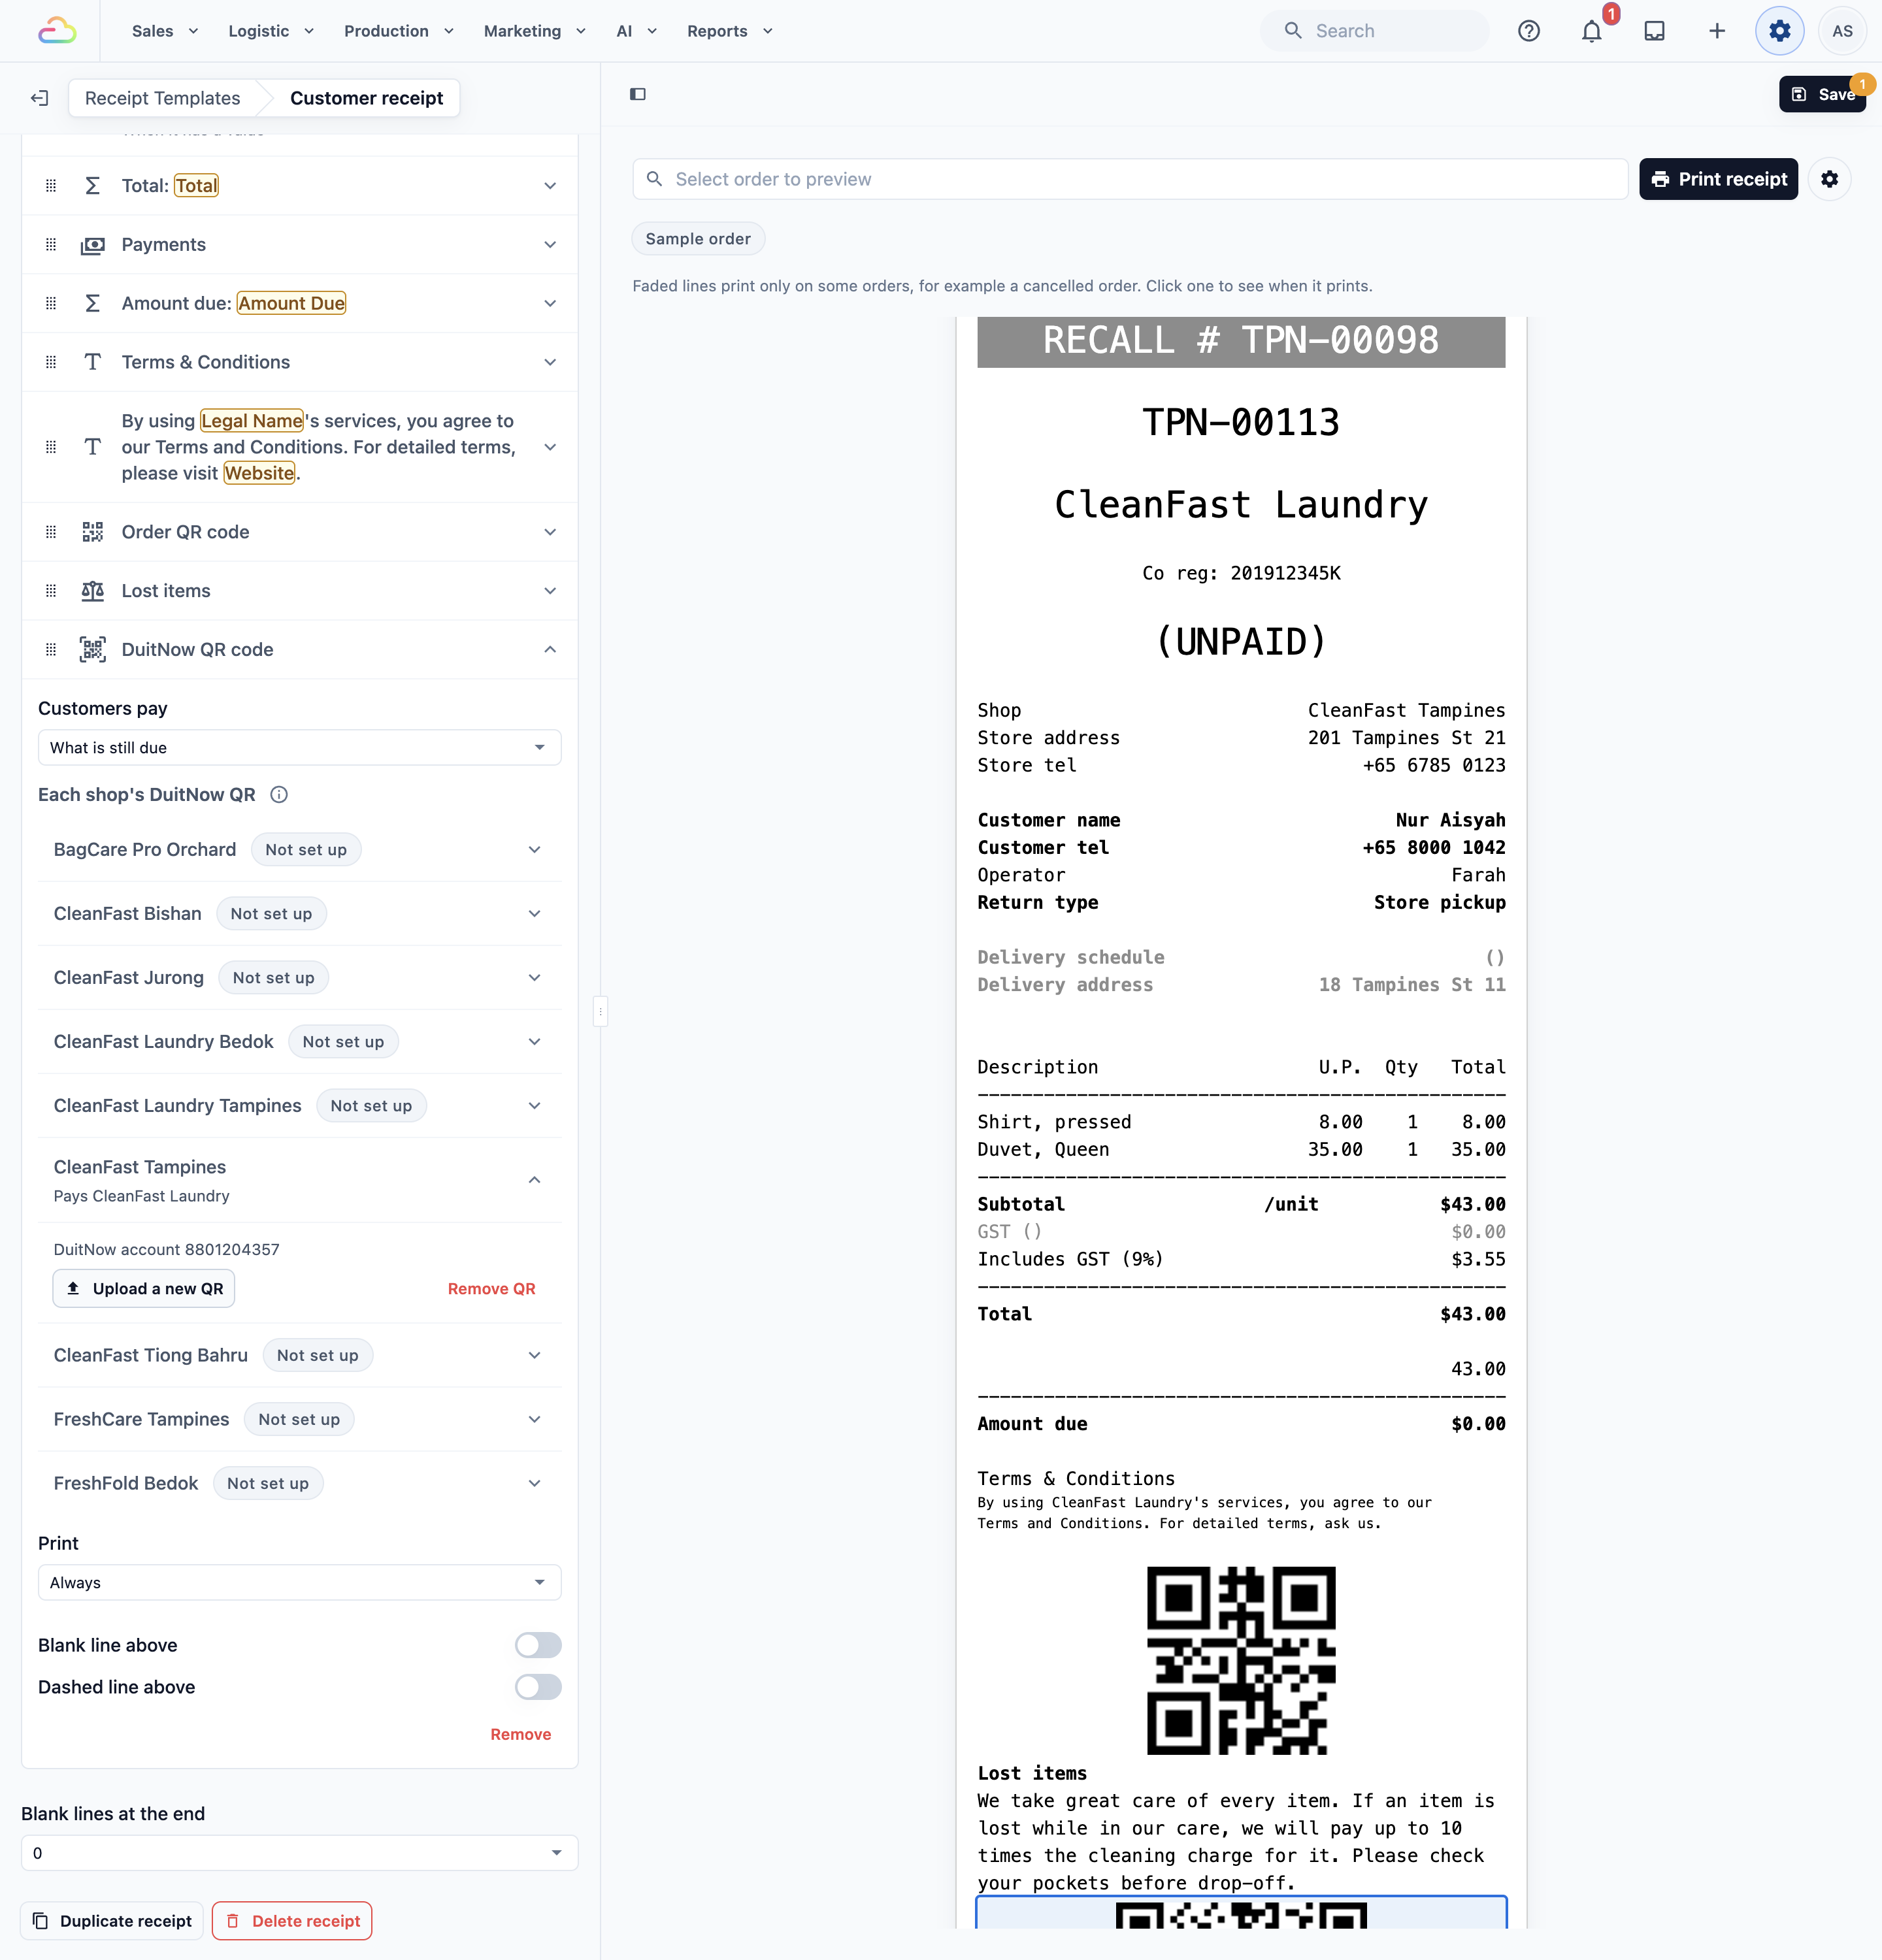
| DuitNow QR code (Malaysia only) | A QR code customers scan to pay by DuitNow |
| Customer signature | A line for the customer to sign on |
| Box for notes | An empty box to write in by hand, for example the driver's note on delivery. **Lines to write on** sets its height, from 1 to 10 lines |
| Order QR code | A QR code staff scan to open the order |
The logo, discounts and surcharges, payments, the QR codes, the signature and the box for notes print once on a receipt, so they are greyed out in **Add line** once the list has them. Each policy can be added once. The **Items** line is always in the list and can't be removed, but you can move it.
In any text, type **@** and pick a detail, such as the customer's name or the order total. It fills in with each order's real details when the receipt prints.
A **Row** has a **Label** and a **Value**. An **Amount row** has a **Label**, a **Middle column** and a **Value**. **Discounts and surcharges** and **Payments** set what each one prints, and list them on their own lines.
Most lines also have:
- **Print**: when the line prints. Choose **Always**, or only for some orders (see the table below).
- **Text size**: Normal, Large or Small.
- **Position**: Centred, Left or Right, for text lines and policies.
- **Bold** and **White on black**, to make a line stand out.
- **Blank line above** and **Dashed line above**, to space the receipt out.
The **Logo** line has no settings. If your shop has no logo, it prints nothing.
| Print choice | The line prints on |
| --- | --- |
| Always | Every order |
| Store pickup orders / Home delivery orders | Orders the customer collects, or orders you deliver |
| When it has a value | Orders where the detail is filled in, so empty rows never print |
| Pickup and delivery at different addresses | Orders picked up from one address and delivered to another |
| Paid orders / Paid or unpaid orders | Orders by payment status |
| Orders not cancelled / Cancelled orders | Orders by whether they were cancelled |
| Orders waiting to be confirmed | Orders staff haven't confirmed yet |
| Recall orders | Orders brought back to be redone |
| Due the same day / Due by the next day / Due within 2 days | Express orders |
| Orders with an express charge | Orders that carry an express charge |
### Items
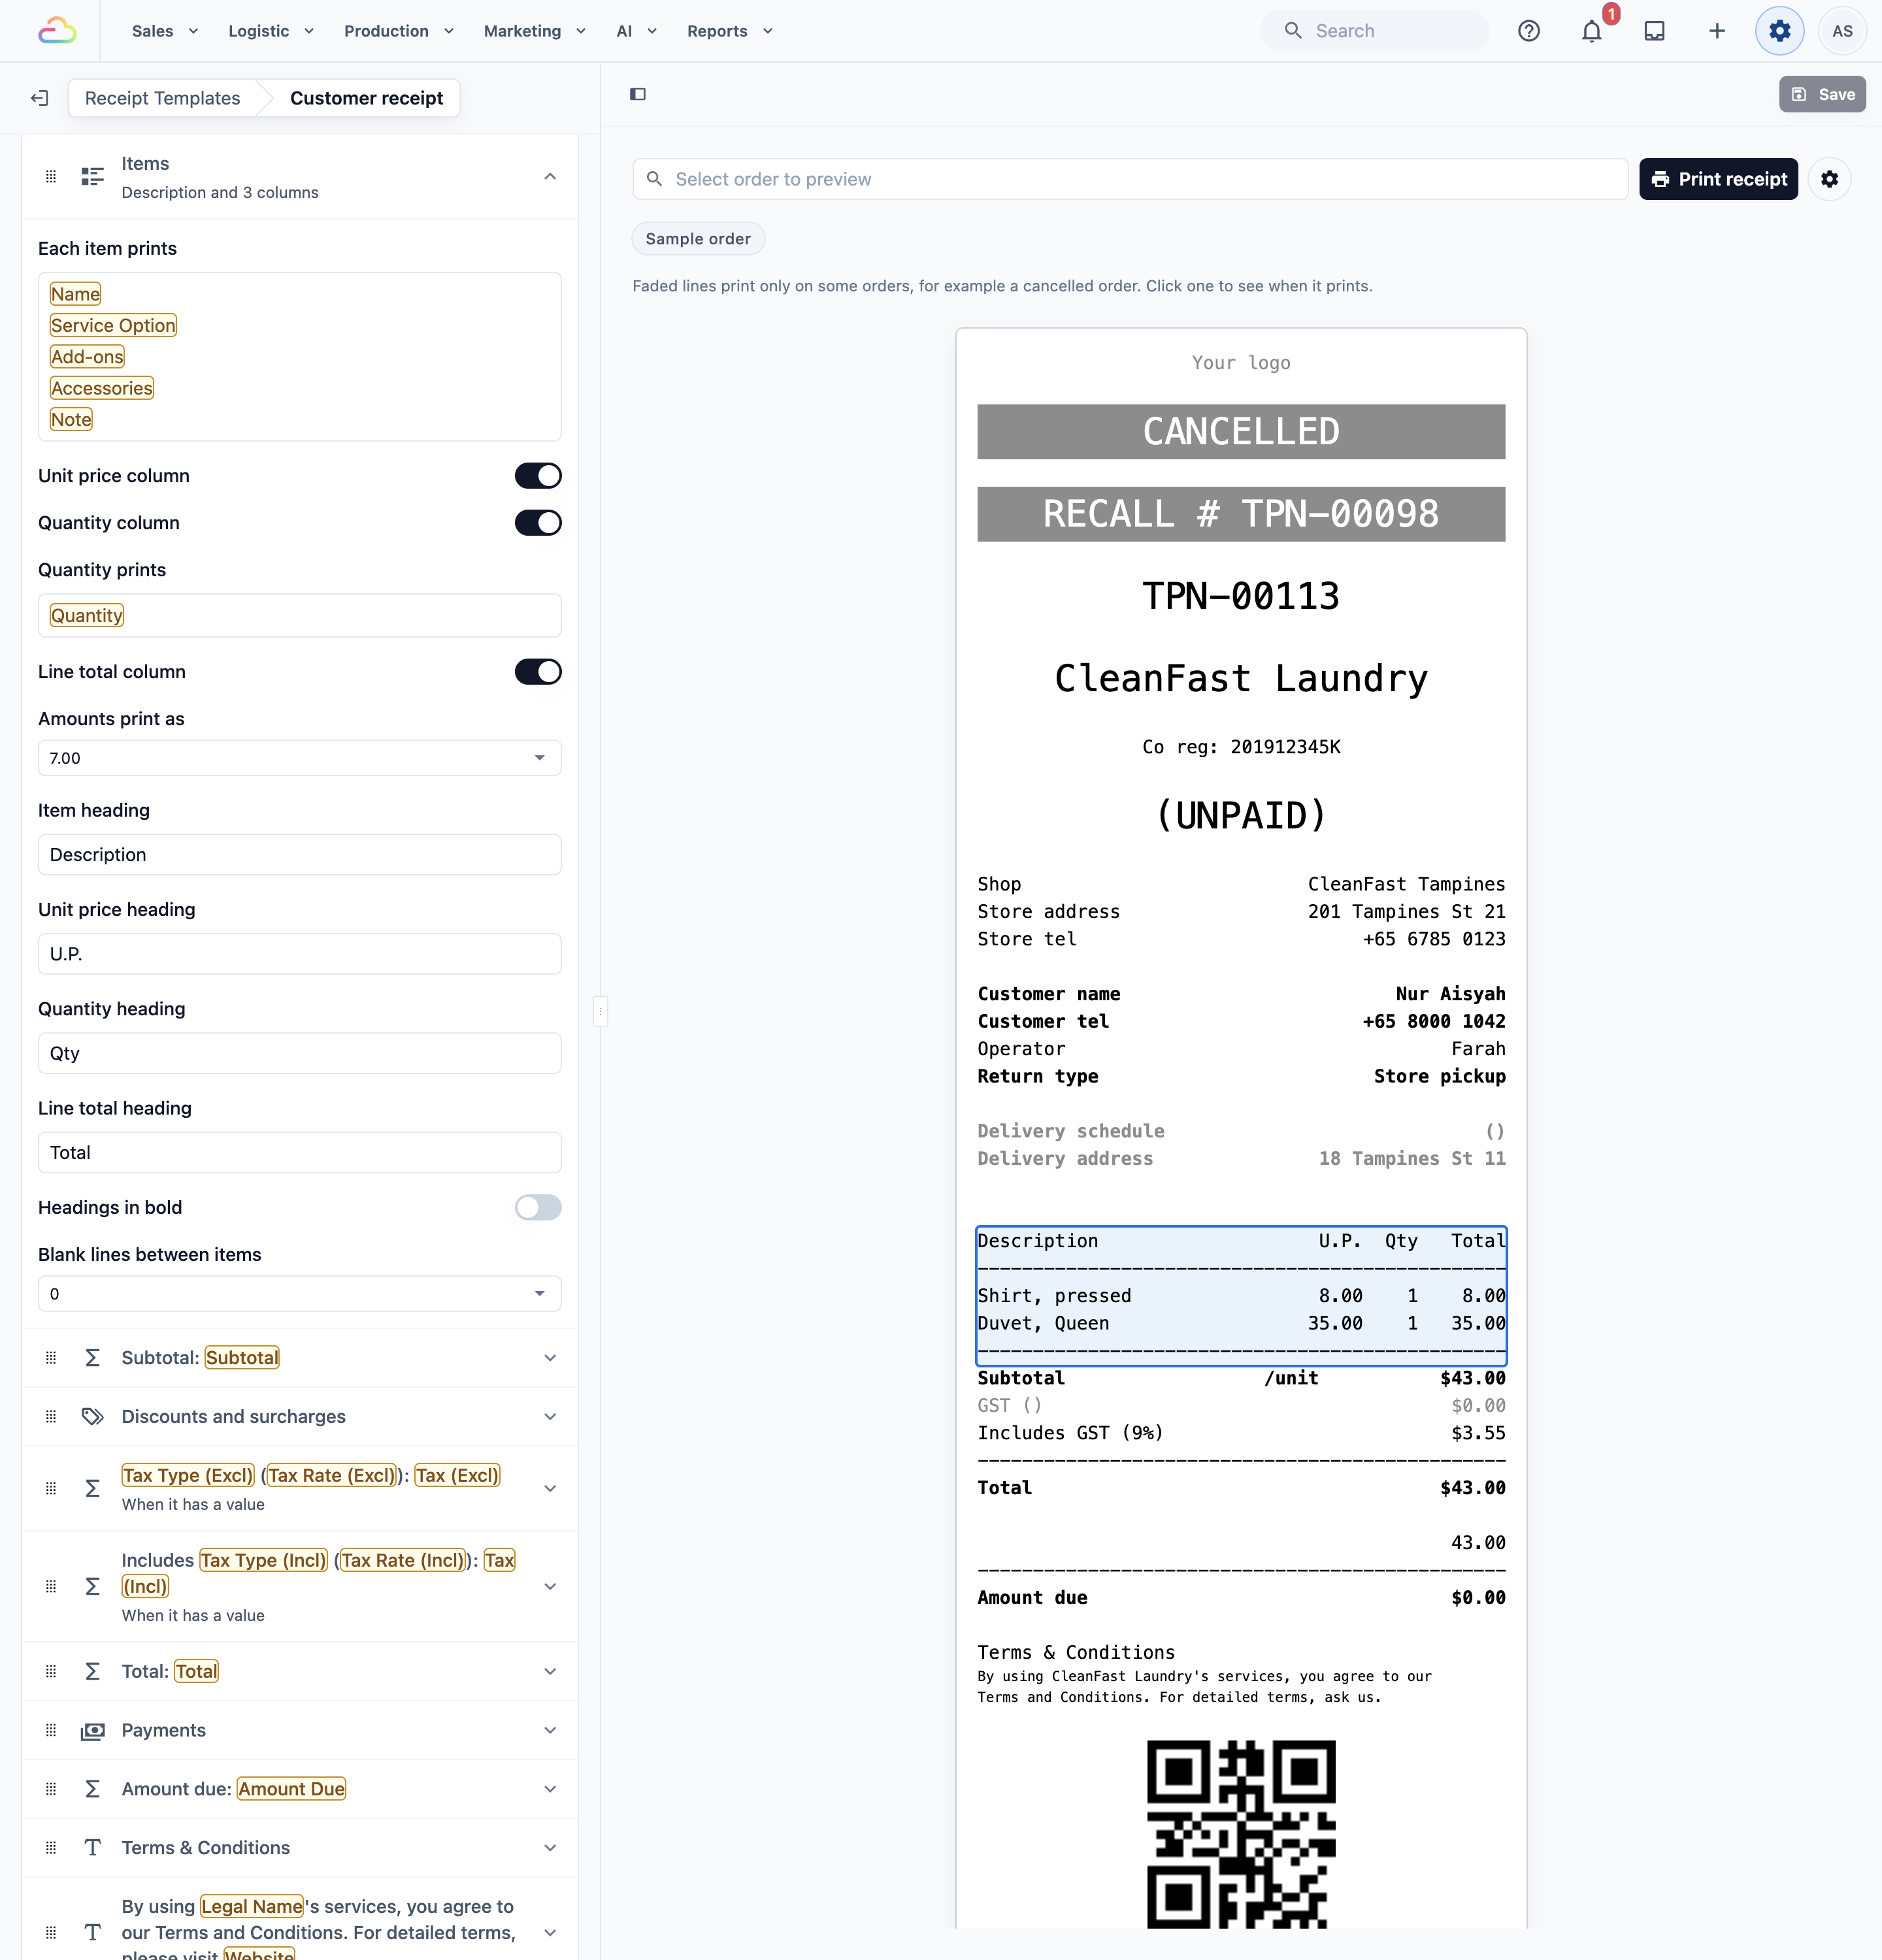
The **Items** line sets what each item prints and which columns show:
- **Each item prints**: the lines under each item, such as the item name, its service option, add-ons and note.
- **Unit price column**, **Quantity column** and **Line total column**: turn a column off to leave it out. **Quantity prints** sets what the quantity column shows.
- **Amounts print as**: for example 7.00, $7.00, S$7.00 or SGD 7.00.
- The headings of each column, **Headings in bold**, and **Blank lines between items**.
- **List items A to Z**: prints the items in name order instead of the order staff added them.
- **One receipt per department**: prints a separate receipt for each department, for example one for the CLOTHING items and one for the LINEN items, so each department gets its own slip. Every receipt prints the order's totals, and items with no department print on an OTHERS receipt. To print the department's name on each one, add a **Text** line, type **@** and pick **Department of this copy**.
For example, a delivery order the customer signs can turn off the unit price and line total columns.
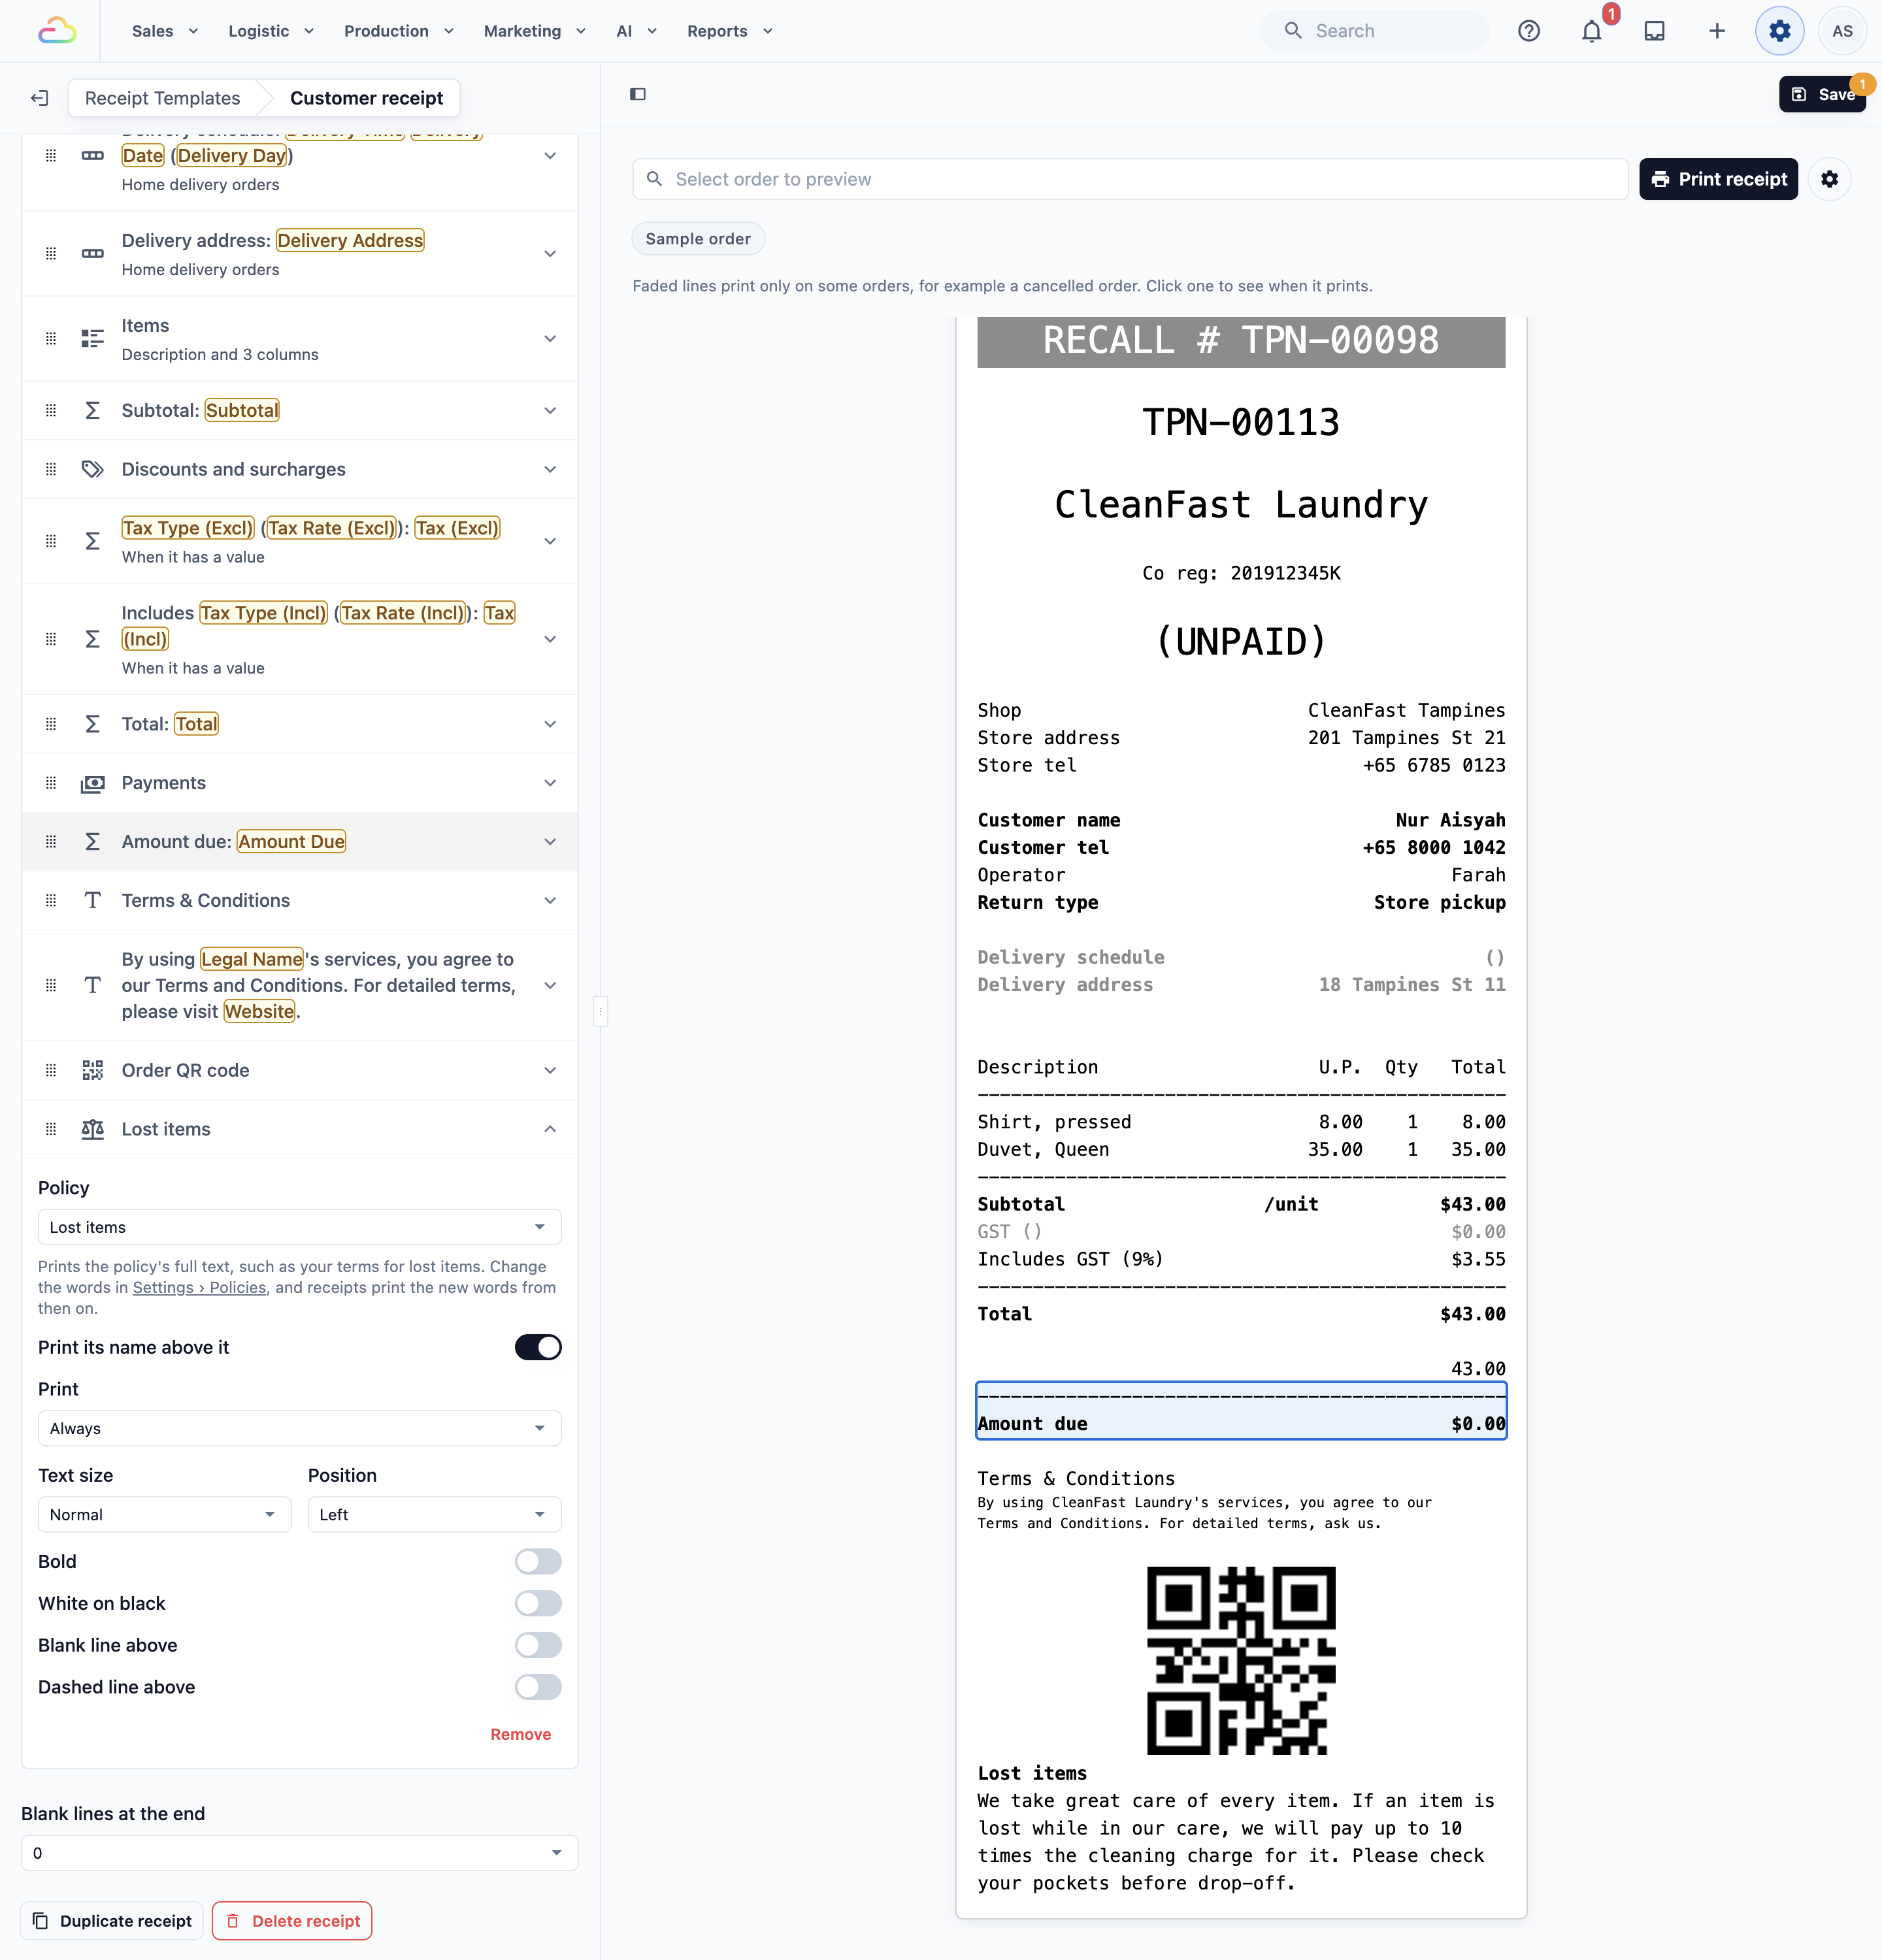
### Payment QR codes, policy and signature
**Policy** prints one of your policies in full, such as your terms for lost items. Choose it in **Policy**, and turn on **Print its name above it** to print its name as a heading. You write and change the words in ⚙️ Settings › **Policies**, and receipts print the new words from then on. If you have no policies yet, **Add line** shows "Write one in Settings › Policies first". See [Setting Up Your Policies and Customer Acknowledgements](/docs/setting-up-your-policies-and-customer-acknowledgements).
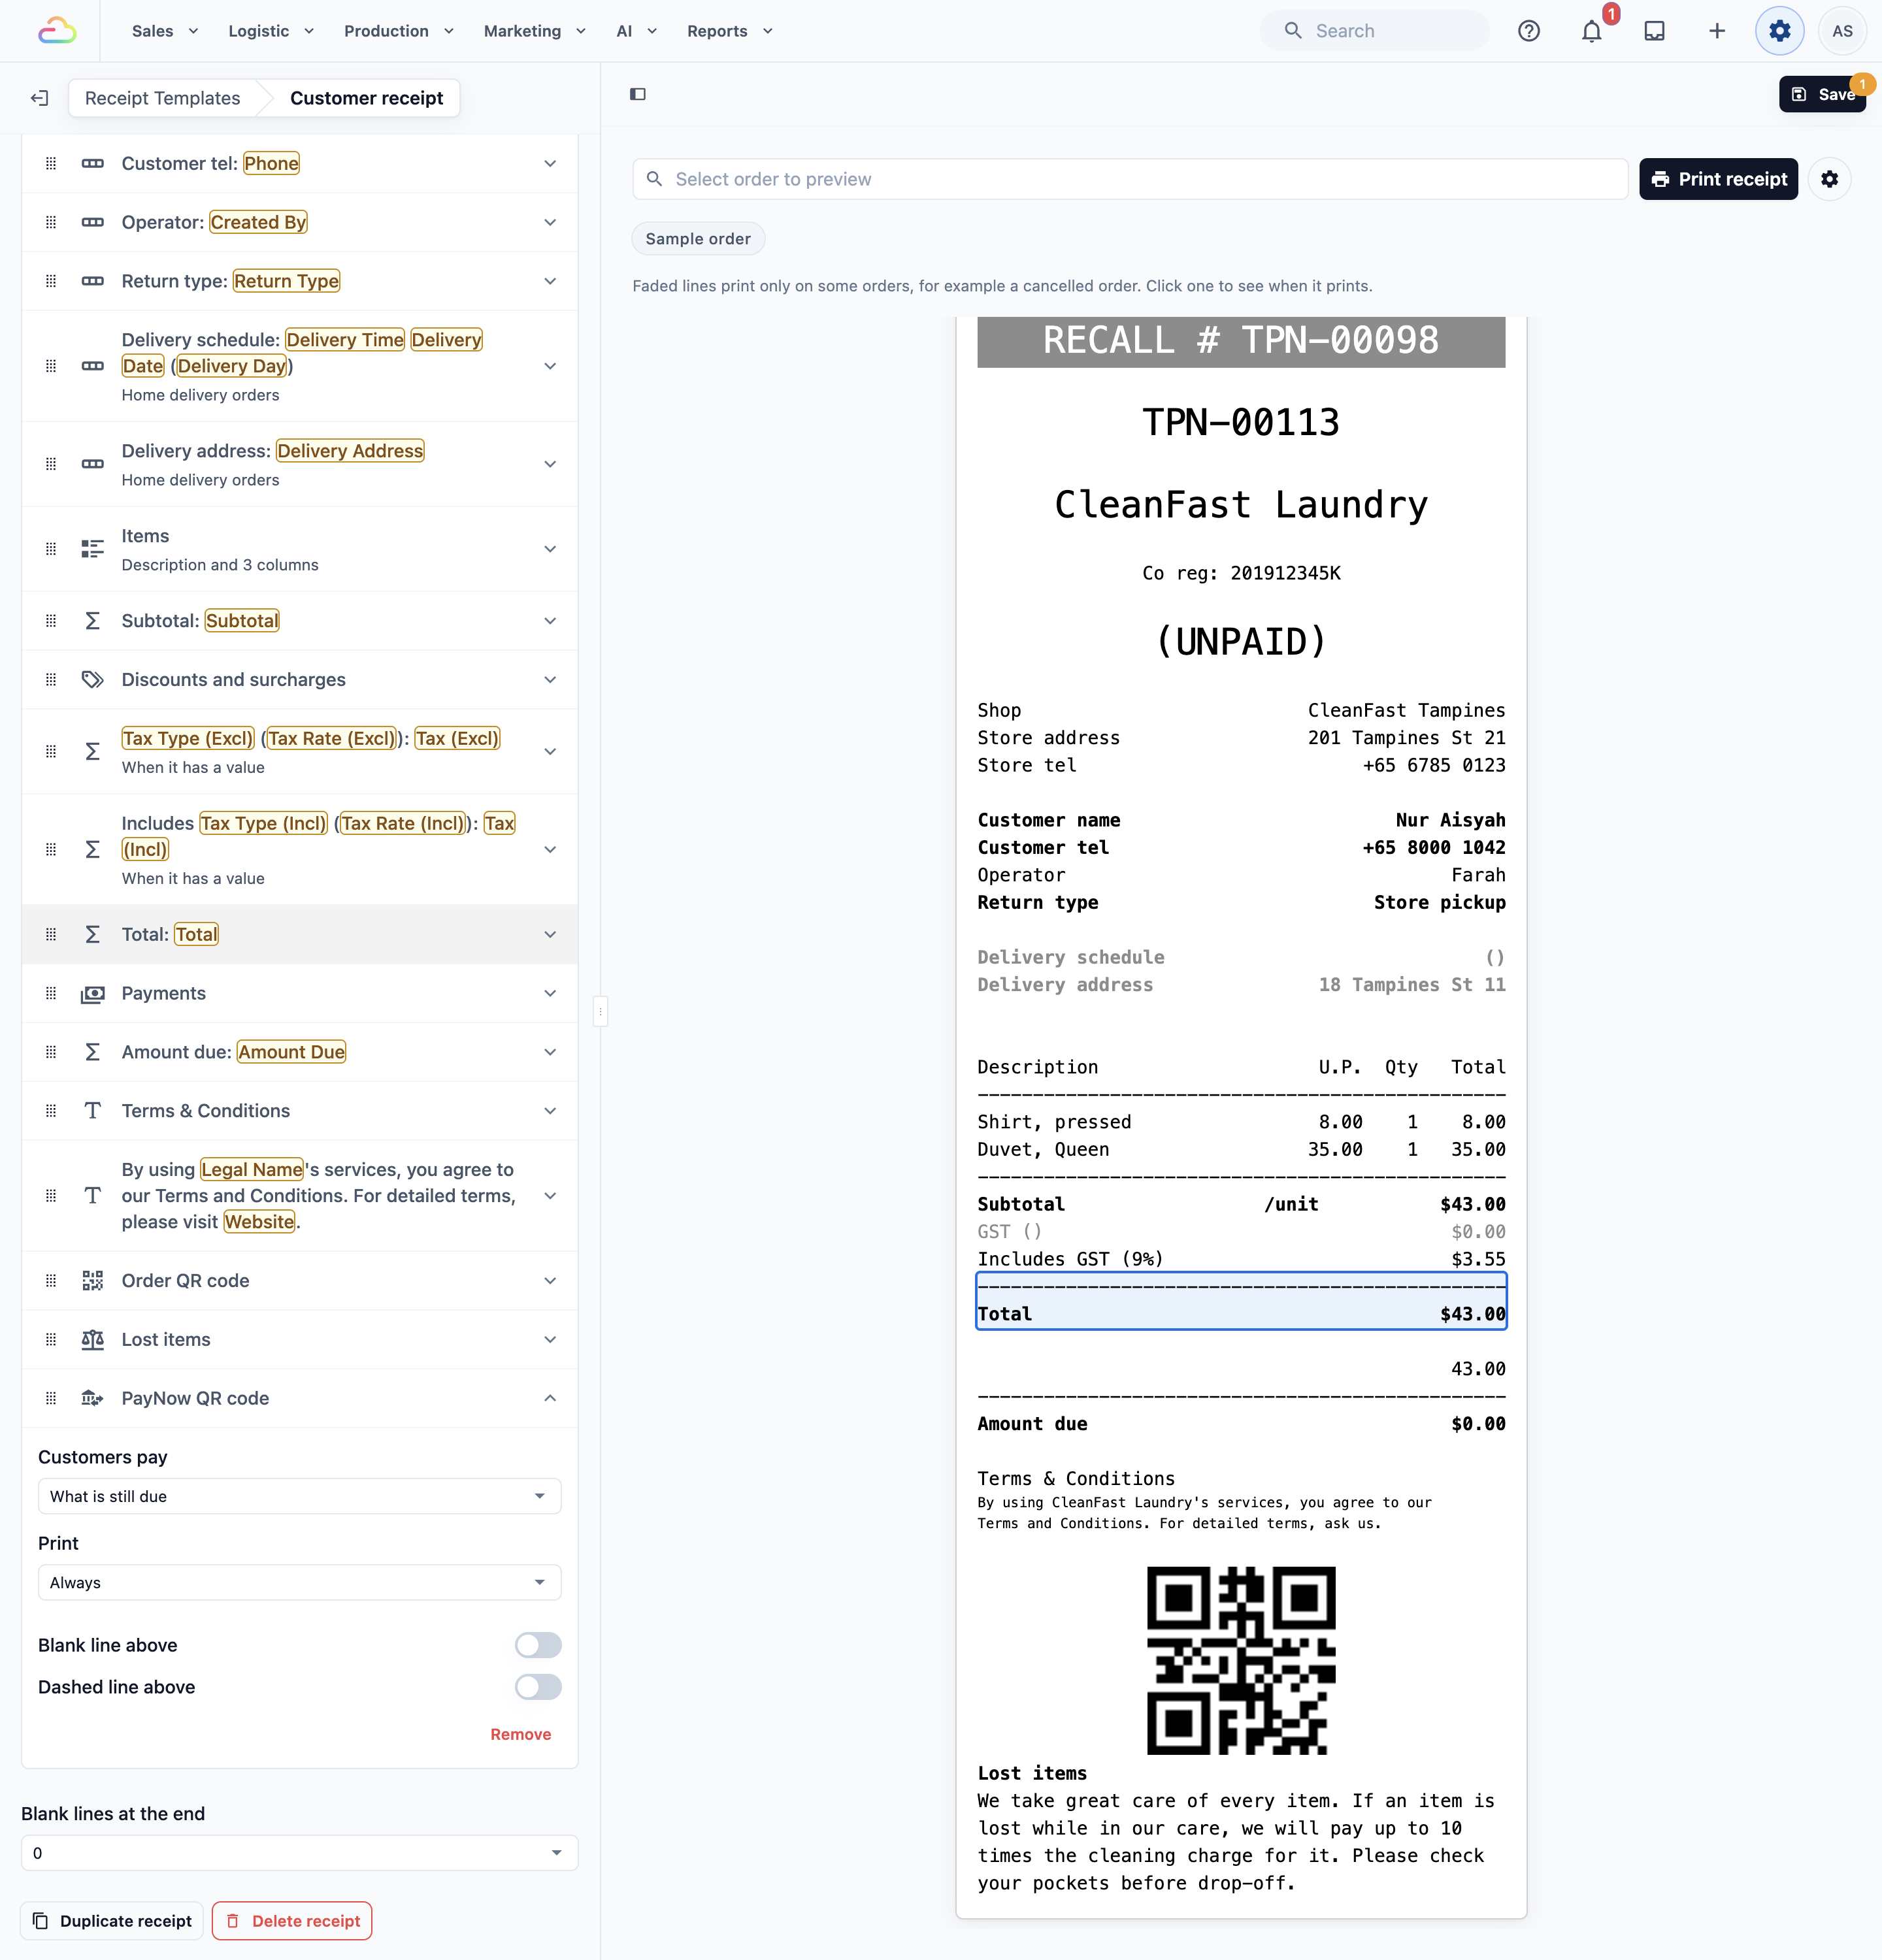
**PayNow QR code** lets the customer pay by scanning. In **Customers pay**, choose **The order total**, **What is still due** or **An amount they type**. The QR uses your company's registration number from ⚙️ Settings › **Company**.
**DuitNow QR code (Malaysia only)**: Use this only if your business has a Malaysian market set up. The **DuitNow QR code** line appears in **Add line** only then.
1. Click Add line and choose **DuitNow QR code**.
2. In **Customers pay**, choose **The order total**, **What is still due** or **An amount they type**.
3. Under **Each shop's DuitNow QR**, click Upload its QR next to each shop. Upload a clear photo or screenshot of the DuitNow QR your bank gave that shop (the one on its counter). The shop then shows "Pays [your account name]".
Receipts from that shop print the QR with the amount and order number already filled in, so customers scan and pay without typing. A shop marked **Not set up** prints no QR. A one-payment QR (one with its own amount) is not accepted.
**Customer signature** prints a space for the customer to sign.
**Order QR code** prints a QR code staff scan to open the order.
---
## Preview and save
The preview sits beside the settings and changes as you type.
- It starts with a made-up order, marked **Sample order**.
- To check a real order, click **Select order to preview** and pick a recent order.
- Lines that print only on some orders, such as a CANCELLED notice, show faded. The note under the preview says "Faded lines print only on some orders, for example a cancelled order. Click one to see when it prints."
- If your shop has no logo yet, the preview shows a faded "Your logo" placeholder where the logo would print.
- When you open a line, the preview marks what it prints. Click a line on the preview to open its setting.
- When everything looks right, click Save in the top right. You will see "Receipts saved". Save stores every receipt you changed.
If a business unit already uses this receipt, its next receipt prints the new layout. Reprinting an older order also uses the new layout. Preview a real order before you save.
---
## Print a test
You need a receipt printer paired with the computer you are using. The Console remembers its own printer, separate from the POS.
1. In the preview, pick a real order with **Select order to preview**, or keep the sample order.
2. Click Print receipt.
3. If nothing prints, click the gear button beside it. **Receipt printer settings** opens, where you can pair the printer.
The **Test print** button in the printer settings checks the printer only. It prints a sample slip, not your own receipt.
---
## Choose the receipt for each business unit
A saved receipt only prints once a business unit uses it.
1. Click the ⚙️ Settings icon.
2. Under the **Administration** section, click Business Units.
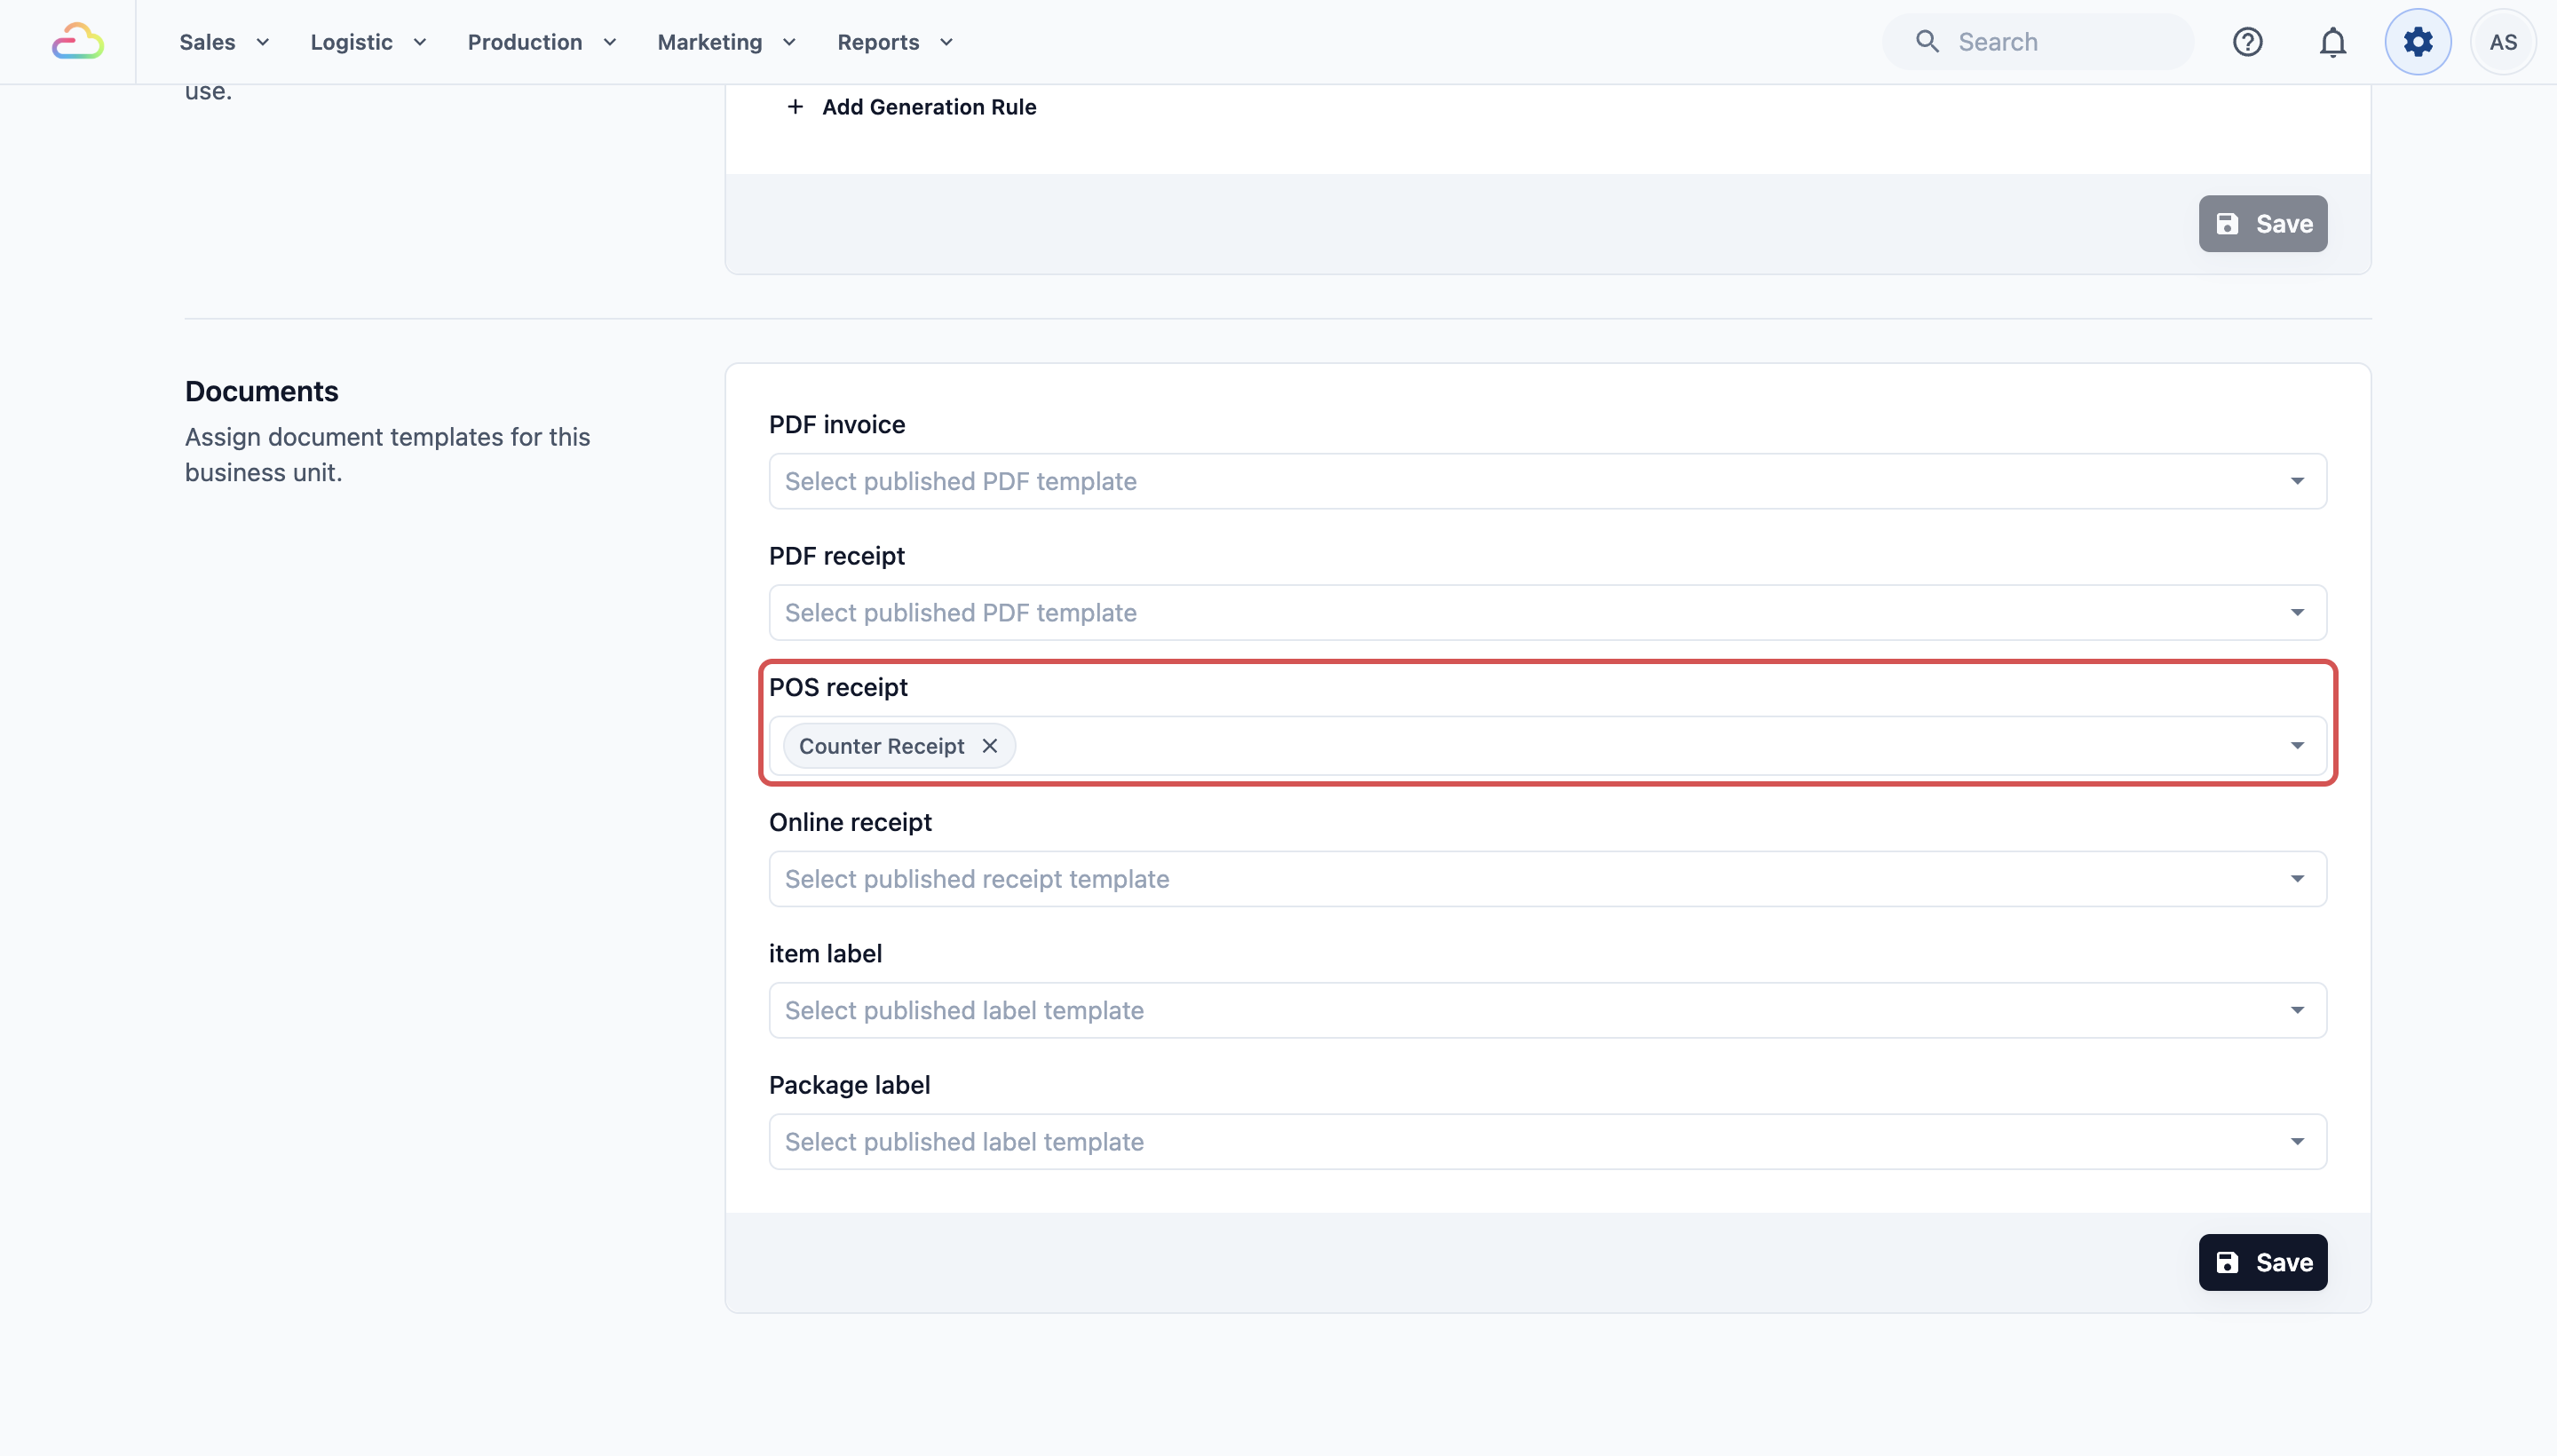
3. Open the business unit, then click the **Documents** tab.
4. Under **Terminal receipts**, open **POS receipt** and choose your receipt. You can choose more than 1, for example a Customer receipt and a Shop copy.
5. Set **Online receipt** too, if this unit takes orders in the Console or on your Online Store.
6. Click Save. You will see "Document settings updated".
A business customer can print its own receipt too. Choose it on its page in **Agents**. Open ⚙️ Settings › **B2B agents**, click the business customer, and pick the receipt in **Receipt Templates**, under **Agent Sales Order Settings**.
---
## Duplicate or delete a receipt
Duplicate receipt and Delete receipt sit at the bottom of an open receipt's settings.
To make a copy, for example a second Customer receipt for your other shop:
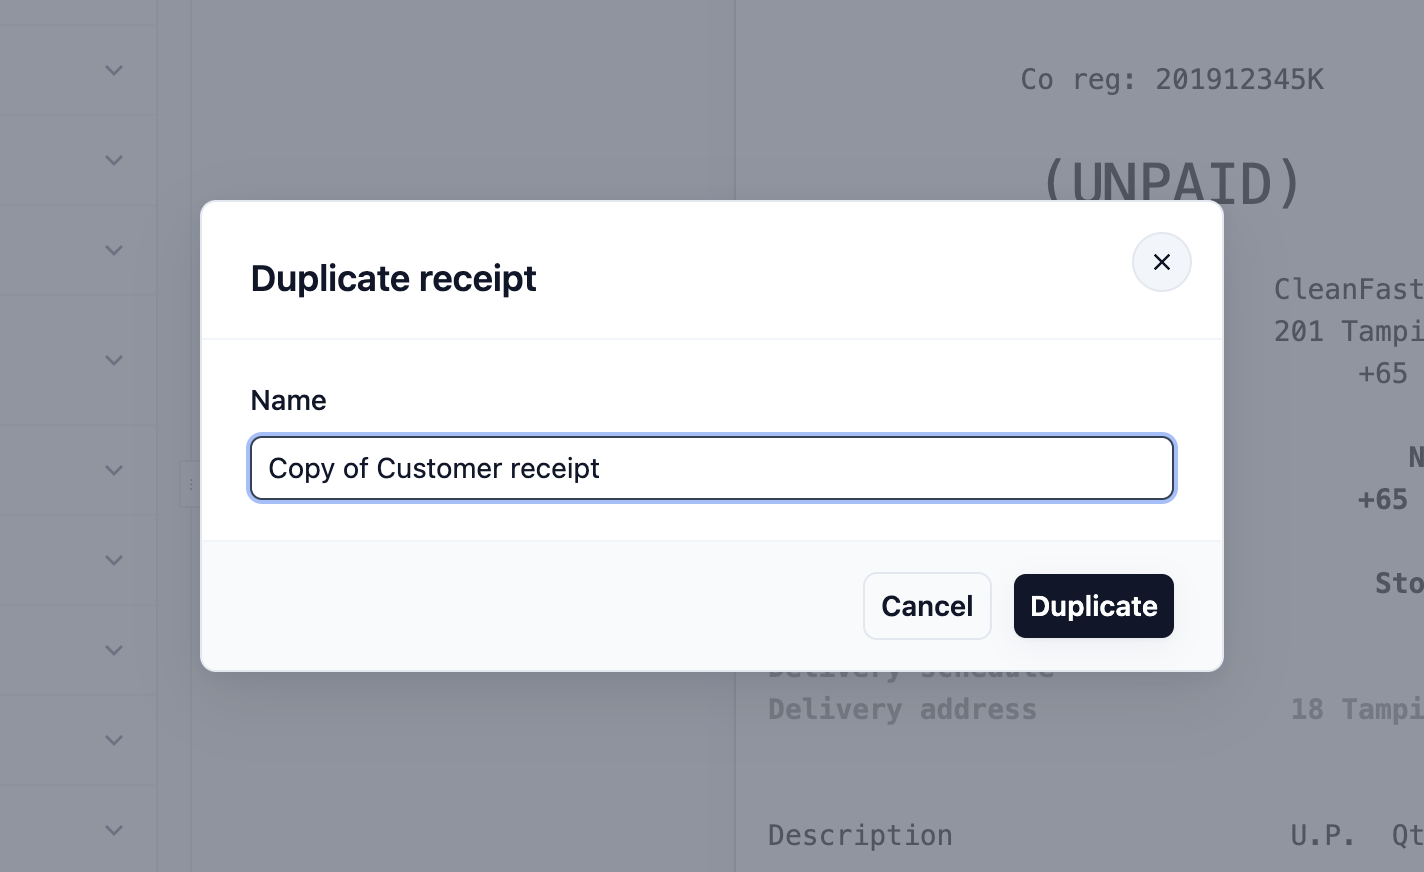
1. Open the receipt and click Duplicate receipt.
2. **Name** is filled in as "Copy of [name]", such as "Copy of Counter Receipt". Change it if you like.
3. Click Duplicate. You will see "Receipt duplicated", and the copy opens.
The copy is made from the last saved version. If you have changes you haven't saved, the dialog says "The copy is made from the last saved version. Save first to include your latest changes." A new copy isn't used by any business unit until you choose it in their **Documents** tab.
To delete a receipt, open it and click Delete receipt. If a business unit still uses it, EasyBiz tells you which ones. Choose another receipt for them in their **Documents** tab first.
---
## Your receipts from before October 2026
Order receipts you made with the old editor were moved into these settings and still print exactly as before. When you change a line, only that line changes.
---
## Other slips and reports
Your shop may print a few other slips. They are listed under **Slips and reports** and added with Add slip:
- **Work order slip**: the ticket that travels with each item in your workroom. See [Setting Up Your Work Order Slips](/docs/setting-up-your-work-order-slips).
- **Close of Day Report**: the end-of-day summary for your counter. See [Setting Up the Close of Day Report Template](/docs/setting-up-the-close-of-day-report-template).
- **Top up receipt**: proof of a Store Credit top-up. See [Setting Up Your Top-Up Receipt Template](/docs/setting-up-your-top-up-receipt-template).
- **Handover Receipt**, **Proof of Delivery**, **Proof of Pickup**, **Proof of Collection**, **Task Slip** and **Custom Note**.
---
## Example setups
- **Sunshine Laundry (1 counter):** prints a Customer receipt on an 80 mm printer. The delivery rows only print on home delivery orders, so counter drop-offs never show them.
- **Bright Aircon Services:** takes most jobs by phone in the Console. They chose the same receipt as both the POS receipt and the Online receipt.
- **Stitch & Mend Alterations:** uses a 58 mm handheld printer, so they chose **58 mm (32 characters a line)** and shortened their address line.
- **Prestige Dry Cleaners:** prints a Customer receipt for the customer and a Shop copy that stays with the bag. Their terms for lost items print at the bottom as a **Policy**.
---
## What your customers see
Your customers get a printed slip from the receipt printer at the counter. It shows your logo and shop details at the top, then their order number, the items, the total, what they paid and anything still due.
---
## FAQs
**Why does the POS say "Receipt not configured"?**
> The business unit has no POS receipt chosen. Choose one under Business Units › Documents › Terminal receipts.
**Can different business units use different receipts?**
> Yes. Each business unit chooses its own POS receipt and Online receipt.
**Why is the right side of my receipt cut off?**
> The paper width doesn't match your printer. Choose 58 mm (32 characters a line) for small rolls and 80 mm (48 characters a line) for normal rolls.
**Can I hide a row on some orders only?**
> Yes. Open the row and change **Print**, for example to **Home delivery orders** or **When it has a value**.
**Do I need a printer to check my layout?**
> No. The preview shows exactly what will print, with a sample order or a real one.
**Why can't I find DuitNow QR code in Add line?**
> It only shows when your business has a Malaysian market set up. Singapore shops use the PayNow QR code line instead.
**Why does the preview show a line my printed receipt leaves out?**
> Faded lines print only on some orders, such as CANCELLED on a cancelled order. Click the faded line to see its Print choice. Print receipt sends only what that order really prints.
**Will editing the receipt change receipts I already gave out?**
> No. Paper receipts already printed stay as they are. New prints, and reprints, use the saved layout.
---
## What's next
Your order receipt is ready. Next, set up the slip your staff print when a customer tops up Store Credit. See [Setting Up Your Top-Up Receipt Template](/docs/setting-up-your-top-up-receipt-template).